Showing posts with label 1950s. Show all posts

Sunday, 28 February 2016

Vintage Pattern Pledge 2016

This year I'm once again joining the Vintage Pattern Pledge hosted by Marie and Kerry - I love vintage patterns and I have quite a few, but I need a gentle prod to actually sew from them rather than just drooling over them.

Last year my pledge was to sew up at least 4 of my vintage or reproduction sewing patterns, but 3 is all I managed - a 1940s dress, a 60s cape, and an 80s top:


It doesn't sound like much, does it!

However, there were two more "half" garments; vintage dresses I started and didn't complete.  So this year my first priority is to finish these two off before they become proper UFOs (unfinished objects):


Vogue 8974

McCall 6581

I've already sewn up an 80s midi skirt for our continuing summer weather, so that's going on my list too:

Vogue 1387 (John Anthony)
And my daughter has put in a request for me to sew her this next dress - I downsized a size 12 copy of this pattern for a dress for her a couple of years ago, and she still loves the style:


Judging by my efforts last year that's probably going to be plenty, but I want to add an extra challenge for myself, should I find myself with loads of time and energy on my hands.


I have two small boxes of very special vintage patterns, patterns from anywhere from the 1920s to the 1960s, that I really should think about sewing.  Here are a few of my favourites:

Simplicity 2647

Simplicity 2844

McCall 7023

McCall 7260

Vogue 100 Ronald Peterson

Vogue 1556 Yves Saint Laurent


Putting it all together, here's my pledge:


I, Gabrielle of UpSewLate, pledge to sew at least one more vintage midi skirt from an 80s pattern, to finish sewing the two vintage dresses I started last year, and to sew my daughter the 1970s dress she's requested. And as an extra challenge, I'll aim to sew at least one of the vintage patterns I normally just drool over.  


And I'll be back soon with a modern bit of sewing that my son graciously photographed for me today.


Happy sewing


- Gabrielle xx


Saturday, 28 June 2014

Mad Jaywalking

The Tessuti Fabrics Jaywalk competition? Yes, I entered too, and this is what I made in a mad, crazy weekend rush:


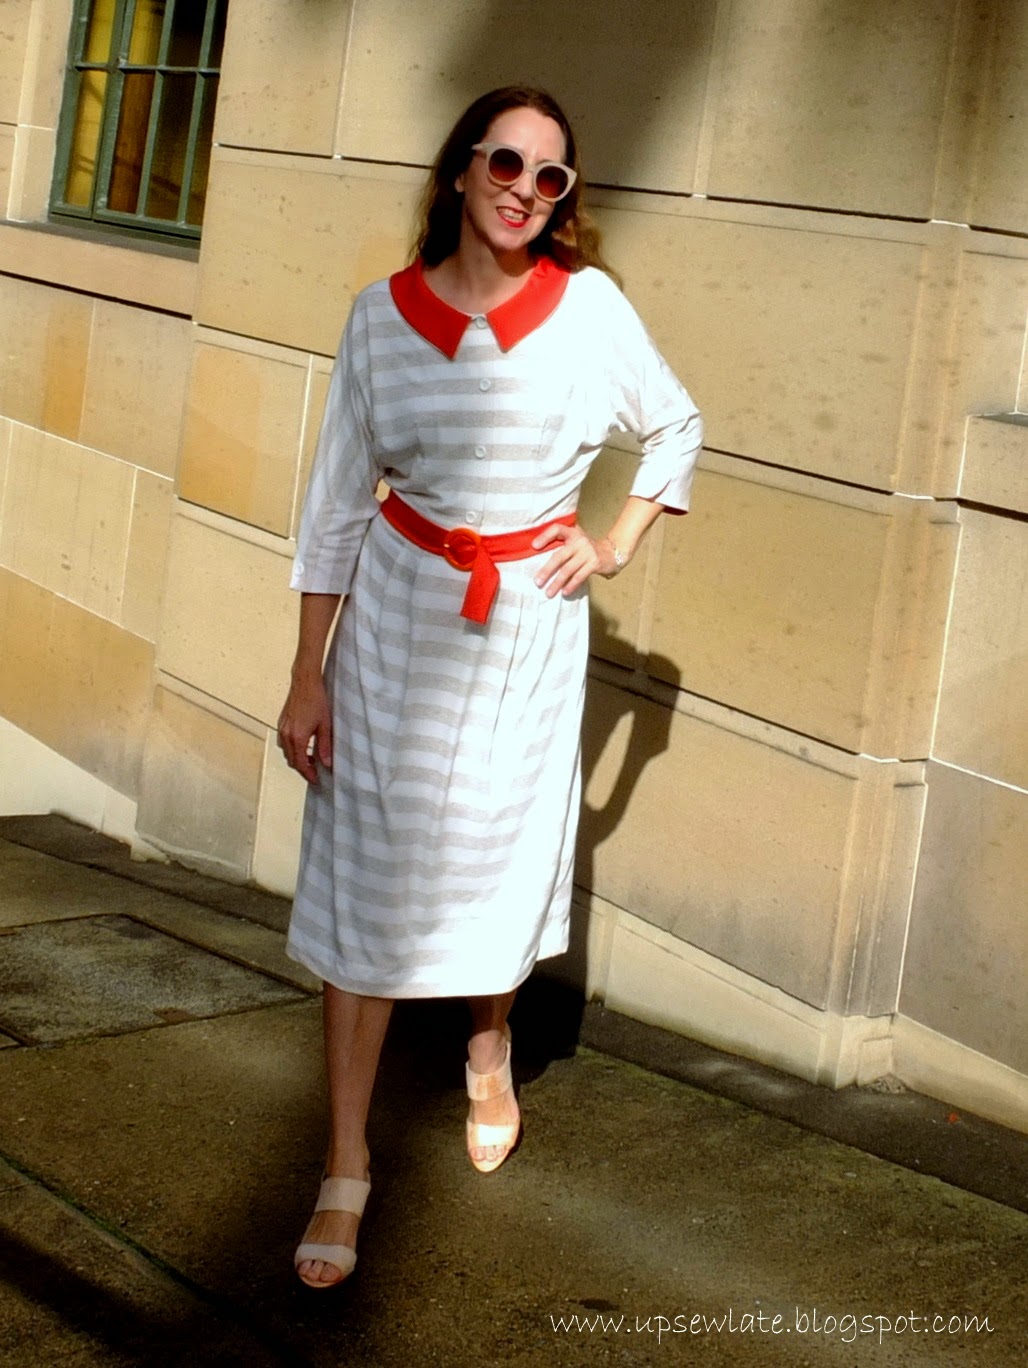
All very bright and striking with the orange backdrop, but below are my "official" entry pictures, taken a little earlier in my lunch break on the Tuesday of the competition deadline - in which you can see the dress just a little better, though still not that well:


That's front, side and back sorted then, right? Oh I know, you can't see the dress very well - but honestly I have to blame the photographer (shhh, that's me).  I think I need to do a basic camera course, maybe even the same course several times over - does anyone have any recommendations for a short course in Sydney?


I'll show you the details bit by bit, since evidently I can't show you the details on me!

First of all, the pattern is this McCall's beauty from the 1950s:


I chose this pattern after a lot of thought - I know it seems a crazy choice for a competition involving stripey stretch fabric, but as I didn't expect to win I wanted to make something that I would really like. When I played with the Jaywalk fabric I had in mind a picture of a vintage shirt dress in muted stripes, and all (d1-3) those (d4-10) selfies (d11-18) in (d19-25) May (d26-31) just amplified my love of the "narrow bottoms + loose top" silhouette. Where's the fun in sewing something you don't like? The red dress on the pattern envelope looked like THAT kind of silhouette :-), though my skirt hasn't worked out anywhere near the illustrated shape. So I used the stretch striped Jaywalk jersey to make something not recommended for stripes, and perhaps not so suited to stretch fabrics - but it's a dress I wore to work the day after completing, and that I'm sure I'll keep wearing. {Breathe out.}

I don't have much experience with proper vintage patterns, so I did a lot of paper measurements before any cutting. Interestingly I was able to sew the pattern (in a vintage size 16 - and I'm about a size 12 in the Big 4 these days) with minimal adjustments, although arguably the fit I've achieved is too loose - or perhaps more suited to a woven incarnation of the dress.  According to the vintage pattern envelope I should have been a size 14 in the bust (and I probably should have been wearing a bullet bra!) and a few sizes up in the waist and hips; the bust is a bit loose and there was quite a nice amount of ease at the waist and hips.  


The pattern was classed as easy back in the day, and it's really not particularly tricky for an experienced sewist though there are quite a few details. It's simply a belted shirt dress, with an invisible zip in the side seam, a buttoned bodice front (it's a proper 2-piece shirt front, but as there's also a side zip I didn't make my buttons functional), and buttoned triple-darted sleeves.  I tried not to take any short cuts, and I cut out and sewed the whole dress to the best of my ability - what more can you do?

The orange fabric you see is a stretch cotton, also from Tessuti Fabrics. I was initially going to make the collar with the orange fabric underneath, but on trying the bodice both ways I found I really preferred having the orange upper-most - apparently having the loud orange on display makes the muted Jaywalk colours easier for me to wear :).


Both the belt buckle and the buttons are vintage, picked up ages ago at a second hand store - and I still have heaps of the buttons left!  When I got up to making the belt I was running out of time, so I tried to wing it and insert a long piece of buckram that I'd cut to size into the sewn belt tube. Unfortunately it proved impossible to insert the buckram without it creasing really badly and making the belt look a mess, so I now have a soft belt :). The buckle is a vintage one that I cut the fabric to fit, and I've just double stitched a row of those little "o" shapes with my machine to make buckle holes. I have made belts before and made them properly, so next time I'll have to check one of my sewing bibles as to the correct method!  

And back to the subject of collars, my experience is that precise cutting out makes a huge difference to the look of a garment, but particularly with collars, where a little asymmetry or deviation from the drawn curve is so noticeable. Collar points are noticeable too - mine aren't that good.

I pinned and pressed the collar so as to have the Jaywalk fabric peeking out from under the orange collar, giving the effect of piping. You can see in the next photo that the effect of this is that on the neckline, the orange fabric hangs past the Jaywalk fabric.


The seams are nearly all sewn with a twin needle straight stitch (lengthened) and finished with an overlocker. The shoulder and arm seam, continuing to the cuff, is stabilised with lightweight ribbon rather than clear elastic, as the seam doesn't need any give:


Here's the invisible zip in the side seam - to sew this in I started by interfacing the seam allowances, then basted the zip in with my regular machine foot and a long stitch length (and lots of pins and pencil markings to help me match the stripes). I finished with the invisible zipper foot and a regular straight stitch. I think it worked out well:  


The cuffs are faced with the same (stretch cotton) fabric as used for the contrast collar and belt, and are under stitched as well as catch stitched to the seam allowance to keep them from rolling out. I did the same with the collar but didn't take photos of it! 


In the next photo you can see the sleeve pleats - which are a bit pointless in a soft, stretchy fabric!


I added a waist stay with the aim of helping to support the weight of the skirt fabric and prevent it from pulling on the bodice, though I'm not sure how well it's working:


And of course there's some stripe matching. Side seams, shoulder seams, arm seams, and skirt panels. The skirt front has soft folds that align with the bodice darts, and the back skirt is made from 4 separate panels that align with the centre back seam, with very slight bodice pleats. I managed to match the stripes across the panels pretty well, though not perfectly:


So that's it!

There was a lot of sewing in this dress, all a mad, crazy rush the weekend before the competition deadline. Started late, finished late (the night before the due date), took photos in my lunch break on the due date, and sent my photos in a few minutes before crunch time. Crazy. And I have to admit (to myself mostly - you probably already knew) that sewing deadlines are just not fun.

Hopefully I'll be wearing this dress lots come Spring (and finding or making myself a dolman sleeved jacket to go on top).  I'm glad I made it, I'm happy with the care I took with it, and I'm super pleased to have used a lovely vintage pattern. Will I enter the comp next year though - and will you?


See you soon
Gabrielle xx


Friday, 6 September 2013

1950s Jacket-Cape for TMS

When I heard about The Monthly Stitch* I promptly threw my hat in the ring - monthly challenges sounded feasible, and I was excited to mingle with a new-to-me group of sewists.  What's more, the August challenge was capes, and capes sound easy, right?

* Have you heard of The Monthly Stitch?  If you haven't, follow the link, go have a look (then come back for the show and tell). It's a similar idea to The Sew Weekly, but it's brand spanking new, it's monthly not weekly (d'oh) and - well, go have a look, join in, sign up! 

Here's my cape - goodness knows what my hands are saying, perhaps "it took me THIS long!":


It looks easy enough, but it took me ages!

Cape patterns weren't so much a problem as a distraction - I had too many lovely vintage cape patterns to choose from. Fabric was the next concern... your traditional cape devours fabric, and I wanted to sew from my stash. Since I don't usually buy huge cape-like quantities of anything I had to pick a pattern that would work with less.  


Vogue 2934, you look a reasonable sort of chap - not too demanding... Think you can wrap your head around working with this 1.85m Plaid fellow? 

     You'll do it?  - - Can I rely on you?


Excellent!  How soon can you start? 


Pattern and fabric started work that very evening.


The work was harder than anticipated, but with a jolly atmosphere, spirits remained high.


I used Vogue 2934, a reissue of a 1950 pattern - a loose, lined cape with a flared back, funnel neckline and dolman sleeves:  


Oh look, no wonder my sleeves are so long - I forgot to turn them up!

----

I started sewing a week out from the due date. My planning skills are appalling - there wasn't enough time! Luckily I was able to get a late pass from Mel, so I chugged away for a few extra evenings and handed it in about 3 days late.

In my defense, I did spend quite a bit of time matching the not-square plaids across fronts, backs, sides and facings.  It took a long time as I only just had enough fabric, but the resulting symmetry and plaid matching make me feel good:


Plus I had to learn how to make a bound buttonhole (woohoo!!! I even got the fabric in the bound section to line up!):


Had to? Well, from the experience on my cashmere jacket I knew that my machine wouldn't manage a regular buttonhole on 2 layers of wool and interfacing. All good though, bound buttonhole-making is a skill worth gaining!


I will definitely need to do a PatternReview of this pattern as I didn't think the instructions were particularly efficient - perhaps they were sticking close to the originals though. [For example, I like to bag my sleeve linings by machine, and this requires a change to the order of lining construction - don't sew the centre back lining seam first!] On the plus side, this pattern sews up a much smarter little cape than I was expecting - and the airy style means it's perfect for in-between seasons. 

Better go - roast potatoes and vintage pattern surfing are calling :)

See you anon
- Gabrielle x


Wednesday, 30 January 2013

Fitted Sheath Dress V1137 (1950) V2

Phew - what a relief to produce something that fits OK and that I know I'll wear!


I made this dress using Vogue 1137, a reissue of an original design from 1950.  I also used this pattern to make a dress last year in a stripey dark blue fabric, but last year's version was according to the pattern and this year's includes some changes.

The original is a mid-calf length dress with side vent openings and a demure v-neckline. Since I only had 2 metres of a narrow fabric, this one is above knee length, which means no need for side vents. And the neckline on this one is completely different looking now...


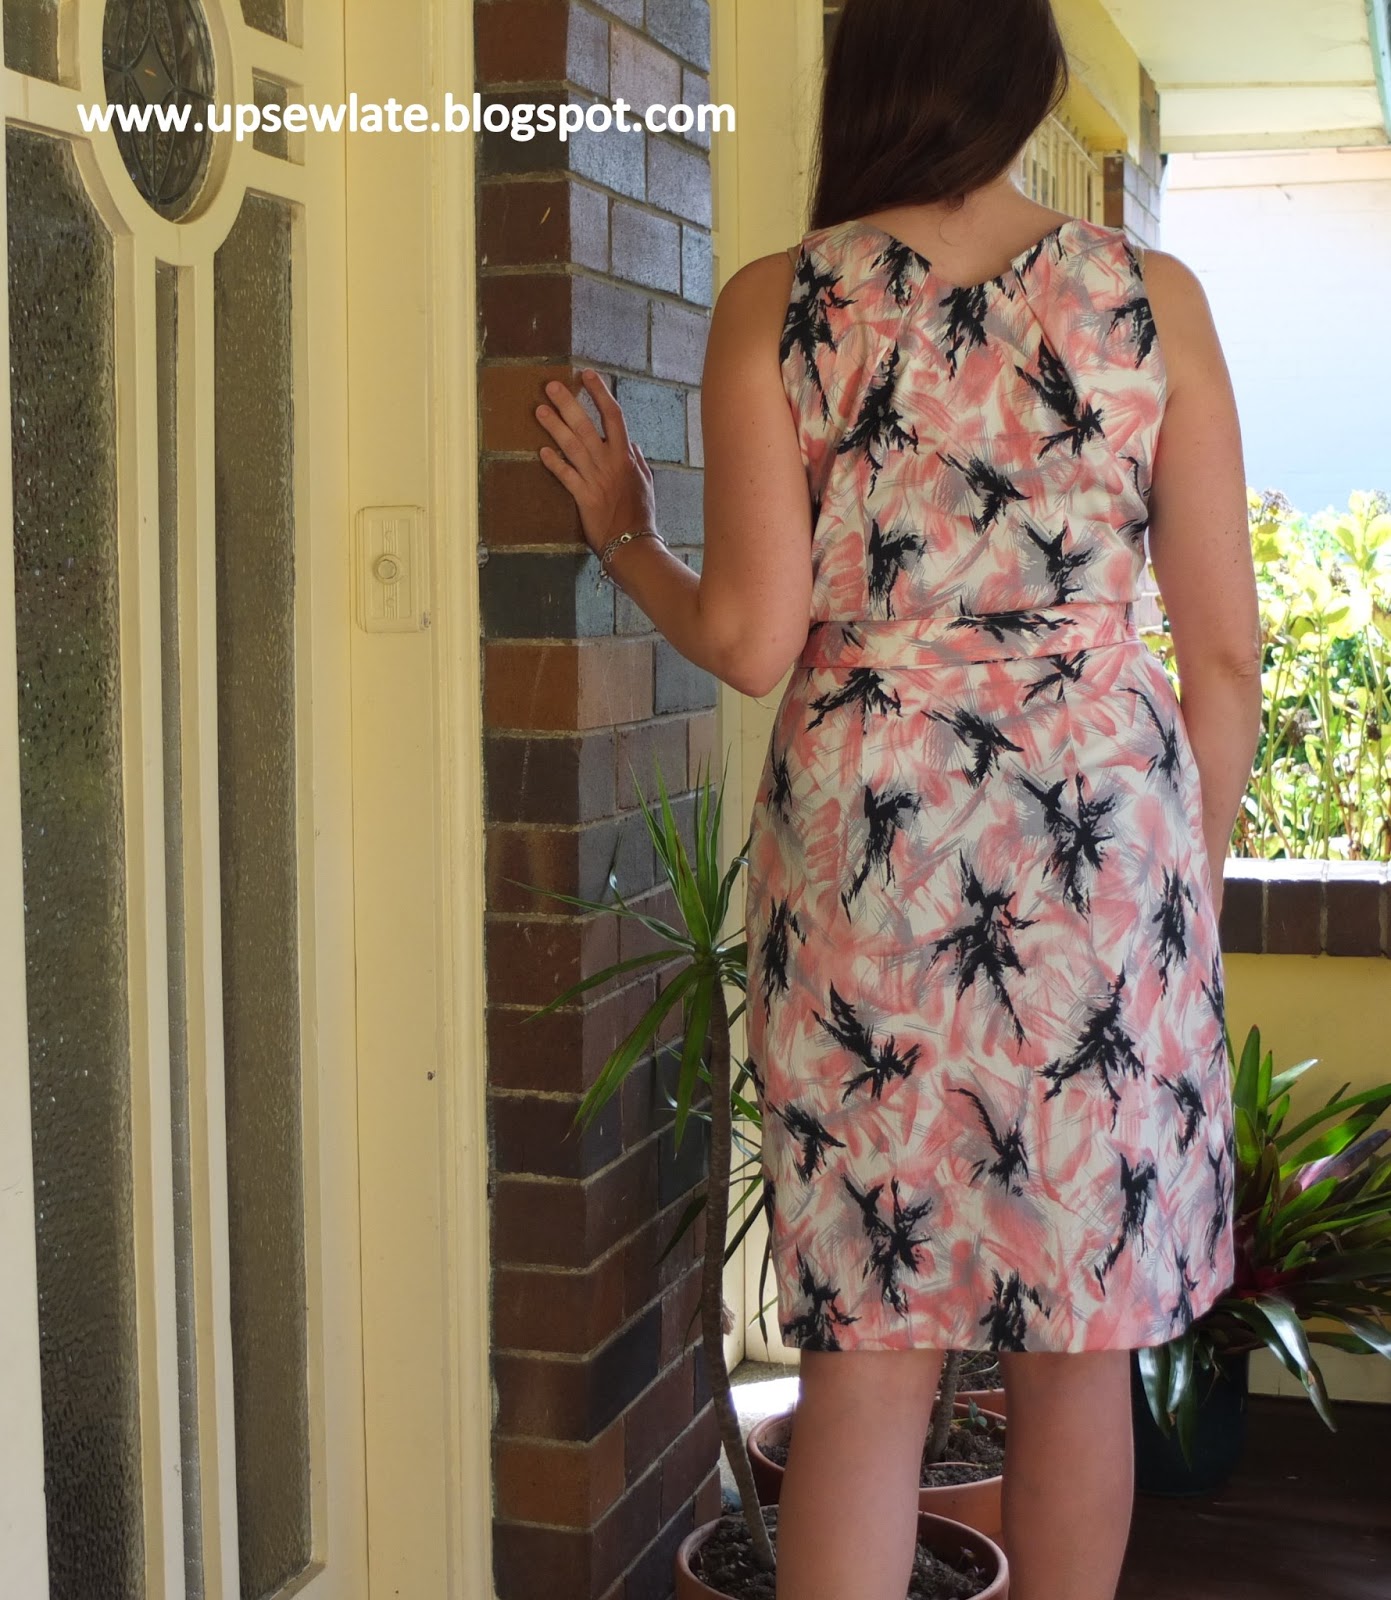
I tried to make this as a quick (ie no muslin, minimal adjustments) dress, but when I tried it on and showed Mr UpSewLate he said something like "what's wrong with the neckline?". The neckline was loose, front and back and the shoulder seams were too wide for my shoulders. I took inspiration from the pleated necklines I've seen at Veronika Maine and pinned away at myself until the fit seemed good enough. Below you can see an inside out view of the bodice against the light - pleats in front and back necklines, angled towards the fullest part of the bodice (well, that's what I tried to do).


I also took the opportunity to add in a bit of a swayback adjustment but looks like I could have taken out more! The upper back is not super tight but sits better than this when I'm not trying to hold my shoulders back for the photo. I quite like the effect of those new pleats...


Do you want a side view too?  The bodice was lengthened in this version by about 1.5cm, and the bust darts lowered by about the same amount.


And because the thought of machine stitching hems now makes me feel guilty (Sherry!), there ended up being hand stitching involved:


Although I'm really slow at hand stitching, the slowest part of the dress ended up being this little feature... which does such a fine job of drawing attention to my lack of waist (maybe a sheath dress wasn't a clever idea!):


The belt strap was fun - made with the buckram from a second hand belt kit - as was choosing the buckle from my small vintage collection. I got stuck on the belt holes though!  Mr UpSewLate and I experimented with hammer and nails, the thing that you use to bang nailheads into the floor, and even a hole punch - he even pulled out a rivet gun (que? well he was going to repair rivets on the lawn mower), but it looked a bit too dangerous. In the end I sewed eyelets on the sewing machine, hacked out the little centres with a quik-unpik, then sewed over them by hand with embroidery floss. 


Ah, a gratuitous "kicking up the legs to celebrate small sewing successes and the sunshine that comes after heavy rain" photo...


Wishing you good luck with your weather and sewing over the next days!

-Gabrielle x 
Related Posts Plugin for WordPress, Blogger...