Showing posts with label vintage pattern pledge. Show all posts

Sunday, 7 August 2016

Diane von Furstenburg in Pink

A couple of weeks ago this next post appeared on A Stitching Odyssey as part of the Vintage Pattern Pledge month Marie and Kerry of Kestrel Makes were hosting.  I was incredibly flattered to be asked to pen a post for Marie's blog - and I imagine many, many of you read Marie's blog already - but I also wanted to blog the post here for my own sewing records.  I've left the words pretty much the same as they were for Marie's blog (though I've changed the title, which grated on me), but I've moved around and added a few photos here.  I'll try to get a new blog post up soon too! 

------------------


When you hear the name "Diane von Furstenberg", wrap dresses are probably what spring to mind. They're the style she's most famous for of course, but she also designed loose fitting dresses like this one - and from the number of copies of this pattern I've seen for sale, I'm guessing it must have been a popular style.

The pattern is this one, Vogue 2065, a Diane von Furstenberg for Vogue American Designer Originals from the late 70s:


The back of the envelope description reads as follows:

Loose-fitting, A-line, pullover, blouson dress, seven inches (18 cm) below mid-knee or ankle length, has scooped neckline, round collar, center front neckline slit with button and thread loop closing, elasticized waistline, pockets in side seams, narrow hem and top stitching and edgestitch trim.  Above or below elbow or full-length sleeves are gathered into buttoned, shaped turn back cuffs. Purchased belt. 

And why did I choose to use this pattern? Well, to be honest, even though I'm very happy with the dress I've made, this pattern wasn't my first choice!

I had two first choices: a red and cream striped 1940s summer dress, and a cream wool and lace 1940s winter dress, both already well underway.  I'm very sorry to say fitting issues with both dresses got the better of me when I tried to finish them up (for now - but I will conquer these dresses!), so I had to step away from the 40s and towards a more recent era.

My next thought was to sew something fun and exaggerated from the 80s.  I got so far as to identify a couple of very cool and unusual Vogue Individualist patterns in my 70s/ 80s filing cabinet drawer, but then an annoyingly sensible voice piped up in my head and reminded me I already have a wardrobe full of fun clothes that get very little wear :(.  So I made a second pass through the filing cabinet drawer, this time looking for "wearable" and "suitable for the office (or casual weekends)", and came up trumps - THIS DVF pattern; pretty, office-appropriate and very wearable, and even in my size.

I really hope the very bright pink fabric stops it from being a boring choice!


By the way, please excuse all the crumples in the photos - I did iron the dress properly, but I then drove into the city to take these photos wearing the dress, and apparently driving makes silk crepe de chine rumple and crease! 

I usually sew a size 12 in modern Vogue patterns for my upper half and a size 14 for my lower half, but I thought 70s sizes might be a little smaller than modern sizes, so the straight size 14 in this pattern looked about right - and it was.  The pattern was straightforward to sew, though the amount of hand stitching required took me by surprise and meant the dress took a lot longer to finish than I'd anticipated.

My gorgeous, very drapey silk crepe de chine comes from last summer's sales at The Fabric Store here in Sydney, and it proved to be the perfect choice of fabric for this dress, even if  I didn't have quite enough of it (my neckline and cuff facings are cut from a different fabric).

It's hard to show movement in photos without jumping around (and also being a good enough photographer to capture the jump!); the next photos are the best we managed to show the swish and drape of the fabric:


You don't normally see castles in Sydney, but yes, the building behind me in a couple of these photos is very castle-like.  The building was apparently based on Inveraray Castle, and was originally built as a "palace for horses" (ie stables!) for the 5th Governor of New South Wales.  And it's now the Sydney Conservatorium of Music, which I think is a much more suitable use of a small castle!  

The rolling parklands are the Botanic Gardens, very pleasantly located between the sea (downhill from these photos) and the city - in this map you can look for Gate 10 to see where the Conservatorium sits in relation to the sea and the gardens. 


If you compare my dress to the detailed description above you might notice a couple of differences... firstly, my dress is knee-length, not 18 cm below mid-knee, and secondly, where's that top stitching?

It's knee-length because I just thought the shorter length looked more balanced with the elbow length sleeves and simple bodice (I did try the longer length and it was a bit nightie-like).  I normally add between 7 and 10 centimetres to skirt or trouser lengths in Vogue patterns, so it was a novelty to get rid of some length - a full 16 centimetres, and that's with enough fabric left for a nice deep hem too.  I should point out though that a lot of that excess length probably came from my fabric "dropping"; the much smaller collar pieces certainly stretched out significantly even with minimal handling.  And as for the top stitching, well it turns out it was only supposed to happen at the hemline, and other than that, the instructions are all about slip stitching and more slip stitching!  I ended up continuing with the slip stitching theme for the hemline anyway - when you're on a roll...

Here's a close up of the collar - it's not perfect, but given the amount of adjusting that was involved to cope with the uninterfaced collar upper stretching out I'm pretty happy with it:


I did have to make another surprise adjustment as I was sewing the dress - but it's one that's not as noticeable.  When I tried the dress on with the cuffs pinned in place before sewing buttonholes, I noticed that the cuffs were very tight on my arms, so to gain a few millimetres of width I've sewed press studs with buttons on the outside instead of buttonholes.  There was actually supposed to be a second button on those cuffs, just in case the cuffs were too loose, but I didn't see any point adding buttons that I will never be able to use so I left them off.


Obviously too I have yet to get a purchased belt, and my hemline really needs one.  I did a lot of measuring and marking and trying on to make sure that hemline was horizontal, but you wouldn't know it because the elastic at the waist tends to move at my hips when I walk around, and that makes the hem rise at the sides! I wish I'd noticed before we took photos... but I'm sure it'll be fine when I add a belt.


So, what's the overall verdict? Well, pleasantly surprised!

Mid-way through making this dress I was really worried about my pattern choice; it was looking so much like a nightgown that I thought it was going to be a wadder - and what a waste of hours of handstitching that would have been!  Thankfully the elasticized waist pulls it back into "dress" territory, as does the shorter hemline  - phew! - and I know this dress is going to get a lot of wear.

Thank you very much to my two charming photographers for the day, my mum and my daughter:


And thank you very much for inviting me to write this post Marie!


See you soon

- Gabrielle x

Monday, 9 May 2016

Summer's End Top + Pants

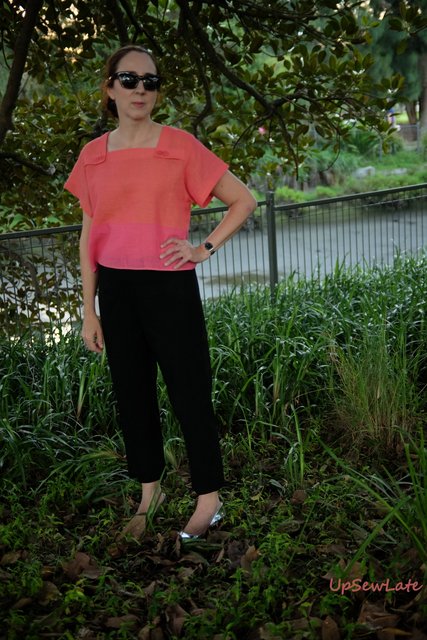
I've whipped up a top and some black work pants - and I'm feeling really happy with them both.

The pullover top is sewn from an 80s pattern (Vogue 8313) and some vintage fabric (quite possibly from the same era).  For all that it's an old style it doesn't look particularly dated to me... and yet it's pure 80s.  In fact my mum had a top with very similar lines to this one when I was growing up, though hers was made from white linen with navy trim inset around the neckline (and no buttons), and had a matching skirt - much more of a classic look than this :).


I found the buttons in my stash - wasn't I lucky to get such a good colour match! 

I modified the pattern slightly to narrow the neckline and to make the buttons decorative rather than functional; I didn't think my loose weave fabric - a lightweight hemp perhaps? - would have stood up to buttoning, and I don't usually have any problems getting pullover tops on. The pattern also called for top stitching to hold the facings in place around the neckline, but I opted instead for lots of 'invisible' hand stitching under the buttoned corners and wherever else I could hide a few stitches...  I love this "no stitches" look and wish I'd thought of it when I was sewing the sleeve hems. 

The top is intended to be a little more cropped than mine but I wanted it to cover the waistline of whatever I wore it with, so I added a few centimetres to the length and cut the front and back with the selvedge in place of a hem.  I can *just* tuck it in too when I wear it with high waisted shorts:


I should have realised such a loose fabric would be slightly transparent - I will have to bear that in mind next time I wear it...


And the black pants are the pants from Vogue 1264 by Anne Klein, described on the pattern envelope as "semi-fitted pants with tapered leg has side invisible zipper" and reviewed here on PatternReview. They're basically just cigarette pants - no pockets, no frills!


Black is so hard to photograph!  

This pattern is a really good basic pants pattern - simple to sew with an invisible side zip and waist darts, and giving a surprisingly decent fit right out of the envelope. My only intentional adjustment from a straight size 14 was to taper the pattern to a size 16 waist, which turns out to be a bit loose on me and makes my pants end up sitting lower than my waistline and makes the pants legs look longer on me than they should (I normally lengthen Vogue pants legs by at least 5 centimetres). 


I also forgot to follow the instructions, and that led to my unintended omission of the cute side slits that should be happening just above my ankles. I'll definitely have to include them next time - they're very easy to sew. and with a nice deep hem they should have enough weight to stay in place and not flop askew.  


I've lightened the next photo so you can see the fit in the back of the pants with my top hoicked up. The fit isn't perfect, but it's a million times less saggy under the backside than all my RTW work pants and would probably look even closer to "spot on" in a drapey wool crepe (these pants are sewn from a stretch cotton):


The pants have a plain facing at the waist and no waistband, and I think this is good for those of us (like me) with a short waist - though I guess it may not work for those who need a belt to keep pants in place. Although I've sewn my pants up with too loose a waist, my impression is that the pattern is also a good starting point for those of us with flat-ish backsides (like me) - the crotch curve looks relatively shallow compared to some pants patterns I've tried.

Extra room for ice cream, right?


Next up I'm hoping to show you a winter dress that's turned out to be more "va-va-voom" than planned (I have no idea whether or not it is going to look alright in the daylight and in photos, but it's looking OK in the weak late-night light...), and then a cute but seasonally inappropriate jacket.

These photos with their varying backgrounds were all taken at Bicentennial Park on the foreshores of Rozelle Bay a couple of weeks ago (thank you mum!) with the exception of the shorts photo (thank you tripod).  I hope this doesn't feel like an excess of photos!


Thanks for reading

Gabrielle xx


Saturday, 9 April 2016

StyleArc Rosie and a Vintage Vogue Skirt

I'm back! It has not been a great month between posts... 

A couple of days after my last post my mother-in-law became suddenly very ill, to the point where she needed to miss one of her beloved early morning rowing sessions.  She still felt able to pick my son up after school, and to dash off to meet friends and see an opera concert, but in between those activities she lay on my couch (a shocking  first) and declined a cup of tea (unheard of!). Within the next couple of days she was in so much pain that she took a taxi to hospital where she was diagnosed with stage 4 ovarian / peritoneal cancer, and promptly had several rounds of chemotherapy scheduled to try to halt the cancer's progress.  Mr UpSewLate and his brothers alternated in staying with her day and night, at home and at hospital, but she was so weak from the "stomach bug" (her GP's diagnosis) she'd been enduring all through February that she didn't survive the first round. She was very brave and stoic, but it was a terrible shock - she was so active and bright, sociable and community-minded that we'd thought she'd live to be a hundred! She died peacefully with her three sons by her side, listening to some of her favourite music. We held the funeral and wake on her birthday last week, and the night before last we attended a beautiful farewell ceremony at her rowing club, with shared stories and message boats on the water. It's been an incredibly emotional month - there's a big gap in our lives now.  

So now you know... 


BUT I'm sure you're not here to read about my life, so let's move on to the much easier subject alluded to in this post's heading:  sewing, and two completed garments.


This post has been sitting in my "draft" folder all month, ready to publish. Here it is, as drafted back at the very start of March - and apologies in advance for the abrupt change in tone, but it was written before the month turned awful:


StyleArc Rosie and a Vintage Vogue Skirt


I have two Autumn garments for today's show and tell (blogging can feel like that, can't it!): a sleeveless StyleArc Rosie top and a vintage Vogue flared skirt in stretch cotton sateen. 

Autumn?

Yes, that's right, it's Autumn in Sydney, and yet on the day I took these photos the temperature was probably still hotter than peak of summer weather in many places. HOT and MUGGY! The hot weather (about 35 days in a row!) seems to have finally broken, but we'll have to wait and see...

Maybe the European-style 4 seasons don't really fit with our weather patterns though? The D'harawal country calendar looks a better fit to Sydney's weather, and it classes January to March as the hot and dry season.

I've had my eye on the StyleArc Rosie top for a long time - the pattern came out years ago - but Kristin's fitting woes with this pattern put me off.  Then I finally twigged that since we're very different shapes, the patterns that challenged us in fit would be very different too.  And it turns out that for me at least, the pattern is a winner.

In all these photos you'll see that the fit isn't perfect, but please bear in mind that I used very unforgiving fabrics for this version, which is really only a test garment.


The centre front panel is a cotton twill left over from my Blinder peplum top of a few years ago, and the rest of the fabric is a cheap cotton that I must have bought a long time ago, as it's not really suitable for clothes being stiff, rough to the touch and very crease-prone. 

I think at least some of the creases will disappear in a better fabric, and I'm hopeful that by adjusting the shoulder line and adding a little bust width in the princess seam I'll get rid of the creasing and pooling at the front underarms.

Here are the line drawings and tech drawings for the pattern - it's hard to see the design lines in my white fabric: 


The Rosie top goes together very, very quickly; it's just a matter of a couple of seams and a folded pleat in the back. with no darts or edge binding.  The pattern does suggest an opening in the centre back seam but I found I didn't need one - the top *just* fits on with a little contortion, and pulls over my larger than normal head easily.  I particularly like the shape of the neckline facing, which is quite deep in the back, the shaped front "skirt", and the panelling that would make this pattern great for mixing fabrics. I'm not so keen on the finish on the armhole - just turn and stitch - so I'll probably cut myself a deeper hem allowance here next time I make the top. 

I sewed the Rosie top in a straight size 10, as the size 10 looked to be a very good match to my current measurements (36", 30", 39") in StyleArc's size chart, and the overall fit seems good. StyleArc doesn't add much ease though, so if you wanted a looser top I'd recommend going up a size or two.

I'm looking forward to making this top again in better fabric - I've got some lovely pieces of silk organza that I think would look great mixed up with other fabrics, but I need to work out exactly which other fabrics :).  


And now for the skirt. The skirt comes from an 80s Vogue pattern, Vogue 1387, that I thought I'd used before - so many similar skirt patterns in my stash! - but which is actually a new one for me.  

The skirt is described as being a "bias, flared skirt, below mid-calf... waistband and side zipper" - in other words, your basic bias cut skirt.  It comes with a very loose, big shoulder jacket (zero appeal to me) and a loose short sleeved top that looks a bit like the Maria Denmark kimono tee in shape - though presumeably lots looser. 


I sewed this in a straight size 14, and left off my usual skirt lengthening as I had only just enough fabric to fit the original skirt length. Because I didn't add any width at the waist I have to wear this skirt at my natural waist rather than half way to my hips :(, and of course that also takes away some potential length. Those two facts mean my skirt isn't below calf length, but that's OK - I do prefer a longer skirt but some variety in the wardrobe is probably a good thing.   


Actually there wasn't quite enough fabric even for the original length - I had to cut the back skirt piece with a narrow triangle of fabric missing at the base of one of the side seams and then insert a similar triangle (matched on colours and grainline) to fill the gap.  Unfortunately I don't have a photo of the patch - I didn't get the chance to take many photos before a neighbour came out to see what I was doing, which of course meant the end of photo taking :(.   


Fitting this sort of skirt shouldn't be tricky, but I think I need to adjust the hip curve if I make this again - I've got some pooling at hip level on the side seams, as you can see in the next photo.  You can also see my cute blue buttons and a super-invisible zip, made more invisible by my camera's inability to cope with the whiteness of the white areas of fabric.


And here's the back view - not very exciting, and no, you can't see the patch:


I'm very happy to have another skirt in my wardrobe, even if it is currently on the tight side of fitting.


Happy sewing, and I wish you and your loved ones good health 


- Gabrielle x


Sunday, 28 February 2016

Vintage Pattern Pledge 2016

This year I'm once again joining the Vintage Pattern Pledge hosted by Marie and Kerry - I love vintage patterns and I have quite a few, but I need a gentle prod to actually sew from them rather than just drooling over them.

Last year my pledge was to sew up at least 4 of my vintage or reproduction sewing patterns, but 3 is all I managed - a 1940s dress, a 60s cape, and an 80s top:


It doesn't sound like much, does it!

However, there were two more "half" garments; vintage dresses I started and didn't complete.  So this year my first priority is to finish these two off before they become proper UFOs (unfinished objects):


Vogue 8974

McCall 6581

I've already sewn up an 80s midi skirt for our continuing summer weather, so that's going on my list too:

Vogue 1387 (John Anthony)
And my daughter has put in a request for me to sew her this next dress - I downsized a size 12 copy of this pattern for a dress for her a couple of years ago, and she still loves the style:


Judging by my efforts last year that's probably going to be plenty, but I want to add an extra challenge for myself, should I find myself with loads of time and energy on my hands.


I have two small boxes of very special vintage patterns, patterns from anywhere from the 1920s to the 1960s, that I really should think about sewing.  Here are a few of my favourites:

Simplicity 2647

Simplicity 2844

McCall 7023

McCall 7260

Vogue 100 Ronald Peterson

Vogue 1556 Yves Saint Laurent


Putting it all together, here's my pledge:


I, Gabrielle of UpSewLate, pledge to sew at least one more vintage midi skirt from an 80s pattern, to finish sewing the two vintage dresses I started last year, and to sew my daughter the 1970s dress she's requested. And as an extra challenge, I'll aim to sew at least one of the vintage patterns I normally just drool over.  


And I'll be back soon with a modern bit of sewing that my son graciously photographed for me today.


Happy sewing


- Gabrielle xx


Thursday, 31 December 2015

More a Miaow than a Roar

Let me quickly try to blog against my Vintage Pattern Pledge target - I was aiming for 4 garments from vintage or reproduction vintage patterns, and though I'm pretty sure I've sewn 4 and a half, I've only blogged 2: my graphic alert dress and my frocktails capethis broderie anglaise top doesn't count because I sewed it late last year. 

So here's vintage pattern garment number 3 for the pledge: a pink animal print (is there such a thing as a big cat with pink fur?) top made using a 1980s pattern. 

This next photo is the best I have - I'm not sure why the rest of my photos are so washed out! 


The fabric is a spongey, crepey, slightly stretchy fabric from Lincraft - it's got to be a cheap polyester. I bought it a few months ago (before I learnt my lesson) for a ridiculously cheap sale price, thinking it would be good "test" fabric, though it's unlike anything else in my stash...  On the plus side it needs no ironing, which makes the top useful when I'm running late for work.  In the below picture I'm doing a terrible job of acting "running late for work". Terrible! 


And the pattern is one I picked up very cheap in a second hand store - there is not that much demand for these 80s basics! I thought it looked like a good pattern though: firstly it's a designer pattern, and secondly it includes three very different tops: a shoulder-buttoned pullover top with cut on, fluttery sleeves (A); a drop shoulder, side-buttoned (!!) long sleeved top (B), and a forward shoulder, front-buttoned blouse (C).  I'm kind of staggered that these three tops were considered good for a single pattern back then - they are all so different!  


On first glance the pattern looked too small for me - it's a size 10, I know the sizing is the same as in modern Vogue patterns, and I currently fit a size 12 in modern Vogue top patterns. However, back then clothes were worn a lot looser than now - yippee!  For 80s patterns I get to go down a size (unless I want an 80s fit!), just keeping an eye out for nipped in waists :).  


I wanted to make something simple with my stunt fabric, so I went with variant A, and left off the shoulder buttons. On the pattern envelope photo the neckline on this top looks absolutely comfortable, but I assume a very slim model was used, as when I cut this out I found the neckline quite constricting - and so small that those shoulder buttons would have been a necessity - so I recut my neckline and facing a couple of centimetres bigger all around to fit my head.  

Without the shoulder button detail all that's left is the shape, with what turns out to be a rather lovely sleeve - I think these sleeves would look beautiful in a drapey silk. The arm scye is quite low cut but not so low cut as to show any bra. 


I sewed this very fast and carelessly, and the result is absolutely wearable but nothing special.  I do like a simple top though, and I think I may be able to square the shoulders on this pattern to make for an even more fluttery sleeve - and a pattern that would then work with a border print along the shoulder line (ideas, ideas, ideas!). So in short, I'll definitely be coming back to this one.


Happy new year, and see you in 2016!


- Gabrielle xx

Related Posts Plugin for WordPress, Blogger...