Showing posts with label tops. Show all posts

Thursday, 5 January 2017

New York Liberty Top

Now when I said the other day that I had taken pictures of 4 tops I'd recently made, I lied.

I have recently made 4 tops, but I only photographed 3 of them - the 4th top I photographed was one made by my mum. I know this is a blog about the things I've made, but the top is just too lovely not to share!


This top is made using Simplicity 1366 combined with a delectable Liberty tana lawn mum bought on her trip to New York a few months back.  I love this particular print - it looks like an art nouveau design I think? - and the scale of the print and colours are right up my alley too.  I love the way the blue pops out against the orange, brown and white, and the careful symmetric placement of the print really pleases me.  I'm pretty sure I haven't seen this print locally (and I can't even find it on the Shaukat Fabrics site!) but if I do ever see it I'll definitely be tempted to get some more.


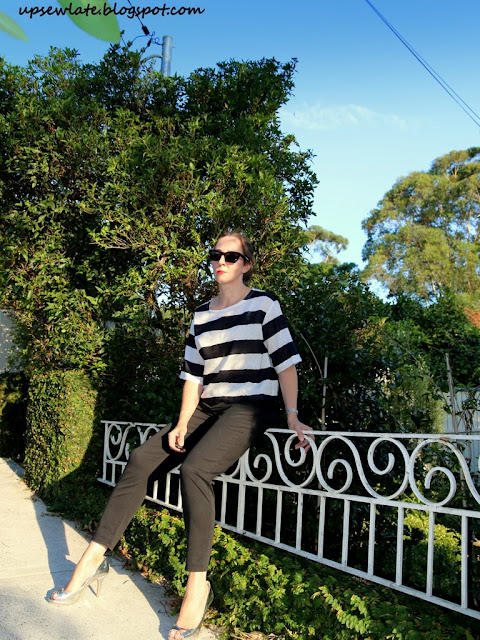
If you remember, this is also the pattern I used for this top - and based on a comparison of the fit and lengths of the two tops, I think it's safe to say this version was sewn in a size 12 (note the size 12 is supposed to fit a bust of 34" but has a finished measurement of 41.5" - so size down on this pattern!) and cropped significantly from the original pattern length (just like my striped version - see photo below).


This pattern is one that just about everyone seems to have success with, and I'm very pleased to say it worked out for mum as well. Oh except that it didn't really, did it - it worked out for me instead! The only reason I have the top is that is turned out too tight across mum's shoulders.


There's not too much to say about this pattern that hasn't been said before by the squillions of people who've sewn it up, but I do want to say a bit more about the fabric.

Liberty tana lawn is such pretty fabric, but to me the truly wonderful thing about it is that it's so lightweight without being fragile. We've been having quite a steamy summer, so this top and my old sleeveless Liberty top have been perfect for looking decent without feeling super sweaty.

Oh and on the subject of lightweight fabrics, there is one other thing... Now that I have an overlocker I tend to serge the seam allowances on everything without really thinking about it, but looking at the finish on this top reminded me that serging is not always best. Sometimes a serged seam allowance can be too weighty or too thick for your fabric - and in such cases a pinked edge or a lightly stitched finish can work better.  Mum doesn't have a serger; she finished the seam allowances on this top with a three-step zig zag stitch and the light touch feels absolutely right for this fabric, so that's something I'm going to try to remember next time I'm sewing a lightweight fabric myself.

And that is all for now :)


See you soon


- Gabrielle xx

Wednesday, 28 December 2016

StyleArc Ethel Designer Top

And here's another StyleArc top, also sewn from a pattern bought at StyleArc HQ over the Melbourne Frocktails weekend. This one is the Ethel Designer Top, and this time the pattern is one size too big :).


I was really drawn to the seam and stitch lines on this top - angled seam lines front and back, and deep facings top stitched in place around neckline and armholes. The top is pretty boxy looking though, so I wasn't sure if I was being foolish sewing this up in too big a size - hence the use of rubbishy Spotlight fabric for test purposes.

Apologies for the horrible camera angle - I didn't really think when I was taking these pictures, but obviously I'd positioned the camera way too low!


I think it would be better a size down, BUT I like this top anyway. It's very airy and comfortable, and I think the excess ease looks OK with narrow pants, though I should probably wait and see how the top looks when the fabric softens after a few more washes.


The pattern is intended to be sewn in linen, so I'm thinking of making it again in a beautiful orange linen that I got as a remnant from The Fabric Store when I went there with Nicole on her not-so-long-ago weekend in Sydney.  I think to pair it with the Ethel Designer Pants (made last summer - see this post) I'd need to size the top down to bring the waist in - otherwise I think the combo would be too voluminous all over.  Hmm looking back at that post is reminding me how lovely and loose those pants are... I think they would be fabulous in a very lightweight cotton or silk!

In the next photo I've pinched out the excess ease at the waistline; I think the top looks better like this.... 


StyleArc actually gave us printouts of diagrams showing how to grade their patterns up and down (ie how much per size for tops and bottoms), so it should be perfectly do-able to size this top down.

If I remember correctly a couple of others who've made this top have said something about the instructions for the facings being a little confusing - maybe I'm mis-remembering, but in any event I was mentally bracing myself for making mistakes when I sewed the sleeve facings.  If I understood the instructions correctly, what StyleArc suggests it to sew the armhole facings with facings right side to the right side of the top, then to flip the facings to the inside before top stitching in place, and then finally to sew the side seams. This order of construction might be what makes the approach a little different? I guess I would normally hide the side seam within a facing, but I can see that StyleArc's approach would be good if you want to avoid puckering from discrepancies between the lengths of the facing and outer armhole edges - sewing instructions are really just a suggestion though, aren't they?

There's not too much more to say about this top - it really is quite a straightforward sew, and if your fabric is wide it doesn't take a great deal of length. The pattern indicates you need between 1.7 and 1.9 metres for the top, but from recollection I got it out of 1.5 metres with lots of fabric left over. So as I said earlier, I'll probably be making this one again in a smaller size and a nicer fabric :).


Gotta go - we're heading to the beach again this afternoon!

See you soon


- Gabrielle xx

Tuesday, 27 December 2016

StyleArc Alannah T-Shirt

Hooray for summer holidays! I have a significant backlog of unblogged sewing but I've got time off work and the evening light is fabulous, so the other evening, while Mr UpSewLate was at the local dog park with puppy and kids, I took the opportunity to race around the garden snapping pictures of myself in four of the tops I've made recently.  This top is the one I snapped last, and I was getting weary of my own forced smiles, so when the family came home and my daughter offered to take over with the camera I was extremely relieved.


I bought this paper pattern when I visited StyleArc's HQ on the Saturday of Melbourne Frocktails weekend (still impressed that they would rock into work on a Saturday to open up their office and show us around, let alone sell us patterns at a huge discount!). Not all patterns were available in all sizes, so although I think of myself as a size 12 in tops and a 14 in bottoms, I picked up a couple of patterns that were a size larger or smaller, and this was one of them. This is the Alannah t-shirt in a size 10, and while it's a little snug across the bust in my cotton jersey from Spotlight I think it would be a good fit in a viscose stretch fabric.  


I'm happy to report that the Alannah t-shirt pattern is a very straightforward and quick sew without sacrificing shape: the sleeve is not symmetric between front and back (thank goodness!), back and front aren't identical, and the pattern nips in slightly at waist level. You could sew this top entirely on the sewing machine, or do the whole thing on an overlocker and cover stitch machine. Mine was sewn predominantly on my overlocker, with just the hems done on my sewing machine.   

The only deviation I made from the instructions (which are brief, but not at all tricky) was to skip the tape in the shoulder seams. I do use clear elastic in the shoulder seams (and neckline, and anywhere else I think needs it)) when I'm sewing with drapey or heavy knits, but this cotton jersey didn't seem to warrant it - and the proof is in the pudding; my shoulder seams haven't stretched out at all. 


I might need a few more of these, I reckon... 

Happy holidays!


See you soon


- Gabrielle xx

Sunday, 17 July 2016

Burda 9439 Kids Tops

Arghhh this post is massively late - it's two kids tops from OVER A YEAR AGO!!


Let me jump straight into it then... 

I find Burda pattern sizing to be really good for my kids - the width and ease are good on my kids, and there's always a good range of "workhorse" styles around.  The two tops here were both made using Burda 9439, a multi-size (are they all?) paper pattern for 6 variants on a t-shirt. The fact that the patterns include lines for so many ages - 3 to 12 in this case - means it's easy to make adjustments if your child is tall or short for their age, or has a stockier or slimmer build. 

The artwork on the envelope suggests the pattern is a mostly girls' one, but views B, E and F all look like they'd be perfectly acceptable to most boys. 


First up, I made a blue t-shirt for my son using view F.  At the time he was nearly 11; I cut the size 11 width-wise with the length of the size 12, the largest size in the pattern.  Both my kids are tall for their age, so while their width measurements are close to what Burda expects for their age, their height measurements generally take them up a size or two. 


He really liked the top, but I should have added more length to it - he grew significantly taller very quickly (apparently kids do that!) and the top didn't get as much wear as I would have liked. Unfortunately I didn't have enough fabric to make it longer, or even enough fabric to cut the front in one piece (yup, that band on the front is a fabric limitations indicator).

Anyway, while it fit him it was apparently very comfortable, with the fabric (a stretch viscose) cool and soft to the touch - I should make him more tops in this fabric.


Around the same time I also whipped up the long sleeved variant, view E, for my daughter.  She needed a warm top so I used a small piece of fleecy cotton jersey for the body (I think some people call this fabric French terry?) and some rib knit left over from another top for the sleeves and neckline.

My daughter was 8 at the time and I sewed her top as a straight size 9 - it looks too big all over in these photos, but the fabric shrank in width in the wash and she also grew suddenly taller, so the fit ended up being perfect despite my not having sewn quite the right size!


So despite my poor planning, this top had a lot of wear and became last year's winter favourite - comfortable and cosy, and plain enough to go with most other clothes.


This sort of pattern is so easy to make that once you've used it a few times the instructions become superfluous - all you really need is the decent drafting provided by the pattern.  Having said that, I have to admit I no longer rely on the proscribed neckband length these days though, because the length needed varies depending on the stretchiness of the particular fabric!

So easy, so quick - why haven't I made my kids more of these tops this year?


Back soon with some grown up sewing :)


- Gabrielle xx

Tuesday, 14 June 2016

Raglan Sleeve Tops


We finally got our winter weather, and I remembered why my sewing and blogging grinds to a near halt every winter: I get too cold. So I'm now trying for a bit of practicality: I've found a heater for the sewing area and I've sewn a couple of tops I can layer.

Top number one is view A from Vogue 8952, a "very easy" pattern.

Please excuse my dodgy photos with their weird shadows and varying colours - I got these tops photographed between working from home the other day and picking up the kids from school, and for the sake of speed they were taken in my hallway, which seemed to confuse my camera's light setings.  


I'm actually wearing the top as I type this - it's not a perfect fit (slightly too tight across the bust, and too much fabric in the upper arms / too low an armscye) but it feels great on and goes really well with the jeans I practically live in :).  That's good enough!  And I sooo love this colour... Anna, can I please have a membership form for the Orange Fan Club?


And there are shoulder darts, and the neckline fit is fabulous!


Pattern: View A from Vogue 8952, size S (8-10)

Fabric: orange viscose/ spandex jersey from Tessuti Fabrics - I think it's this fabric type, but in a colour more like this

Thread: Gutermann 100% polyester, colour #16

Adjustments: well yes, there were a few, but they all related to having bought insufficient fabric! I originally bought the fabric to make my son a long-sleeved top, but it turned out he preferred the idea of a blue linen collared shirt.  But enough fabric for a top for an 11 year old skinnymalink is not quite enough for this pattern, so I reduced both the flare and the length of the top (by folding out some width and shortening at the shorten line), and shortened the sleeves (again at the shorten line).  Removing length in the middle of the arm has made the sleeves narrower than intended in the middle and lower parts of my arm, as the sleeves are tapered and I've ended up with the narrow wrist width a few inches above my wrists. The cuffs were added at the very end when I realised I had enough scrap fabric to add some cuffs and regain the sleeve length. Finally I hemmed the bodice using a generic version of steam-a-seam. It makes for very easy hemming but the hemline feels a bit stiff - I'm hoping it will lose the stiffness in the wash.

I'm happy with the top and am going to wear it to bits, but if I make it again I want to leave the sleeves at their regular length and also raise the armhole a little and give myself a bit more width across the bust (if I can be bothered, ha!).   I'd make the same reduction in length and width of the body of the top though, as the length seems good to me and I don't want too breezy a top in winter.


Top number 2 is the top from Vogue 1389 by Donna Karan (rated "Average", but the top is definitely an easy sew):


I'm very happy with the fit on this one - out of the packet the fit seems pretty good, though I'm wondering when I look at these photos whether I've underestimated my size... I sewed this as a straight 12, forgoing my usual "grading up" to a 14 from the waist down, and the horizontal creases in the back of the top tell me yes, I do need the extra width.


The cut of the raglan seam and underarm sit quite high, but not uncomfortably so.  This gets rid of most of the underarm wrinkles you saw on the orange top above - though there are still just a couple which may be more about needing to size up at the bust.


As you'd expect from a sleeve design invented for maximum battlefield mobility, the sleeves on this top work beautifully for dancing, catching a ball or whatever you want to do with an arm in the air.


I don't love the floral print - it's something I bought to sew a dress for my daughter with, but she didn't like it (am I the only one sensing a theme here?) - but who knows, I might yet come to love it.


And regardless of how I feel about the print, I am definitely going to be wearing this top.  I LOVE the neckline and the lines of the pattern, and being quite a slim fit it will definitely layer well under my jumpers and cardigans.


Pattern: View C from Vogue 1389, size 12

Fabric: cream / floral print jersey from either Spottie or Lincraft (I can't remember which!)

Thread: Gutermann 100% polyester, colour #111

Adjustments: I had plenty of this fabric so I've sewed the top exactly as instructed, just giving myself extra room at the waist and hip level.  As with my orange top, I've used a generic version of steam-a-seam for the hemline and it (again) feels a bit stiff, so when I make this top again (yes, I'm already planning to make it again) I'll just do a regular twin needle finish on the hem instead.

As you may have gathered, I love this pattern. I've also sewn up the skirt and am planning to make the jacket too - I think the pattern is a really great professional wardrobe builder. The wrap-around side seams on the top are really cool and I think they'll look great in a plain fabric. The neckline sits nicely, the fit is good, and I like the length of the top and the sleeves.


====================


Now for some geometry.

Sewing these two tops got me thinking about raglan sleeves. The last time I sewed myself raglan sleeves was with this Papercut Undercover hoodie (sans hood), and I remember not being over the moon about the fit (though I wear the top heaps, so the fit is obviously no longer bugging me much).

Fit depends tremendously on your particular body shape and the fabric you use - and whether you use a size that is tight or loose on you - but I was curious to see how these three patterns compared in the shaping of the raglan seamline and thought you might be interested to see how the patterns compare too.


Vogue 8952 has curved raglan seams and a shoulder dart. The sleeve front and back armscyes are different shapes, as are the bodice front and back.  I think the curves and darts in these pattern pieces have the potential to give a very close fit.


Vogue 1389 has simpler looking curves but very different shapes and seam lengths for the front and back raglan seams.  The front seam length is of course shorter because the neckline is significantly lower at the front, but I'm guessing some curvature has been added and length removed for clever Donna Karan fitting reasons.


The Papercut Undercover hoodie top is close to symmetric, front to back, apart from the front neckline being a little lower than the back. This gives a boxier shape than the above two patterns, more of a "T" shape.


Here's what the Papercut raglan top looks like on (on the same day, with the same lighting, same goofy poses - ie ideal test conditions):


The looseness of the top makes it lovely and boxy, but the relatively flat curve in the front raglan seamline also results in more folds when my arm is by my side than I get with a more pronounced curve - well at least that's my impression!   But it IS a loose top, and the seamlines look very nice when my arm goes up.


I wouldn't say any of these three designs is "wrong" - but they are certainly different. 

For now I think the Donna Karan is my favourite (the floral top) of the three raglan sleeve patterns, but perhaps I should wait and see which of the tops gets the most wear.  Do you have a favourite raglan sleeve pattern? And do you like your raglan sleeves loose or fitted?


Thanks for reading

See you soon
- Gabrielle xx


Monday, 9 May 2016

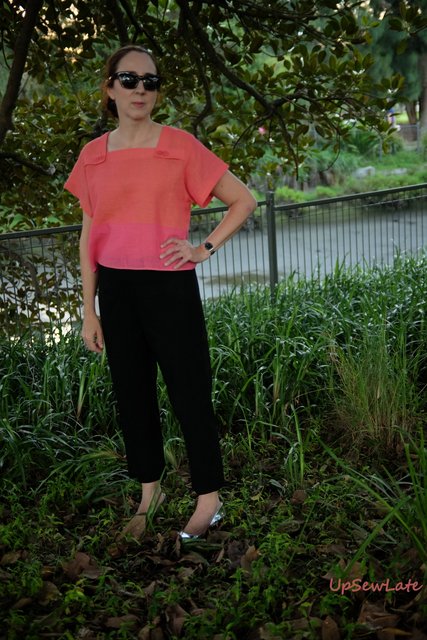
Summer's End Top + Pants

I've whipped up a top and some black work pants - and I'm feeling really happy with them both.

The pullover top is sewn from an 80s pattern (Vogue 8313) and some vintage fabric (quite possibly from the same era).  For all that it's an old style it doesn't look particularly dated to me... and yet it's pure 80s.  In fact my mum had a top with very similar lines to this one when I was growing up, though hers was made from white linen with navy trim inset around the neckline (and no buttons), and had a matching skirt - much more of a classic look than this :).


I found the buttons in my stash - wasn't I lucky to get such a good colour match! 

I modified the pattern slightly to narrow the neckline and to make the buttons decorative rather than functional; I didn't think my loose weave fabric - a lightweight hemp perhaps? - would have stood up to buttoning, and I don't usually have any problems getting pullover tops on. The pattern also called for top stitching to hold the facings in place around the neckline, but I opted instead for lots of 'invisible' hand stitching under the buttoned corners and wherever else I could hide a few stitches...  I love this "no stitches" look and wish I'd thought of it when I was sewing the sleeve hems. 

The top is intended to be a little more cropped than mine but I wanted it to cover the waistline of whatever I wore it with, so I added a few centimetres to the length and cut the front and back with the selvedge in place of a hem.  I can *just* tuck it in too when I wear it with high waisted shorts:


I should have realised such a loose fabric would be slightly transparent - I will have to bear that in mind next time I wear it...


And the black pants are the pants from Vogue 1264 by Anne Klein, described on the pattern envelope as "semi-fitted pants with tapered leg has side invisible zipper" and reviewed here on PatternReview. They're basically just cigarette pants - no pockets, no frills!


Black is so hard to photograph!  

This pattern is a really good basic pants pattern - simple to sew with an invisible side zip and waist darts, and giving a surprisingly decent fit right out of the envelope. My only intentional adjustment from a straight size 14 was to taper the pattern to a size 16 waist, which turns out to be a bit loose on me and makes my pants end up sitting lower than my waistline and makes the pants legs look longer on me than they should (I normally lengthen Vogue pants legs by at least 5 centimetres). 


I also forgot to follow the instructions, and that led to my unintended omission of the cute side slits that should be happening just above my ankles. I'll definitely have to include them next time - they're very easy to sew. and with a nice deep hem they should have enough weight to stay in place and not flop askew.  


I've lightened the next photo so you can see the fit in the back of the pants with my top hoicked up. The fit isn't perfect, but it's a million times less saggy under the backside than all my RTW work pants and would probably look even closer to "spot on" in a drapey wool crepe (these pants are sewn from a stretch cotton):


The pants have a plain facing at the waist and no waistband, and I think this is good for those of us (like me) with a short waist - though I guess it may not work for those who need a belt to keep pants in place. Although I've sewn my pants up with too loose a waist, my impression is that the pattern is also a good starting point for those of us with flat-ish backsides (like me) - the crotch curve looks relatively shallow compared to some pants patterns I've tried.

Extra room for ice cream, right?


Next up I'm hoping to show you a winter dress that's turned out to be more "va-va-voom" than planned (I have no idea whether or not it is going to look alright in the daylight and in photos, but it's looking OK in the weak late-night light...), and then a cute but seasonally inappropriate jacket.

These photos with their varying backgrounds were all taken at Bicentennial Park on the foreshores of Rozelle Bay a couple of weeks ago (thank you mum!) with the exception of the shorts photo (thank you tripod).  I hope this doesn't feel like an excess of photos!


Thanks for reading

Gabrielle xx


Related Posts Plugin for WordPress, Blogger...