Friday 27 January 2017

Inari 2: Adjusting the Sleeves

Way back when (well here...) I blogged an Inari dress I was feeling equivocal about. It was made from a medium weight cotton, and despite the pattern's fabric suggestions ("light to medium weight fabric, inelastic or with stretch") the fabric just felt wrong for the dress and exacerbated sleeve fit issues that would probably have been less noticeable in a knit fabric.

Ever since, I've been meaning to re-make the Inari with a modified sleeve, but also to re-make the Inari in a knit fabric without modifying the sleeve, to see how the sleeve felt when the stretch of the fabric took on the role of accommodating arm motion. What I've finally got around to is a hybrid re-make; the Inari dress with a modified sleeve, in a knit fabric.

Spoiler alert: this one's a keeper:


I put this modification off for a long time, but it's actually super easy.  I took a couple of photos to illustrate how I applied a different sleeve (the sleeve and arm scye from Simplicity 1366), but I'll also describe the process in words of course.

So first of all I cut out the sleeves from Simplicity 1366, with the only change being a reduction in sleeve length. I measured the length of the Inari sleeve (based on that short straight seam under the armpit) and folded up the S1366 sleeve to a matching length.

Below you can see the difference in the two sleeve shapes. The Inari has a much higher sleeve cap, and I figured that since I was flattening this out in the S1366 sleeve (and also since the S1366 sleeve sits on a slightly dropped shoulder) I could forget about the curved hemline - the total sleeve length from the shoulder point should be very similar. Here are the shortened S1366 and Inari sleeves laid on top of each other (I have the Inari front sleeve sitting on top of the S1366 back sleeve):


If you change a sleeve so radically, you of course need to change the arm scye it'll be sewn into. To do this I aligned my Inari and S1366 front and back pattern pieces along the shoulder line, with the grain line arrows parallel to each other.  Since S1366 makes a pretty loose top (a couple of centimetres wider than the Inari in the sizes I've made) I didn't align the pattern pieces on Centre Front or Back, but instead had the pattern pieces matching on width at the underarm - and this means I didn't have to change the side seams of the dress at all.  You can see below that the biggest impact of this change is that the arm scye is raised significantly - ie the sleeve now sits closer into the underarm:


This process is super easy to do, but it does rely on your having a pattern that fits the way you like. The two areas I'm fussy about when I do this are (1) the shoulder line - I want to keep the shape of the shoulder line from the pattern that fits me, and if it's very different from the shoulder line of the pattern I'm adapting I'll spend a bit of time working out the point at which the two shoulder lines should meet (near the neckline vs near the arm), and (2) the grainline - the grainline of the pattern that fits reaaly has to be parallel to the grainline of the pattern being modified. But I'm sure most of you already know this and more!

I kept the Inari sleeve cuffs (but because I sewed the dress with my own order of construction I can't turn the cuffs back the way the pattern intends):


And I used the neckband intended for knit versions of the dress:


Happily even with my sleeve changes the dress still looks like an Inari - and I can finally join the Inari fan club! Happy happy days...


And what's more, I managed to eke this dress out of 1.1 1.5 metres of 150 cm wide fabric (!!) and now have only the tiniest scraps leftover - that makes me even happier! 


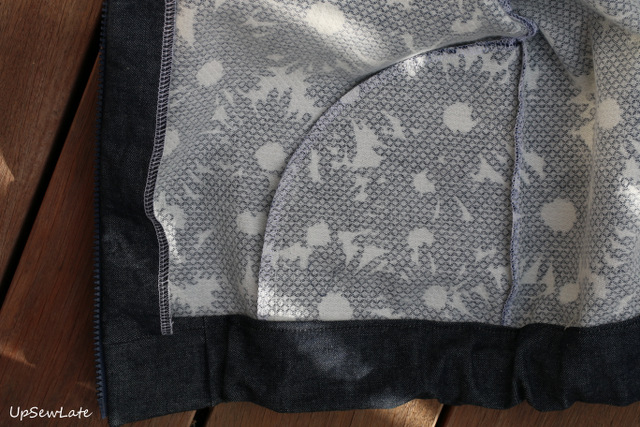
Now with my previous Inari I talked a bit about mitred self-faced hems, but if you look at the examples in my "how to" for this sort of finish, you'll see that it's more commonly used with woven fabrics (stretch wovens included).  My very stretchy viscose (an Italian viscose/ lycra from Tessuti fabrics which looks to be sold out in their online shop - but this link takes you to their other printed jerseys) didn't feel like it would support the weight of a mitred self-faced hem without the dress stretching out, so I used the narrow hem finish suggested in the pattern this time around. And because my fabric was a bit shifty, I used steam-a-seam to keep the vertical and horizontal hem edges nice and straight:


The corners DO sometimes flick out in motion:


but mostly they're well behaved:


Thank you to my lovely daughter for taking these terrific photos for me (and some gorgeous floral close-ups)!


And I'll see you soon!


- Gabrielle xx

Monday 16 January 2017

Vogue 1496 Cocoon Dress

While the light is good (hello Summer!) I'm trying to ignore the disgusting heat and get photos... so a couple of evenings ago when mum was over visiting, I asked if she'd mind going for a walk with me to take photos of this new dress. These photos are much nicer than what I would have been able to get with my tripod and remote...


You may have seen this dress, Vogue 1496, sewn up already - there are some amazing examples around (like Lara's, Erika's, Lauren's...) and it's been around for a little while.  I sewed it up on a whim the weekend before last with a drapey polyester from Spotlight, and have been VERY surprised at how much I like it.  I like it enough that I'm seriously contemplating making another very soon - despite my insanely long to do lists!!


Size wise I cut out the dress that best matched my measurements, a size D.  The pattern comes with a lot of tips, including a tip as to how to pick the right size - basically because the dress is a tapered cocoon shape, the lower edge width is the key measurement to check; this width needs to be bigger than your largest body width to ensure you can get the dress on and off.  That means too that there's a lot of leeway with the fit of the dress - you can sew the dress too big or too small, and so long as you can get it on and off you can call it a fitting success :).


This is a shortened version of View B of the pattern, which is the version that doesn't include an inset neckline. But because a few other people had mentioned that the neckline on this dress is pretty low, and because the pattern includes instructions for raising the neckline, mine is raised. I raised it about 5cm at the lowest point, and I diverted from the instructions to raise it by about 0.5cm all around because I was also concerned it might be a bit too wide.  I should also have top stitched the facings in place as Lara did - my facing moves around a lot and in all these photos you can see it had folded over itself on one side.


The only other change I made was to use the length of View A plus about 5cm.

In the next couple of photos I think  you can see the unusual way the armholes are formed in the back of the dress - the front dress piece wraps around the neckline and forms the back yoke, with the armholes set between this yoke and the back dress pieces.


The other detail I really like on this dress is the pockets. Instead of being in-seam side pockets, they're pockets that are stitched onto the inside of the dress - and the look of these pockets reminds me very much of a particular type of funky 1960s patch pocket :).  The pockets are attached to the dress with a clever technique I hadn't tried before involving steam-a-seam; I found the process a bit fiddly, but the alternative as suggested by Erika Bunker would be to use a glue stick to lightly fasten the pockets before top stitching them in place.  I hope my single row of top stitching is strong enough...


All up I think this is a lovely and very informative pattern, and one that makes for a flattering and very wearable dress.  If you're tossing up whether to sew this, my vote is to go for it!


Thanks for reading, and I'll be back soon!


- Gabrielle xx

Saturday 14 January 2017

Summer Blues: Floral Bomber & Big Denim Skirt

Two for the price of one today!


What I'd like to share with you today are a modified Butterick bomber jacket (B6181) and a Vogue Nicola Finetti skirt (V1486), with thanks to my daughter for the happy photos :).

Let's start with the jacket - top down, as it were!


I started this floral bomber jacket several months ago - in fact I think it was in October, back home from our Italy trip - after being inspired by some online images of oversized, 90s style canvas bomber jackets. This jacket is very far removed from my original inspiration, but that's the way it usually seems to go for me - I start at point a, get sidetracked to point b, and end up at point c. I'm sure that's pretty normal :). I can't find my original inspiration images any more, but basically I'd stumbled across some waist-length canvas bomber jackets with a boxy, minimalist style. I've got my own sketches of what I found (point a), and to be honest they're closer to the Falda jacket than to what I've made here... I'll have to make the Falda later!

So starting with my "point c" sketches I went trawling through the technical drawings of all the possible contenders from my pattern stash. Although the cover art on B6181 is very boring and dated-looking to me, the pattern had the raglan sleeves, zip front and simple shape I was looking for - and it was already in my stash :). Here's what the technical drawings and illustration look like - and I went with View D:


I thought it would be pretty straightforward to make this more cropped and more fitted (oh so different to my original inspiration!), and it was. All I did was to go down 1 size from the one that fit my measurements (getting rid of the looseness), and remove length from the sleeves, body, facings and pockets - about 10cm, removed starting from the bottom of the pocket working upwards, and removed from the lower arm section of the sleeves.

Because this interpretation was so different from my original idea, I didn't use canvas - instead I used a lovely textured Japanese cotton from Tessuti fabrics (the indigo / cream) floral coupled with a little bit of denim from a large piece bought at The Fabric Store (and the same fabric as used for the skirt). The denim collar and waistband (and facings) came about because I had slightly too little fabric, and I thought the denim coordinated reasonably well with the floral and would also go with most other garments I might wear this jacket with. The zip is one that was in my stash - how handy is a stash! - but was originally bought at Spotlight when I thought I might make a few bags (didn't happen).


I'm pretty happy with the way this jacket had turned out - for example, the collar worked out very nicely after a few passes:


but there is one detail I need to correct - I made the elastic in the waistband too loose:


In the next photo you can also see that the pockets innards show when I use the pockets and the jacket is unzipped... I think the jacket would be improved by top stitching the pockets to the jacket outer.  I guess I can still go back and do this if it bothers me, but the pockets are set slightly too high to be practical on me, so this may not be an issue. 


And now for the skirt.

The inspiration for this skirt was my fellow blogger Rachel, who posted a terrific photo of herself wearing this pattern on Instagram (here) - and I wanted a skirt just like hers!

My version of the skirt also uses denim from The Fabric Store (copy cat! I hope you don't mind Rachel, but at least we're in different States, right?).  I've done a terrible job in ironing my fabric after pre-washing it, but my current iron just doesn't get very hot - I recently used its cotton setting on polyester and the heat was just right, which seems wrong. Please excuse the wrinkles...


I sewed this up in a size 14 with a size 16 waist. I would normally add about 10cm to a skirt or dress, but this time I cut the length as designed because it *looked* long...  Anyway, the skirt has turned out a bit shorter than expected (I'm about 5'8" and have a short upper body) so I've left the hem raw and am hoping it will eventually acquire a cool slightly frayed look.

Here's a look at the technical drawing for the pattern:


The waistband is just a rectangle (my waistband facing is navy blue cotton voile, as are my pocket lining pieces) and unfortunately that's not the right shape for me; I need at least a little curve in there. I forgot to ask my daughter to take photos without the jacket so you'll have to trust me on this, but the waistband needs a couple of darts to fit better. I think it looks OK with the jacket open, but there's definitely some gaping at the sides.


The skirt has in-seam pockets and the most awesome pleats in the lower tier - at the front and back, but also along the side seams:


I haven't sewn anything but invisible zips for ages, and I didn't think I could sew regular zips in neatly, but I followed the steps in the pattern and I'm happy with the way the CB zip has worked. The Vogue skirt instructions included more steps than I previously would have used for a regular zip, so I expect that's why it's better than usual for me - it's centred and even, and although there are bumps where the skirt meets the waistband, I can tolerate that because I know there were a few layers of denim in the seam allowance there...


(Oh and I should say I'm pretty happy with the zip on my jacket too - it might be time to branch out from invisible zips!)

Here's the side / back view:


All up I'm happy with this outfit - not perfect, but pretty good.  And even though I don't think the skirt style does my thick waist any favours I'm considering this skirt pattern as a contender for the upcoming Sydney Frocktails - that's crazy though, isn't it?


See you soon

Gabrielle xx

Thursday 12 January 2017

New Year's Resolutions 2017

Happy new year everyone - and I hope your 2017 is off to a promising start!

I don't really believe in new year's resolutions so I don't have any general "life" resolutions for 2017. In the weeks before Christmas I was talking to a colleague, and she claimed using a theme for the year had worked well for her over the past few years - so if I can think of a useful and not too annoying theme I guess I might try this.  Her example was that in 2015 she'd used the theme of "yes" to force herself to get out and socialise more, and to take on new work challenges: she said "yes" to invitations and requests instead of saying "no" by default. I'm not sure that I would be able to stick to a theme for the year though...

On the sewing side it's a bit easier.  I do have sewing resolutions, but they're easy to remember because they're things I already think about ALL year:


Finish off more WIPs and UFOs

I'm pretty sure I always say this, don't I? In 2016 I did manage to get through a few UFOs (unfinished objects), but the list remains very long - and it's crazy long when I add in the WIPs (works in progress).

I'm going to embarrass myself by publishing the list here, and hopefully that will give me the impetus to either finish things off or get rid of them. Oh and if I come across any more (which is highly likely) I'll add them to the list later:
  • Floral modern McCall's dress (Gail's fabric as seen in colleague's Zara dress)
  • Blue and white striped shorts (Vogue / self drafted)
  • Khaki shorts (Vogue / self drafted)
  • Blue and white floral vintage dress (McCall) in 80s fabric - donated to charity with unfinished seams
  • Cream lace and wool vintage dress (McCall)

  • CR dark blue dress to skirt 
  • Khaki wool tie jumper (Vogue)
  • Donna Karan blue wool jacket in Tessuti boiled wool
  • Child's music bag - donated
  • Lined black crepe dress (Tessuti Gabby dress as base)
  • Teal and white swimmers McCall's
  • Wrap Vogue DKNY dress (muslined)
  • Fitted Vogue button front dress (muslined)
  • D&G vintage Vogue midi dress - blogged here
  • Fitting alterations for DD's dress
  • Jeans from Vogue designer pattern (muslined)

Blog more regularly 

My blog posts were very infrequent through 2016, and each of those infrequent posts took ages to write, but when I was writing daily posts at the end of December to try to catch up on some of my unblogged garments, the posts got written really quickly - in other words it shouldn't take me that long!  So my aim this year will be to blog more efficiently - take photos before starting to write, and don't overthink the words!

Here's the list of finished garments from 2016 or earlier that I still have to blog - I am still so behind:

  • Butterick floral bomber jacket blogged here
  • Big denim skirt (Vogue Nicola Finetti) blogged here
  • Frocktails dress (Vogue Kay Unger)

  • School uniform Tessuti Libby skirt  
  • Merchant and Mills Bantam singlet 
  • Vintage Vogue cropped stretch top with peplum
  • Pale pink Vogue cocoon dress blogged here
  • Old fashioned school girl costume (vintage pattern mash-up)


  • Genoa tote (Blogless Anna) 
  • Princess dress for niece's bat mitzvah (vintage pattern)
  • Vogue button front linen shirt with short sleeves  blogged here

I was also intending to blog about the following, so we'll see if I can catch up on these posts too:
  1. Liebster awards
  2. Pants crotch curve comparisons
  3. Inari dress adjustments (blogged here with a new stretch viscose Inari dress)

Be conscious of the treasures in my stash and buy less

My huge stash is currently stored in plastic tubs (the fabric) and filing cabinets and boxes (the patterns), and sometimes I forget exactly what I already have. I'd love to be able to track everything in a spreadsheet, but I'm not prepared to invest the time in listing all my fabric and patterns.  I've tried using Evernote and a few other apps on my phone, but I only managed to get a small proportion of my stash loaded, and my mobile phone has recently started complaining about too much of the storage space being used. For fabric tracking I like Christy's idea of snipping little pieces of all the fabrics and clipping them together so I can see them all, but pattern tracking with minimal effort escapes me.  Even without a means for tracking patterns, there is hope: we're planning to renovate the study / sewing room soon, so hopefully with clearly defined storage and work spaces I'll (1) cull my stashes and (2) be able to see what I have more easily.

This piece has finally been used for a vintage Vogue top - yet to be blogged


Reply to blog comments, and comment on other people's blogs 

This one is getting harder: I changed to a more demanding job in June, then went full-time in October, and my free time has become quite limited. My drive to create is still really strong, so when I do have free time I tend to want to get cracking on sewing things. I'm sorry!


Donate or alter clothes I don't wear

Hard.  I did manage to alter a Tessuti Gabby dress into a top this year (not blogged; it was my Picnic Dress Gabby), and I also managed to donate plenty of clothes to the second hand store, but I have to admit I hate alterations, and I'm a hoarder by nature.


=========================


And finally, just to add to the lists, here's my current sewing wish list:

  1. Cropped Vogue top to go with big denim skirt
  2. Jumpsuit (shorts) 
  3. Loose shorts  
  4. Striped pants and top eg Tessuti Chloe pants + Ruby top
  5. Wide legged pants
  6. Atelier Louise sandals - in progress
  7. Tessuti Ruby dress
  8. Carrot leg pants eg Burda
  9. Pattern Fantastique Falda jacket
  10. StyleArc Gabby jacket
  11. More swimmers for DD, me - swimmers for me completed
  12. Rashie tops 
  13. Ralph Lauren 80s pattern
  14. Squirrel D&G dress
  15. Linen shirt for DS
  16. Vintage (80s?) kimono sleeve dress
  17. StyleArc Mary dress
  18. Frocktails Sydney outfit - completed, blogged here
  19. Pencil or fitted wrap skirt for work - completed
  20. Fun clothes for DD

Phew - lots to keep me busy!

See you soon


- Gabrielle xx

Related Posts Plugin for WordPress, Blogger...