Sunday 29 April 2012

A Heavily Modified Koos (V2971) Top

V2971, a Koos Couture by Koos van den Akker pattern, was one of the patterns I was trying to give away earlier this month.  I was a bit surprised not to have any takers for it, so decided I should have a go at it myself and see if it was a 'worth it' pattern or not.  On close examination of the line drawings I thought the top would need modification for my body shape (looks to suit broader shoulders and a larger bust) and that the skirt looked an interesting shape (ignoring all the trim, which is not my cup of tea) but time consuming to make.

I opted for the top. Here's the final result:


and this is how it looks with ties undone (+ an odd filter applied in Picasa for seam highlights):


You'll probably see me wearing this top soon in Me-Made-May '12, which is why I've not bothered presenting you with a self-portrait...

FYI this is how it looked on the pattern envelope - unprepossessing, to be honest!


 but on the Vogue patterns website there's this close-up:


and ooh - I see I missed something! So my top is not finished - there's a 2cm piece of stitching still required!


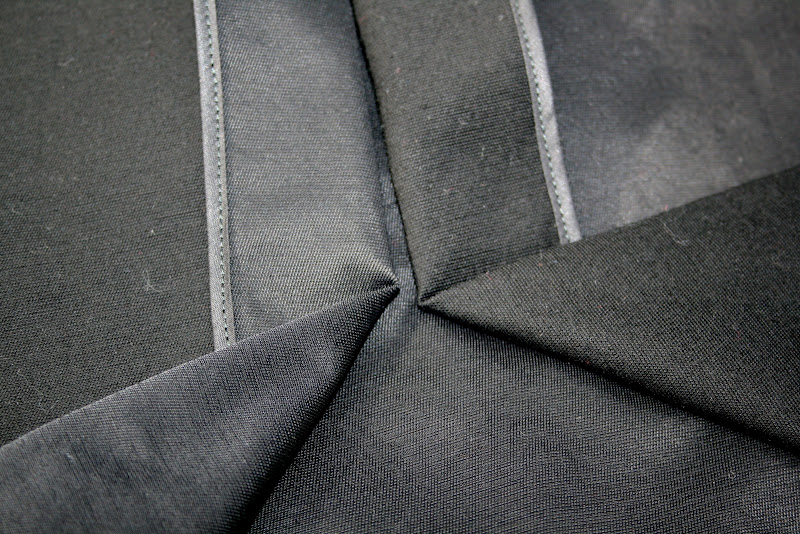
Anyway, as is, this is my favourite part:


and right nearby, this is my least favourite - I don't particularly like gathers on the sleeve cap of a stretch top, but as the owner of the obviously flawed modifications I take full responsibility:


I made so many changes that it seems only fair to show the original and modified pattern pieces.  My modified version is on the white tissue paper; the brown tissue is the original V2971 pattern pieces.
  • changes to the back neckline, shoulders and arm scye, including new darts below the shoulders:


  • changes to the front shoulders, arm scye and bodice width - but removing bodice width also affected the length of the ties. Mine aren't quite long enough to do up at the back:


  • changes to the shape of the sleeve cap (and sleeve length, not shown):


If you're thinking of making this top, it's probably also worth mentioning that the sizing seems large. Normally I'd make a size 12 in tops, and this is a stretch fabric pattern (ie the sizing should already take stretch fabric into account - but perhaps it doesn't?) but a size 10 was a good fit for me, even with that large amount of width taken out of the front pattern piece.

Overall I like the fit of this heavily modified pattern, and I like that this top cost me peanuts - I think the pattern was $4, but the fabric (Lyocell I think) was left over from a project a long time ago (therefore free), as was the white thread. I don't know how useful it's going to be, but I guess it's a bit of variety for my wardrobe!


I'll try to get around to writing a proper review over at Pattern Review as there were a couple of steps in the pattern that I ignored and did my own way. If you're thinking of making this top please feel free to email me - I made notes on the pattern instructions as I went and I'll be happy to pass those on.


Friday 27 April 2012

Me-Made-May '12 + My Wardrobe tab


I'll be taking part in Me-Made-May this year - although I know the weather will probably be chilly and so I'll have fewer homemade efforts available to wear than in summer. Somehow I always sew too many warm weather clothes and not enough of the cosy stuff!  Since work is insanely busy with my manager on 5 weeks leave, my parents are both still recovering from illness / operations, and my kids are running around yelling a lot these days, I'm not going to promise more than 1 item per day. I will be aiming for 10 items per week though, including me made items worn by any family members that prove amenable to coercion (probably only the youngest family member).

 Photobucket

I, Gabrielle from 'Up Sew Late' do hereby sign up as a participant of Me-Made-May '12, and will endeavour to wear 1 me-made item each day for the duration of May 2012.  If through lack of sleep or brain fog I am unable to wear a me-made item on any given day, I will catch up by wearing two me-made items on the following day.  I will also attempt to coerce family members into wearing me-made items in May 2012, withe the aim of reaching 10 me-made item wears per week.

I don't intend on blogging about what I'm wearing every day but I will try to do a few roundup posts during May. I'll probably be posting my proof photos on the MMM group on Flickr...but there's also going to be a Facebook place to hang out and chat in a Me-Made way :-)

Last year these were the photos that summarised my self-stitched wardrobe:

t-shirts

casual skirts

dresses
more dresses


long sleeve tops


skirts, a pair of pants and a jacket
work / play tops

work tops

But what awful photos! 

This year to help myself review what's in my wardrobe I decided to put together a visual summary of my me-mades, which will sit in a new tab (up in the top left hand side) called "My Wardrobe". I'm late to the tab party, aren't I!  Here's the work in progress if you're interested. I will be adding links from the photos to the original posts, and I'll probably rearrange the photos - maybe by season, or colour, or even by wearability - what do you reckon? 


Tuesday 24 April 2012

V1282 Donna Karan Fitted Skirt + A Winner

The weekend before last I did some proper sewing.  I made a new Vogue Donna Karan skirt!


This is a very fitted skirt... VERY fitted! But it doesn't feel overly tight on. This is a straight size 14 - my usual Vogue skirt size... the waist is generous and elasticated so you can pull the skirt over your hips without having to trouble with the tedium of a zipper :-)


My first thought on trying this on was "sausage skin".  But that was unkind to the skirt, which is really quite lovely! And although it's snug, the cut fits better than those snug stretchy skirts in the shops.


Despite the Donna Karan moniker, this was not a particularly onerous sewing task. And have I mentioned it's really comfortable? No? Not yet?


There are pleats and tucks, but they don't take too long! 


I made just one (unintentional) design change - somehow I thought there was supposed to be a contrast panel down the back! Turns out I like it. In any event to fit the pattern onto my (cotton elastane) fabric I had to cut the back piece out upside down, and my fabric had distinctly different sides. It's not too obvious a contrast, and it may even trick the eye of the beholder into noticing the vertical lines rather than the contours on the horizon!

Oh - but you can't even see it in this photo:


This shows the contrast better:

back (before hemming)
front (before hemming)
You can see it here too (thanks kids - how about a photography course for your birthdays?):


And even though this was a straightforward piece of sewing, I learnt something... Hong Kong seam finishing!


I simplified the job a little from the instructions. Instead of making my own bias binding from leftover skirt fabric (which didn't sound like a fun way of playing with stretch fabric) I used some black cotton bias binding I already had - and sewed it on while slightly stretching the skirt fabric with the hope it should have enough give when the skirt fabric stretches.


Why did I put this off for so long? It looks so neat - and it was easy too!

So if you've been considering this skirt, I say go for it! It's snug but comfortable, straightforward to make, and you can choose whether or not to flaunt your curves by the length of top you wear with it.

******************************************************

Finally, for those of you waiting to hear, the winner of my pattern giveaway is Bernice. Thank you to those who took part, and congratulations Bernice! V8554 and V1236 will be wending their way north shortly - and I'll be contacting some runners up to see if they're still willing to provide homes for the other patterns.  

Monday 16 April 2012

Blocked Silk and Jersey

The other day when I walked through the turnstiles into work I saw a woman ahead of me wearing a striking little blue top with her boring black business skirt. The top had cute short sleeves, the sort that look most fabulous on young arms, but the thing that most intrigued me was the way the top was blocked with two different fabric types - a more solid fabric on the upper part of the bodice (and sleeves), and a more lightweight, drapey fabric in a similar colour on the lower part of the bodice. It was so intriguing that I hustled over quickly and then walked just behind her all the way to the lifts so I could get a good look at it. Bad manners! Anyway, I came home inspired... and that's all that matters! (No, just kidding, and I hope I wasn't making that poor woman feel harrassed.)

Putting that inspiration together with what was in my stash and also with some more net-a-porter ideas (see below) I decided to whip up another version of the silk satin polka dot top in a combination of something ancient that I hope is silk plus a cosy sort of jersey.

Nice job of posing by the hedge...


Posture!  Don't tip over!

The (possible) silk was only just enough for the top 1/3 of the top, only as far down as the armhole band (which is sewn on the inside of the top).  I had such a small amount of this, and not even cut with parallel edges grrrr. Don't you hate that?

For the bottom 2/3 of the top I used some jersey that's a lovely colour and drape, and that coordinates really well, but that looks like it will pill in an instant - if I could only recall whether it was from Lincraft or Tessuti I'd be able to make a better prediction! I still have so much more of this jersey fabric that I'm  considering extending the top into a dress :-). I'm thinking of an elastic casing at the waist and a gathered rectangular jersey skirt (well this Tracy Reese pattern is the one that sprang to mind). If I were to do this I'd have to sew a slip though as the jersey is quite light and a tad transparent. 

The silk and jersey played together very nicely despite their different characteristics
 
Do you think this looks like silk?

I'm reasonably satisfied with this top - it came together as I thought it would - but it's not at all the same as my original inspiration top. Stylistically I think the change in fabrics should be happening higher up the bodice, but I hadn't wanted the little sleeves to be two toned. So perhaps I should have though this through and made narrower sleeves. Oh well - you live and learn!

I'll leave you with a couple of the professionally colour blocked tops:

Camilla and Marc via net-a-porter
Gucci via net-a-porter


and if you like the top on the right, make sure you check out Audrey's summery Creamsicle colour blocked top

Finally - don't forget, I've got a pattern giveaway on at the moment - please do enter if your pattern stash isn't too full! Entries close around this time on Tuesday night (ie 48 hours away).

Friday 13 April 2012

Pink Silk Polka Dot Top (+ Giveaway Reminder)

Recently I've been noticing a lot of sweet little blocky tops with rounded necklines and short kimono style sleeves. They look so wearable. I WANTED ONE!

Here are some upmarket examples:
Exhibit 1 by Day Birger et Mikkelsen
Exhibit 2 by Thakoon

That shape just looks so simple to make! 

So here's what I made - as it looks in daylight - same kind of shape, right?


There's a bit of puckering in the top stitching around the neckband - my tension was just a little off.

I used view A from this little specimen from the Butterick Classic era. You could draft something yourself though - it really is a basic shape.


My neckline is more rounded and a bit lower than my inspiration tops, but I'm happy with the way it looks.

* these photos taken inside in the evening with not enough light and accordingly lightened in Picasa

I need to work on smiling for the camera
 
and on looking AT the camera!

No circus tricks were required to make this top

My son says if you don't know about smiling for the camera, chop your head off

Steeling myself to do a better job with the ironing - maybe tomorrow

Giveaway Reminder
I had a problem with blogger last week and my award / giveaway post didn't seem to make it through most of the usual channels. So in case you didn't see my post last Tuesday, I'm running a giveaway - with the chance to win 3 patterns of your choice from a selection of new and old Vogue, Butterick and Simplicity patterns. Entries close next Tuesday, and at the time of writing there is just 1 entry - the odds are looking fantastic!

Wednesday 11 April 2012

Inspiration from Barbie?

In case you came here expecting a serious essay, I apologise in advance. I'm not really a Barbie fan but I just don't have the energy to get my anti-Barbie thoughts lined up properly. Anyway, this blog is about sewing. And this post is about small scale sewing.


So
  • My daughter loves Barbie. But she also loves every other shape, size, colour and age of doll. And she knows that Bratz dolls look wrong.
  • Barbie has a lot of seriously inappropriate (eg falling off her boobs) clothes, since this seems to be all she can get at the shops. In this respect she seems to fare worse than other dolls.
  • Barbie's tarty wardrobe can be replaced over time - using a tasteful vintage trousseau pattern*, of course. 
I present by way of supporting evidence Item 1, the Liberty-Linen frock.


Here's the spiel:

A modest dress that masquerades as top and skirt, this dress is made from the most delectable of scraps - Liberty Tana Lawn coupled with Italian linen - and fastens with 3 darling old-fashioned press studs. A sure-fire winner with mothers and daughters alike, this dress can be used in true-to-life 'Barbie goes to the office' pretend play.


Further supporting evidence is seen in Item 2, the chic coordinating linen dress and jacket:


From the jungle to the office, this classic ensemble of sheath and jacket in graphic Italian striped linen cuts a swathe through the competition. 
"That smart girl bonus? Yes, I'll take it!"
Just another day in the life of the trousseau collection...


All joking aside, I do think these little outfits are very smart, and I wouldn't mind having them in my own wardrobe. (Hey Big 4, how about it?)   And I do love this striped linen. It's left over from a now lost dress made some 20+ years ago, and still crisp and clean looking. Lucky Barbie - there wasn't enough fabric for even a small person.

This is the pattern used:


I have been under pressure to make the wedding / party dress with a full skirt next, but that will have to wait as adult sewing swings into catchup mode - the weather in Sydney has switched back to winter mode and I don't seem to have enough warm clothes.

And coming soon - blog fixes (so that you can see all my posts, I hope, and take part in the giveaway if you want to!), and show-and-tell of some silk and jersey tops (for me) as well as a vintage pattern dress for my daughter.
Related Posts Plugin for WordPress, Blogger...