Showing posts with label trans-seasonal. Show all posts

Tuesday, 18 June 2013

Reddy, Steady, Go!

Is there anyone out there who really has pants fitting sussed?*

* If so please, please, please chip in and tell me how to fix these pants!  


These red pants were made in time for Me Made May, but by the end of May the pants were feeling a little less than awesome (sorry pants, not your fault. If I need to eat more chips to fill you out I will, promise).

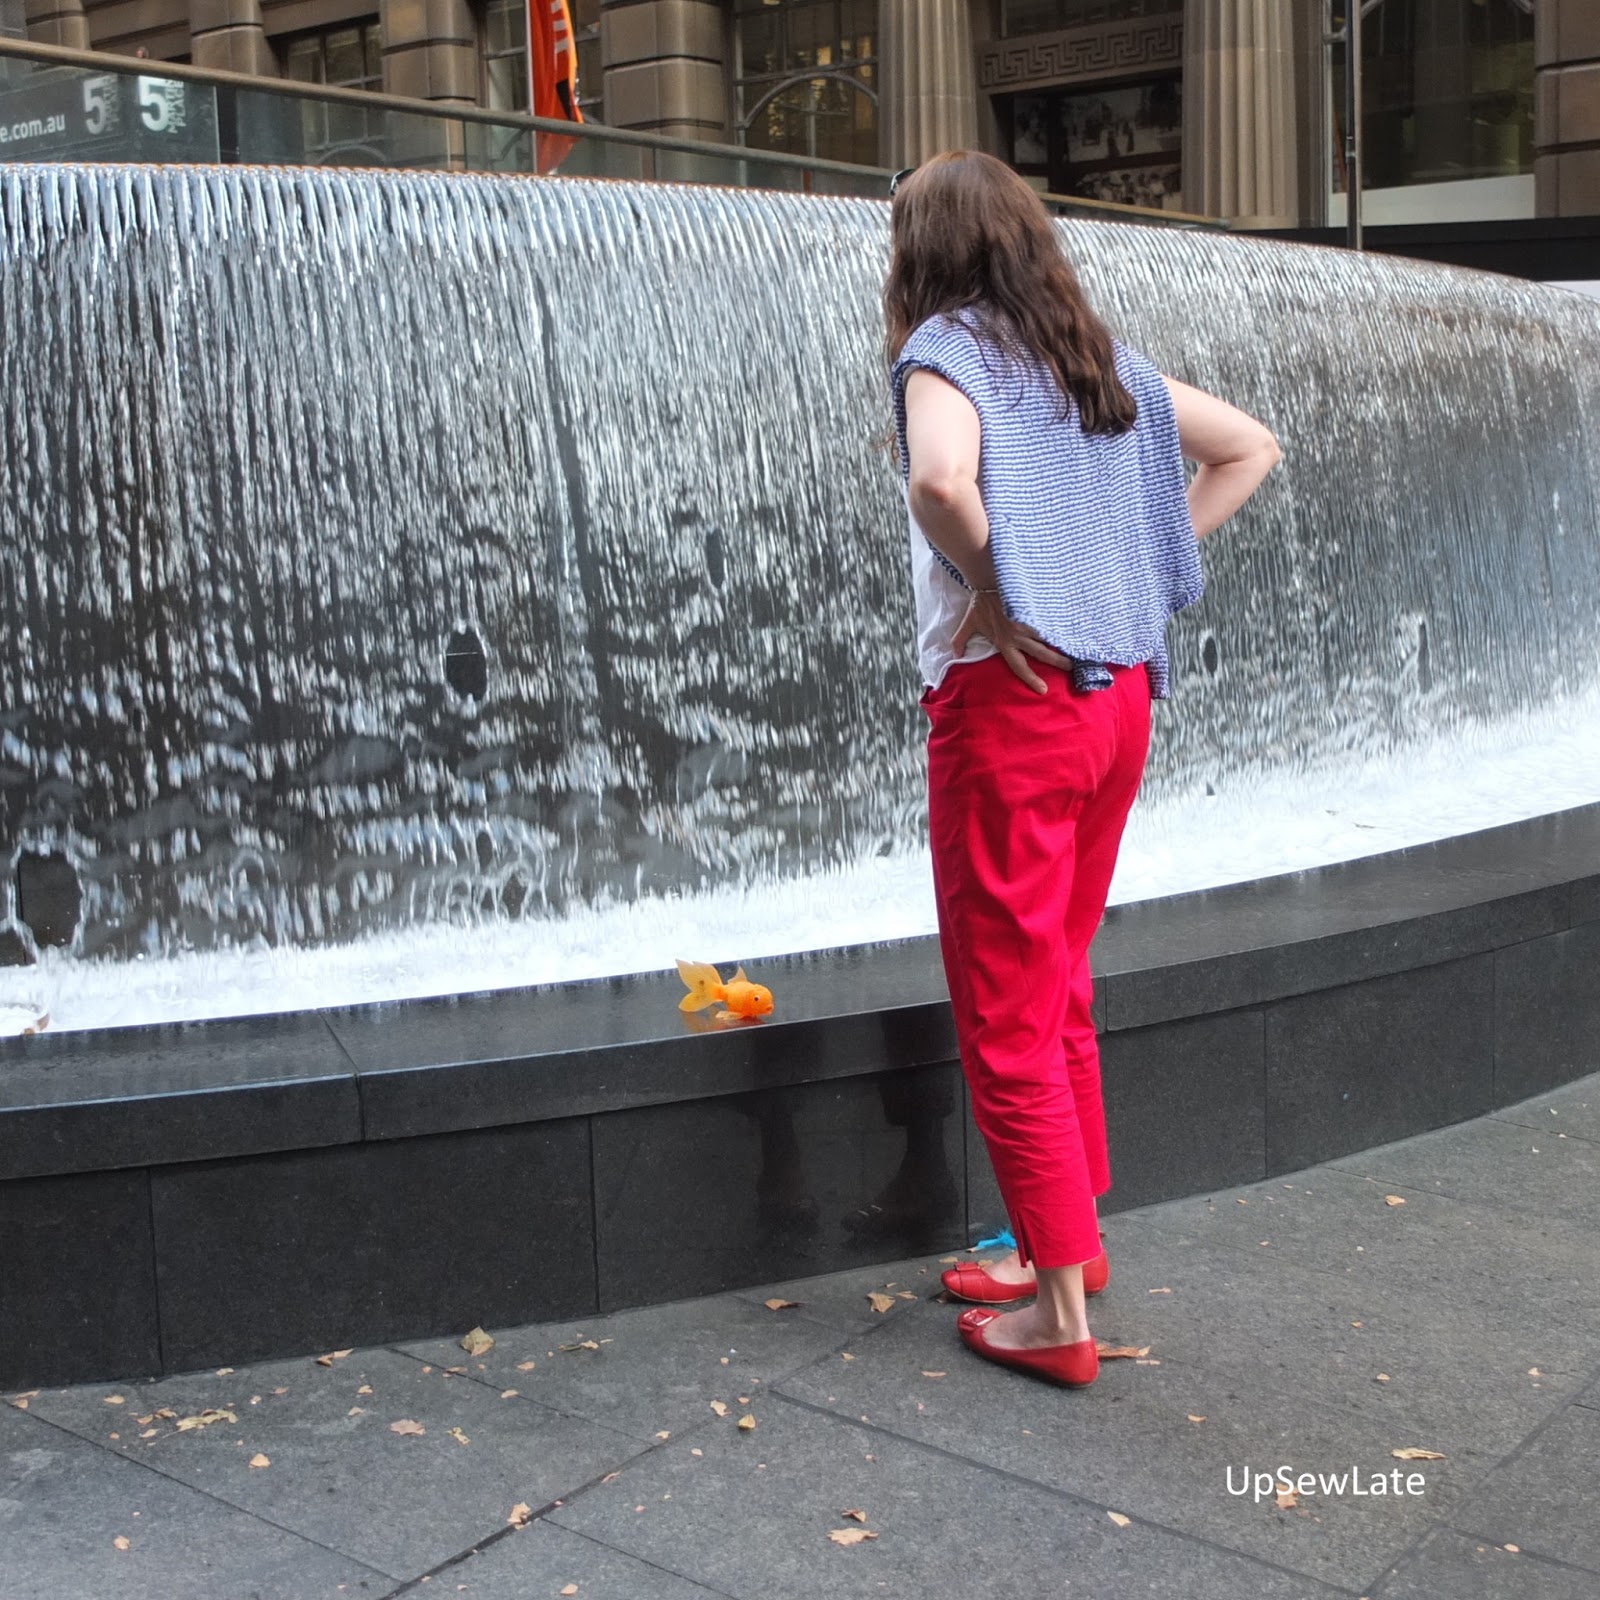
Although the pants looked OK to me from the front, my photos showed me there was some excess fabric in the back. And now that I've noticed, it's really bugging me :(


I have made three pairs of pants that fit well (here, here and here)... but all three were all made from the same pattern. And now that I'm using a new pattern, I'm thinking those pants fitting 'skills' were pure luck :). 
 

My new-ish red pants, made just in time for Me Made May, use Vogue 1293, an Anne Klein pattern for "Semi-fitted, tapered pants ...[with] contour waistband, carriers, side front pockets, fly front zipper, hem slit, and narrow hem."  The suggested fabrics are Linen, Crepe, and Dupioni, but I used a lovely stretch cotton from Tessuti fabrics (bought last year). Oops!


I muslined the pants in a vile pale blue shiny stretch fabric (no, there are no appalling photos). There was a truckload of excess fabric in the front (perhaps necessary for non-stretch fabric) so I removed a triangular wedge, widest at CF and tapering to nothing at the sides.  I adjusted the pocket pieces to take out this wedge too. I removed a smidgen of length from the waist at the centre back to make the waistband stay level all the way around, and removed some width from the side seams to make them taper. 


Then I sewed them up in my lovely red fabric, with organza strips stabilising the pocket openings. The pocket bags are cute polka dot rayon, but I've misplaced the photos. I love how neat the fly looks, even if I do say so myself...


When I wore these new pants in early May I thought they fitted me really well, and I was really pleased to be part of the red pants trend. The photos make it very clear there's still work to be done, but interestingly (and GOOD news) the fit is a million times better than that of my two favourite pairs of RTW pants:

Exhibit A - look at those folds of fabric!!


and Exhibit B - look at the unintentional harem effect!
 

With all this room for extra luggage, do I even need a handbag?  

Hmm, but seriously, I would like to improve my pants fitting skills - I want to make this pattern again in an even louder fabric, but I'm holding off till I know how to correct the problems. If you have some advice - nothing nasty, mind - I would really appreciate hearing from you!

Thank you!

- Gabrielle x

Saturday, 13 April 2013

Love My 'Lisalex!

 Ta daaaa - my Elisalex dress!

Is it a bird?  Is it a plane? No?? What then?
I'm sure you've already heard / seen for yourself the gorgeous By Hand London patterns - such a delectation compared to the Big 4! The Elisalex dress pattern comes in a pretty blue box, and includes a By Hand London label to stitch into your dress, the pattern tissue and an instruction booklet. The instructions were a bit sparser than I'd expected, but were really nicely illustrated - and it's not a complex construction so most of us wouldn't need more details. The pattern tissue is very lightweight and includes all sizes, but I found the print lines for the different sizes hard to distinguish.


I think you can tell... I like this one!

Finished about 2 weeks ago, then waited for ideal weather, and procrastinated on ideal locations. And after all that you're getting the same late afternoon balcony shots as usual and an unimpressive skyline - sorry!
 

I like the front view of the dress. I was aiming for very fitted in the bodice, but went a bit far with fitting in the bust - too tight! It's good to see how the other half lives occasionally isn't it?  The waist looks but doesn't feel too tight.


oops -  pulling it


Side view - and yes, you can walk in a tulip skirt!


There IS TOO room for striding

I don't know what my fabric is apart from an interesting Tessuti remnant, but it's definitely man made and unforgiving. Lots of mean puckering when I tried to speed up the seams, and any unpicked stitches left permanent scars. Plus I don't think it likes being ironed... On the plus side it's quite a glam fabric and quite a strong one, and the dress can pretty much stand up on its own if I run out of coat hangers or something. And I love that it holds the exaggerated skirt shape so well!  On the negative side the back view of the dress is not great - I inserted a hand picked zip but the fabric was really tough on my hand sewing needle and I must have been pulling the threads too tight. I may go back and redo this...what a mess!


I'm a bit shocked to tell you this was my first ever purchased independent pattern. Accordingly I was pretty cautious: I meaured the paper pattern (as well as myself) and made a muslin before attacking the real fabric. But the fit of my calico muslin was so different to the fit in my fashion fabric though that I had to make lots of new adjustments in the fashion fabric. \ ^..^ / 

Starting with the paper pattern, I used the sizes recommended based on my measurements. The skirt pattern pieces looked terrifically long so I measured them against myself before removing 10cm (I'm about 173cm tall, with most of my length below the waist, so I guess the pattern is designed for very, very leggy ladies...). To keep the exciting tulip shape I took this length out about 2/3 of the way down the skirt, in the section where the tulip was starting to narrow.  Interestingly the hem turn up doesn't get factored into the side seam shaping - so I took in / reshaped the side seams from hem level to about 15cm above the hems to avoid having to create hemline pleats.

In muslining the bodice I only made a very minor reshaping of the princess seams to fit my (smaller) bust. However in the very unyielding fashion fabric I had excess fabric above my bust and at the sides of my bust. To correct these issues I shifted the centre bodice piece upwards slightly against the side bodice pieces, and to made deep side darts which I then rotated into the princess seam going into the arm scye. These cunning moves worked reasonably well (although the bodice now looks too tight), but affected the front bodice shape of the arm holes. Luckily I didn't have to do any post muslin adjustments in the back.


Overall I'm really happy with this dress pattern and I am definitely thinking to make it again - with sleeves and a bit more ease. Love my 'Lisalex!


Friday, 15 March 2013

Work(ing) the Skirt


Here's my newest skirt, unwinding on the deck with the red shoes after a day at work...


Turns out even a basic ponte skirt feels a bit rumpled after being subjected to the cold, then warmth, then humitity and rain, and (the final straw) unexpected exercise including a near nobbling by an allied umbrella.

This little skirt is an incarnation of Vogue 7333, a "Today's Fit by Sandra Betzina" pattern. Though the pattern is new to me it dates back to the year 2000, when hemlines were apparently down to mid or lower calf - I had to hack a fair length off to meet this year's corporate dress guidelines.


I always find the Sandra Betzina patterns to look a bit daggy (does that mean I'm not their target market?) so I was a tad worried I'd end up with a daggy skirt. Count me pleasantly surprised!

V7333 is a straightforward pattern with optional diagonal seams on the front skirt ("opportunity for embellishments") and the choice of a waistband or none. I'm not really big on embellishments where there's no duress (that's why my daughter gets them), and I'm short waisted, so I chose the most minimal version.


The skirt has double darts front and back (4 in the front, 4 in the back), which is all about sharing the load (otherwise known as the tummy). Somehow this works without being too obvious.  And what this means is that the skirt feels really comfortable on and doesn't re-enact a whirlpool as you walk.

My fabric is a thick black ponte di roma, bought last year at Tessuti Fabrics. It's stretchy but hasn't sagged after being sat on at work. It's a good weight of fabric for the skirt, and my overlocker loved it.  Oh, and it seems to have amazing light-absorbing skills.


Conclusion: Don't judge a book pattern by its cover! I'm really pleased to have found a basic skirt pattern that fits my post-childbirth proportions, so you may be seeing this pattern again in more adventurous fabrics.


Apologia:
Sorry it's so hard to see the details in the above photos. I took lots of close-ups when the skirt was resting with the shoes, but then my camera card died in the middle of uploading to the computer and all photos not already uploaded have gone. I did consider taking new late night photos - but the details aren't all that scintillating really.

Sorry for the long gap between posts! I've got another finished garment, a dress - much more exciting than a black work skirt - but I haven't yet taken photos! Maybe this weekend?

Sorry Hazel for taking so long in passing on the award and answering your questions... sorry, sorry, sorry; I don't have a good excuse.

Excitementia:
Got my Elisalex pattern in the mail today - and the packaging is just so gorgeous that I am now convinced this pattern will give me the most gorgeous dress in the world!  

Sunday, 29 April 2012

A Heavily Modified Koos (V2971) Top

V2971, a Koos Couture by Koos van den Akker pattern, was one of the patterns I was trying to give away earlier this month.  I was a bit surprised not to have any takers for it, so decided I should have a go at it myself and see if it was a 'worth it' pattern or not.  On close examination of the line drawings I thought the top would need modification for my body shape (looks to suit broader shoulders and a larger bust) and that the skirt looked an interesting shape (ignoring all the trim, which is not my cup of tea) but time consuming to make.

I opted for the top. Here's the final result:


and this is how it looks with ties undone (+ an odd filter applied in Picasa for seam highlights):


You'll probably see me wearing this top soon in Me-Made-May '12, which is why I've not bothered presenting you with a self-portrait...

FYI this is how it looked on the pattern envelope - unprepossessing, to be honest!


 but on the Vogue patterns website there's this close-up:


and ooh - I see I missed something! So my top is not finished - there's a 2cm piece of stitching still required!


Anyway, as is, this is my favourite part:


and right nearby, this is my least favourite - I don't particularly like gathers on the sleeve cap of a stretch top, but as the owner of the obviously flawed modifications I take full responsibility:


I made so many changes that it seems only fair to show the original and modified pattern pieces.  My modified version is on the white tissue paper; the brown tissue is the original V2971 pattern pieces.
  • changes to the back neckline, shoulders and arm scye, including new darts below the shoulders:


  • changes to the front shoulders, arm scye and bodice width - but removing bodice width also affected the length of the ties. Mine aren't quite long enough to do up at the back:


  • changes to the shape of the sleeve cap (and sleeve length, not shown):


If you're thinking of making this top, it's probably also worth mentioning that the sizing seems large. Normally I'd make a size 12 in tops, and this is a stretch fabric pattern (ie the sizing should already take stretch fabric into account - but perhaps it doesn't?) but a size 10 was a good fit for me, even with that large amount of width taken out of the front pattern piece.

Overall I like the fit of this heavily modified pattern, and I like that this top cost me peanuts - I think the pattern was $4, but the fabric (Lyocell I think) was left over from a project a long time ago (therefore free), as was the white thread. I don't know how useful it's going to be, but I guess it's a bit of variety for my wardrobe!


I'll try to get around to writing a proper review over at Pattern Review as there were a couple of steps in the pattern that I ignored and did my own way. If you're thinking of making this top please feel free to email me - I made notes on the pattern instructions as I went and I'll be happy to pass those on.


Tuesday, 24 April 2012

V1282 Donna Karan Fitted Skirt + A Winner

The weekend before last I did some proper sewing.  I made a new Vogue Donna Karan skirt!


This is a very fitted skirt... VERY fitted! But it doesn't feel overly tight on. This is a straight size 14 - my usual Vogue skirt size... the waist is generous and elasticated so you can pull the skirt over your hips without having to trouble with the tedium of a zipper :-)


My first thought on trying this on was "sausage skin".  But that was unkind to the skirt, which is really quite lovely! And although it's snug, the cut fits better than those snug stretchy skirts in the shops.


Despite the Donna Karan moniker, this was not a particularly onerous sewing task. And have I mentioned it's really comfortable? No? Not yet?


There are pleats and tucks, but they don't take too long! 


I made just one (unintentional) design change - somehow I thought there was supposed to be a contrast panel down the back! Turns out I like it. In any event to fit the pattern onto my (cotton elastane) fabric I had to cut the back piece out upside down, and my fabric had distinctly different sides. It's not too obvious a contrast, and it may even trick the eye of the beholder into noticing the vertical lines rather than the contours on the horizon!

Oh - but you can't even see it in this photo:


This shows the contrast better:

back (before hemming)
front (before hemming)
You can see it here too (thanks kids - how about a photography course for your birthdays?):


And even though this was a straightforward piece of sewing, I learnt something... Hong Kong seam finishing!


I simplified the job a little from the instructions. Instead of making my own bias binding from leftover skirt fabric (which didn't sound like a fun way of playing with stretch fabric) I used some black cotton bias binding I already had - and sewed it on while slightly stretching the skirt fabric with the hope it should have enough give when the skirt fabric stretches.


Why did I put this off for so long? It looks so neat - and it was easy too!

So if you've been considering this skirt, I say go for it! It's snug but comfortable, straightforward to make, and you can choose whether or not to flaunt your curves by the length of top you wear with it.

******************************************************

Finally, for those of you waiting to hear, the winner of my pattern giveaway is Bernice. Thank you to those who took part, and congratulations Bernice! V8554 and V1236 will be wending their way north shortly - and I'll be contacting some runners up to see if they're still willing to provide homes for the other patterns.  

Related Posts Plugin for WordPress, Blogger...