Monday 30 September 2013

Fruit Break: 1970s Cotton Dress


While I was going through my stash trying to decide what I could bear to part with for my upcoming giveaway, I came across a metre of this interesting, fruity cotton seersucker. I recall buying it a few years ago from Lincraft, mentally earmarking it for a dress for my daughter - but then I forgot.  So I decided to make hay while the sun shone - and while a metre was still enough - and whip up a shoulder-friendly 6 year old's dress.


I used a cute little pattern that I assume I must have come across in a second hand store a while back as lately I'm not coming across too many patterns I particularly like. The 70s silhouette doesn't appeal to me for myself (not sure why not - when I see it on other people I like it!) but I love it for kids. The pattern is a size 12 though, so I had to grade it down to a size 6.  By "grade" I mean that I placed it against the Burda dress pattern that I recently muslined (see, it was worth it!) and re-drew the pattern so that the shoulders, armholes, chest width etc aligned.


I added side seam pockets, an essential for a play dress, and kept as much length as I could with the constraints of my single metre of fabric. A ruffle on the bottom would have made it better too...


If you come across this pattern and decide to make it, the pattern instructions don't seem fantastic. I followed them to start with, but the steps they describe give an unnecessarily messy finish on the inside (not photographed) - the seams where I was doing what I was told are not concealed between bodice and facing as I think they should be. It's annoying, but then this is just a kids dress that will probably get trashed over summer :).


The shoulder ruffle was very popular in the 70s: I know I used to wear this shape of dress when I was knee high to a grasshopper or thereabouts. Cotton seersucker was pretty popular too. So I think this little dress will be joining a couple of vintage sewing challenges, just like my 1940s dress (TMS and Fall for Cotton).


See you soon

     Gabrielle x

Friday 27 September 2013

To the Gallery: 1940s Cotton Dress


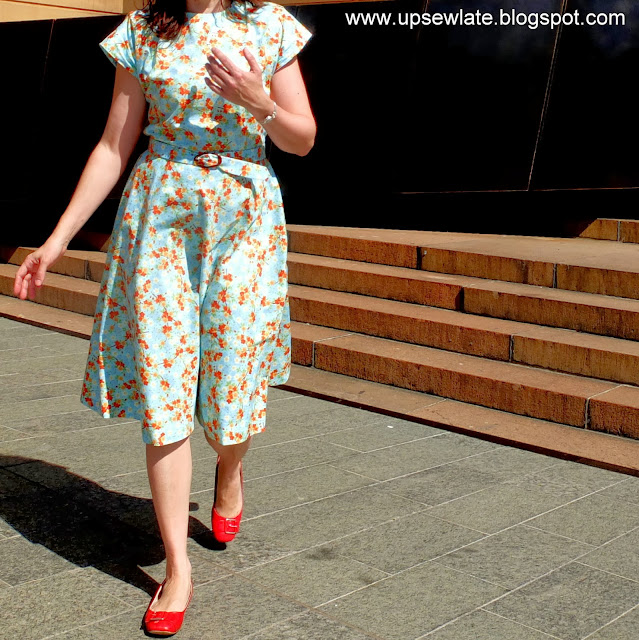
Ta da! Here's my TMS vintage effort for the month of September - and also my Fall for Cotton entry (is that a bit cheeky, or super efficient?!).


Not sure if you can see any details - it's quite a plain little dress; a very simple 1940 silhouette courtesy of Vogue 8811, - but we were having such a hot, bright Spring day that my outside photos were a bit washed out (I've darkened these significantly).

I originally made and blogged about this pattern last year (back here) as a crunchy, exciting pewter coloured taffeta, but that version only fits when I'm at my thinnest, which is not necessarily when I want to wear it. This version differs in more than fabric choice: I graded it up in the waist (necessity), left the neckline pretty close to the original pattern instead of scooping it out and adding a collar, and in the spirit of proper vintage sewing, made those shoulder pads myself from layers of cotton wadding with a darted fabric cover.


Can you guess where we took these photos? And by "we" I mean my kids... Well obviously it's a gallery, but this is the Art Gallery of NSW. Culture - and so much of it for free!


Naturally I wouldn't have had this smug expression on my face if I'd realised one shoulder pad was trying to break free... what a goose!

Ignoring the wayward shoulder pad, you may be able to see that the shoulder pads are pretty much just a reflection of my natural shoulder line.  I suspect now that they're supposed to give a slightly extended shoulder line - but I really don't know what's right for the 1940s.

I know I'm not showing you photos of all these details, but my back button is vintage, the press stud it's hiding is vintage, and the belt buckle is vintage (probably a different vintage, but it was the best match I had to hand). I have to say this is probably the worst belt I've ever made - I should've used something heavier than interfacing, I don't know what I was thinking. Maybe I'll make a new belt with some buckram inside it... And I don't know that this is a vintage feature or if I was just half asleep, but I didn't see instructions for any interfacing to be used apart from in the belt so that's the only place I used it - and of course in the belt it's completely insufficient.


The invisible zip which you really can't see in these photos IS pretty invisible and is modern, and the fabric is modern - Japanese quilting cotton from Lincraft, bought in a panic when I was trying to get this project done early. The fabric is (of course) cotton, and having pored over a bunch of 40s dresses on the internet and in books, I thought the floral pattern looked suitable for the period.  I've never sewn for myself with quilting cotton before, and I was worried that it would be too heavy or have poor drape. This particular cotton is lightweight and drapes well after a wash, but I don't know if it's going to have the longevity of a fashion fabric. I hope it does, because the dress feels lovely and breezy on a hot day, while still looking kind of smart.  


As you can probably tell, the weather was really hot - Aussie mid-Summer hot. Heaven help us if Summer is hotter than Spring this year; the bush fires have already started! 


So why did it take so long for me to make a simple cotton dress?

Well, the above dress is not the one I started out making.  I was originally trying to make this pattern:

click for source
I had the pattern in the right bust size, and I graded up for waist and hips. Then I made my muslin, and WOW the fit! It was absolutely appalling! There were a good 2 inches of what seemed like excess fabric in the front upper bodice, and another 2 in the back! Now I know I have narrow shoulders and a small bust, but surely the women of the 1940s didn't have such broad shoulders...

Without really knowing what 'good fit' was in the 1940s, I then spent a lot of time thinking instead of sewing. It was possible that the style of the time was for a lot of excess fabric around the shoulders and bust (hmmm maybe a bit of ease was considered stylish... but probably not this much), but another real possibility was that McCalls back then were known for their out-of-control vanity sizing (hey, maybe it was just as much of a hot topic then as now).

I pinned out the excess on my dress dummy, but then I got cold feet.


I've had this muslin on my dress dummy now for a few weeks, and I've decided that regardless of how authentic to the 1940s this fit is, I like it. I want to make it like this (but regular length) in a crepe or silk satin; something really drapey. 

Monday 23 September 2013

Princess Aurora

It was book week again recently (is it really only once a year??) and with nearly a week's warning, my daughter decided to dress up as Aurora (otherwise known as Sleeping Beauty). Her shop-bought costume from a few years ago was getting too small, so the order went in for a new costume - one that matched the dress in the book, and one that didn't have any scratchy bits. Here's what she ended up with:


And here's the "pattern" (really more of a design, isn't it?) I was asked to work from:


Surprisingly, my ridiculously large pattern stash didn't include anything that exactly matched this design... so this piece of sewing turned out to be an interesting little exercise in pattern modification and drafting:

Speaking of which, I REALLY need to have a giveaway soon - to pass some of my stash on! More on that later :)

We started by making a muslin using Burda 9534, the closest thing I had to the desired dress shape, to which I added a zig-zaggy peplum. This gave the Princess confidence that her slave mum knew what she was doing, so the Princess decorated her muslin and decreed it appropriate for Cinderella* dress-ups:


* that's Cinderella the drudge, not Cinderella at the ball

I love the decorations... wish I was brave enough to do this to my clothes!


Here's the tech drawing from the Burda pattern - which gave me a bodice, long skirt and long sleeves to play with:


I took a day of annual leave from work. Fabrics were hunted and gathered from Spotlight (I couldn't get quite the right shades of pink), and then the modifications to the muslin began:
  • changed the neckline from round to V-shaped
  • drafted a self-lined collar to extend to the width of the shoulders and sit a little above the dress (which meant a different shoulder seam shape)
  • lengthened the bodice for a lower waistline

  • re-cut the waistline from a horizontal to a V-shape, echoing the new neckline
  • modified my initial peplum to match the shape of the downwards pointing waistline and to include a self-lining
 

It worked so well from the Princess' perspective that I'm encouraged to start drafting a few little details for my own sewing projects!


**********

Now, if you've read this far, thanks for your attention - how about advance notice of a giveaway? I'm coming up to my 200th post and 3rd blog anniversary, so I want to hold a "shop my stash" giveaway to celebrate within my next few posts.  I'll either post photos here or on Pinterest of what's up for grabs - which may be fabric, sewing books or patterns - and you can comment to let me know what you want.

Friday 6 September 2013

1950s Jacket-Cape for TMS

When I heard about The Monthly Stitch* I promptly threw my hat in the ring - monthly challenges sounded feasible, and I was excited to mingle with a new-to-me group of sewists.  What's more, the August challenge was capes, and capes sound easy, right?

* Have you heard of The Monthly Stitch?  If you haven't, follow the link, go have a look (then come back for the show and tell). It's a similar idea to The Sew Weekly, but it's brand spanking new, it's monthly not weekly (d'oh) and - well, go have a look, join in, sign up! 

Here's my cape - goodness knows what my hands are saying, perhaps "it took me THIS long!":


It looks easy enough, but it took me ages!

Cape patterns weren't so much a problem as a distraction - I had too many lovely vintage cape patterns to choose from. Fabric was the next concern... your traditional cape devours fabric, and I wanted to sew from my stash. Since I don't usually buy huge cape-like quantities of anything I had to pick a pattern that would work with less.  


Vogue 2934, you look a reasonable sort of chap - not too demanding... Think you can wrap your head around working with this 1.85m Plaid fellow? 

     You'll do it?  - - Can I rely on you?


Excellent!  How soon can you start? 


Pattern and fabric started work that very evening.


The work was harder than anticipated, but with a jolly atmosphere, spirits remained high.


I used Vogue 2934, a reissue of a 1950 pattern - a loose, lined cape with a flared back, funnel neckline and dolman sleeves:  


Oh look, no wonder my sleeves are so long - I forgot to turn them up!

----

I started sewing a week out from the due date. My planning skills are appalling - there wasn't enough time! Luckily I was able to get a late pass from Mel, so I chugged away for a few extra evenings and handed it in about 3 days late.

In my defense, I did spend quite a bit of time matching the not-square plaids across fronts, backs, sides and facings.  It took a long time as I only just had enough fabric, but the resulting symmetry and plaid matching make me feel good:


Plus I had to learn how to make a bound buttonhole (woohoo!!! I even got the fabric in the bound section to line up!):


Had to? Well, from the experience on my cashmere jacket I knew that my machine wouldn't manage a regular buttonhole on 2 layers of wool and interfacing. All good though, bound buttonhole-making is a skill worth gaining!


I will definitely need to do a PatternReview of this pattern as I didn't think the instructions were particularly efficient - perhaps they were sticking close to the originals though. [For example, I like to bag my sleeve linings by machine, and this requires a change to the order of lining construction - don't sew the centre back lining seam first!] On the plus side, this pattern sews up a much smarter little cape than I was expecting - and the airy style means it's perfect for in-between seasons. 

Better go - roast potatoes and vintage pattern surfing are calling :)

See you anon
- Gabrielle x


Related Posts Plugin for WordPress, Blogger...