Showing posts with label wool. Show all posts

Saturday, 8 July 2017

Guy Laroche Top (Vogue 1450)


Vogue 1450 by Guy Laroche has been waiting in my filing cabinet for a few years... I love the Guy Laroche Vogue patterns, but they often look too "Fashion" when they're first released for me to contemplate them in my wardrobe.  I'm not sure if it's that the designer looks gradually filter down to the high street, or if staring at the designer patterns for a few years makes them eventually look more normal, but I've now made the top and the skirt is on the shortest of my "to sew" lists (the physical version of the list, where fabric is matched with patterns and piled next to my sewing machine - still no guarantee it'll be made though).


This top was designed for summer, but I thought it would look great in a cashmere-wool blend. Possibly that thought was triggered by the fact that I had a nice little cashmere-wool remnant in the stash, but does that even matter? My remnant was pretty short - just 0.7 metres long but 155 centimetre wide - but it looked to me as though the top could be squeezed out of that limited yardage despite the pattern's stated 1.8 metre fabric requirements.


I measured myself and checked the finished dimensions, and went down a size to a 10. I couldn't fit the length of the fronts on my 0.7 metres, so I also cropped the top by an inch or two.

It turns out that the 10 fits when I'm wearing the same lack of layers as when I measured myself.


In all these photos I'm wearing a warm singlet and a high-waisted skirt, and in some I'm also wearing a long-sleeved merino wool top, just because it's cold here at the moment.  With extra layers on, the top is definitely a bit snugger than I'd hoped, and I haven't tried it without layers... I think I need to have another go at making it in the correct size and length, as I suspect I'll love the larger version more than this one.  Bigger is better!


The Sewing Details
Pattern = Vogue 1450 by Guy Laroche:
Very loose-fitting top has asymmetrical snap closing, extended shoulder forming cap sleeves and bias (lining) binding finishing seams and facings. 

Fabric = wool-cashmere mix, a remnant from Tessuti fabrics, along with a small piece of magically coordinating silk also from Tessuti fabrics

So, although this looks like quite a simple loose top, the design is stellar. There's a curve to the shoulder that sits beautifully when worn, and the armholes are perfection: low enough for layering but not so low as to reveal much, but also a great shape. Can you see too the front half of the armhole is a different shape to the back half? The front is slightly lower cut than the back and follows a different curve - and that means a much better fit than the common symmetric armhole, with no excess fabric getting folded under my arm as I swing it forward.  


There are these lovely darts in the back of the top too - no partying in the back, but some interest for sure!  These darts are replicated in the lining to the top. Since I'd bought insufficient lining I rotated the darts into a new horizontal seam line at the same height as the darts - but I don't seem to have a photo of this. 

Anyway, check out my dart alignment in the wool! (I had to have three attempts at the centre back seam before I was happy with their alignment, so a bit of basking is permissible isn't it?)


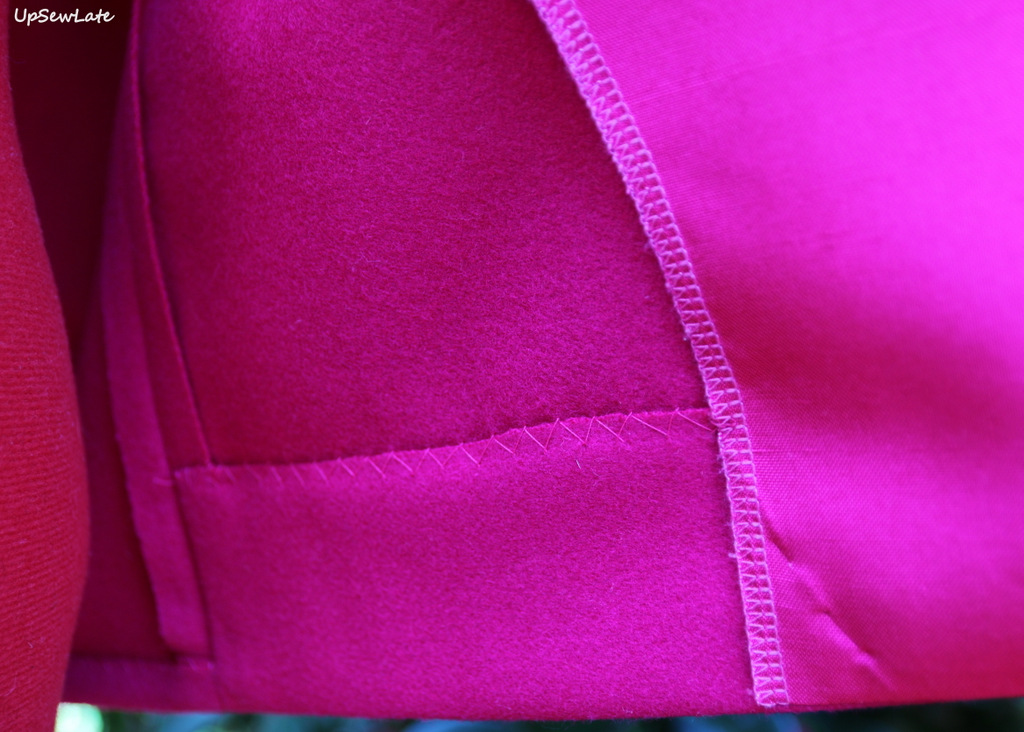
The top is supposed to be sewn with three large snaps and two buttons, but I got cold feet about the buttonholes, so my top has five large snaps. I'm super slow and not the neatest of hand stitchers, but I love the control you get with hand stitching. With the snaps I decided to start from the bottom and work my way up.  The hemlines really need to align, but at the neckline there's a crossover that would definitely mask a bit of length discrepancy if required. For the left hand side, I sewed the snaps to the wool (and not the lining), using the snap half that has an indentation (I think this may be upside down, but it seemed like this orientation would cause less of a bump to show through when the top was fastened. 


On the right hand side I sewed the snaps to the lining, but before doing so I cut out some small squares of wool that I positioned under the snaps as I sewed them in. The snaps are quite strong, and I didn't think the silk lining on its own would be any kind of match for them - with a wool backing the lining has a chance of surviving!  From the photos on the pattern envelope I assume the snaps aren't supposed to attach to both layers of fabric, though perhaps the designer garment was just sewn by someone with incredible, invisible hand stitching? In any case, sewing them to just one of the layers means a bit of movement can happen without creating too many creases on the outside (and any creases you do see in my top are therefore more likely to be related to my wearing too many layers and wearing the wrong size!). 


The pattern has you use a bias binding seam finish using your lining fabric but I didn't really have any spare lining fabric, besides which my lining was too heavy, so my lining seam edges are overlocked and my wool edges have been left raw after neatening them.  


I'm trying hard now to think what could possibly be improved in this pattern - and the only thing I can come up with is having separate lining and outer pieces, with the lining pieces slightly smaller to ensure it didn't show around the edges... not a big deal with wool as the outer layer as it stretches a little when steamed, but I can imagine this being annoying in a fabric with less give. And other than that, nothing!


Thanks for reading!

See you soon


- Gabrielle xx

Thursday, 18 August 2016

Donna Karan Drape Jacket: V1129


I started this jacket back in 2011, before I owned a serger (or an edge stitching foot), back when I was very cautious sewist, still finding my feet.  I wanted to sew designer Vogue patterns like this one, Vogue 1129 by Donna Karan, but I was really concerned that a mistake at any individual step might be ruinous to the final garment (I'm so not like that now). So I took the sewing slowly, with tailor tacks at every possible marking and the neatest of precision notches... and it was going beautifully till I got stuck on a step that was beyond my experience and skills. 


My sticking point related to the way the drape is sewn and where it's sewn. It's basically supposed to be sewn onto one side front of the jacket in a curve, with the stitches hidden inside the drape, then attached to the rest of the jacket neckline, ending at the other side front.  Vogue provided a guide for the curve, but I wanted to adjust the placement of the curve - when I pinned it all in place the fit didn't look right, and I didn't know how to make it look right. Argh! What's more, I wasn't sure I'd understood the way the drape was supposed to be joined to the neckline...


In the months after putting it aside I took it out periodically, reviewing the pattern instructions in case they "clicked", examining the jacket, then putting it away again because I still couldn't work out how to sew that curved drape on neatly. And then it stayed put for a long time, because I had the idea in my head that I was stuck on something very tricky indeed.


Anyway, fast forward to the week before last and this time the challenges didn't seem that great - hooray for having better skills than 5 years ago!

I pinned the drape in place again, tried the jacket body on, moved the fabric around a bit and took out some excess at the armhole - easy :).  The curve I've sewed isn't perfect but isn't normally seen, and the fit seems good.  And the way the drape connects to the neckline is actually straightforward, but I'd made a small mistake in an earlier step that had made my garment look different to the diagrams, and I guess that had thrown me.  I hadn't finished the seams a few years ago (as I mentioned earlier I had no serger, and my zipzag stitch looked messy) and the fabric wasn't unravelling so I didn't finish the new seams either - consistency is the thing! 


You can see in these photos that my fabric is a dense wool - it wasn't labelled because it was a random op shop find (and only $8 from memory!) but it has a distinct wool smell and feel.  I'd say it's from the cheaper end of the wool scale because the fabric also feels quite scratchy on the skin.

Here's what the pattern envelope photos look like - and yes, I accidentally copied the colour (except of course I didn't; random op shop finds don't allow for colour choice):


The pattern is described as follows on the back of the pattern envelope:
Unlined, fitted jacket with pockets, drape, two-piece sleeves and topstitch trim, above mid-knee length.
There is a bit more to it than that though... princess seams, faux flat felled seams, in-seam pockets and clever concealed snaps in the front (as well as a nifty hidden hook and eye that holds the drape in place on the shoulder, though I haven't yet sewn mine in).


I cut this jacket out as a size 12, adding length to the sleeves and body at around hip level.

These days I think I would have cut it out as a 12/14, but I don't mind the fit of the 12 - and I think the finished jacket looks pretty similar to the pattern photo.

I like the length and fit of the jacket overall, though the sleeves feel a couple of centimetres too long on me (and I have no recollection how much length I added to them, sorry).


This pattern is out of print and Vogue are no longer selling Donna Karan patterns, but if you do come across it, it's a good one - the jacket has the clever design lines you'd expect from Donna Karan, and I think it also makes a pretty useful layering piece for those sunny winter's days where there's just a bit of a chill in the mornings and evenings; so pretty and practical if your weather is mild.

I don't normally give my garments a test run before blogging them because I'm clumsy and a messy eater, and I don't want to show you food stains when I'm trying to tell you how happy I am with a pattern, but it dawned on me that my typical delay between taking photos and finishing a blog post actually gives me ample time to wear a new garment out and about, without the risk of nasty stains in the blog photos. So this time around I have tested the jacket - and found I like it more than I expected :). I thought the itchiness of the wool was going to make this jacket borderline unwearable, but it turns out it's absolutely unnoticeable in a long sleeved top and a scarf (that is unless you try to cuddle me - sorry kids...).

There's not much more to say - but when I was taking these photos a darling little fellow called Charlie wandered over and became my new best friend (sadly he had to scamper after a few minutes). He does a good job of looking like he's with me though, doesn't he:


So, to conclude, I love the shape and fit and drape of this jacket, and I'm impressed with past me for doing neat top stitching without any specialist sewing machine feet to help keep me at the same distance from the seam edge.  I don't love the fabric, but I like the colour and the fabric is absolutely wearable so long as I wear a scarf with it (not a problem!).

I think this jacket would be divine in a soft cashmere wool - something smooth and luxurious and drapey - but I don't need another jacket this shape, so I'll leave that one for someone else to make :).

See you soon

- Gabrielle x

Thursday, 4 June 2015

Chilling: V8930

Back in October of last year, I fell in love with a coat. This one! Oh, Yoshimi - I want to come to Japan and steal your coat - is that too evil of me?

Well, probably yes.

I don't really have plans to travel this winter, so for now I've had to make my own jacket from the same pattern, Vogue 8930. Yoshimi used an amazing double faced wool that I imagine was a real challenge to finish along the long edges of the jacket, but I used a boiled wool (so much easier! so much quicker!) in a lovely berry colour.  My fabric came from Tessuti fabrics, and while they don't look to have this colour in stock any more, they do have boiled wools in grey and black. Oh and the dress I'm wearing is this one in merino wool, made back in 2011.

# V8930 : drapey in boiled wool
The V8930 pattern comprises a front pattern piece which extends into the ginormous collar, a cut-on-the-fold back pattern piece and a sleeve piece. There are two options for jacket length and hem shape, and there's a choice of patch or side pockets, depending which view you sew.  The shoulders are dropped low and the jacket is a loose fit, which makes it easy to throw on top of other warm clothes - although I should mention due to a purchasing error I sewed the size L here, and normally I sew a size M, so I guess mine is looser than the designers intended.

My jacket is basically view A of the pattern, with the length from view B and the side pockets from view C.


# Side pockets for cosy hands in V8930
View A is the single layer of fabric version of the pattern, and it has a raw edge finish that's refreshingly quick to sew. The pattern suggests a single line of stitches set in from the edge, but I added a second parallel line of stitches about 0.5cm further in - I thought the single line of stitches was disappearing in the fabric, and that a second line might make the stitches look more intentional. Plus boiled wool likes to fray, and two lines of stitches seemed safer than one.

# Close up of edge stitching and mock flat felled seam, V8930
Speaking of simple modifications, the sleeves as drafted on this pattern were a bit short for my liking. Looking at the line drawings, the sleeves are apparently intended to be 3/4 length and to show sleeves from the layer you're wearing under the jacket, though this isn't mentioned in the pattern description. I really didn't want cropped sleeves on a snuggly coat, so I cut my sleeves 1.5 cm longer, and later trimmed the edges back by 0.5 cm instead of the 1 cm in the instructions.  I also gained a few centimetres in sleeve length by having narrow shoulders (finally, a narrow shoulder win!!) and by making a larger size than usual. So all up the resulting jacket sleeve lengths are perhaps 3 or 4 cm longer than the standard lengths, and exactly as long as I wanted.

I also took the opportunity to cut out the jacket with a few extra centimetres of length in the body - I figured it's easier to subract than to add length later!

# Very dropped shoulders on V8930
And one more change, a small detail. Given I don't intend to wrap that huge collar around my head, in step 8 for views A and B, I lapped the right side of the front sections over the right side of the back. The instructions tell you to lap the wrong side of the front sections over the right side of the back, but this results in an exposed seam when the collar lays flat on your back, and I wanted instead to have the neater right side of the collar uppermost when the collar was laid flat.

In the interests of fabric frugality (and now I have some left over!) I cut the back of the jacket as two pieces and sewed a mock flat felled seam on the centre back. [I used 2.6 m of 150 cm wide fabric, but the pattern suggests I should have needed 3.9 m; I'd bought 3 m.] The majority of the seams on this jacket are exposed seams where one piece of fabric overlaps another, and I know that sort of seam is trendy but I think I prefer the look of flat felled seams, and they're not too much harder to achieve with a well behaved wool.

# A back view, V8930
Did I mention how easy this pattern is? It's rated Very Easy, and that classification is absolutely spot on. Sure, you could pick a tricky fabric to up the challenge level, but with an easy fabric - and specifically, something that doesn't fray much - this is the sort of jacket you could whip up in on a quiet afternoon.

# V8930, draping like a waterfall cardigan

I'm really enjoying the way this lighter fabric drapes and folds... it's a bit like a waterfall cardigan. Having said that, I'd still really like to own this jacket sewn up in a luxuriously thick fabric, just like Yoshimi's...


Thanks for reading, and see you soon!


- Gabrielle  xx


Sunday, 18 May 2014

MMMay14 Days 11 - 18

Another week of Me Made May documentation, taking me up to Sunday the 18th of May:


Day 11


Day 11 was Mother's Day in this part of the world. My kids spoilt me with handmade treasures, and Mr UpSewLate had repaired a favourite glass ring for me - yay! And we celebrated with my mum over breakfast at a lovely sunny French cafe.


I wore my recent BHL Elisalex/Vogue Pink Panther dress (a SewDollyClackett make) with a big yellow RTW cardi - I got it at a third of the normal price even though it was brand new stock, simply because most people apparently don't want to wear yellow. Crazy!!! But I do wish I could knit so I could make my own big chunky knitwear!
 

Look what the shop was selling - I was so tempted by these French oilcloths till I looked at the price:


Later in the day we headed over for a "bring a plate" dinner at my mother-in-law's house to celebrate a brother-in-law's birthday.  We brought a traditional bouef bourgignon that Mr UpSewLate had spent hours slaving over (we use the Simone Beck / Louisette Bertholle / Julia Child recipe from Mastering the Art of French Cooking and I'm going to resist a little aside on Julia Child mythology, as it really irritates me... ). We finished off with my MIL's lemon pound cake, then it was time to scarper off home and rush the kids to bed.  It had gotten chilly so I wore an old Vogue patterns black wool jersey dress. I'm not too sure of this dress - it always feels too short and too loose on - but my MIL loved the way it draped... And unfortunately I took very few photos and you can't see much in them. If you do want a better view, you can also see this dress under Day 17 in this blog post from MMM13 and under Day 25 in this blog post from MMM12.


Photos taken by me and MrIUpSewLate (backdoor of the cafe), then later with camera on tripod with 10 second timer on, with camera on continuous burst mode.


Day 12

Back to work - I don't hate Mondays though! It was another gorgeous Autumn day, so I wore my plaid wool jacket-cape, made from a vintage Vogue pattern reissue. Evidently I don't know how to wear scarves, even though I wear them all the time in the cooler months. These pictures were taken in the Royal Botanic Gardens.  I was planning to take pictures with the sea and /or Opera House behind me, but there were too many other people already doing the same thing (tourists? or maybe they were MMMay-ers?). 


Photo taken by me with camera on a bench (tree photo) and attached to a handrail (statue), on 10 second timer, with camera on continuous burst mode.


Day 13

A long meeting at my old office meant one good thing: photos on one of their terraces after the meeting. The doors to this particular terrace are normally locked, but the staff told me I was allowed out there if the doors weren't locked - and they weren't :). So I got the whole area to myself, with the downside that everyone walking past the glass doors on that level would have been able to see my foolishness. Oh well, I'm working on that thick skin... Wearing my self-drafted geometric silk top (this shape reminds me of the Belcarra top!) with my cropped cashmere jacket and The RTW pants that fit (even though they don't fit perfectly).


Photo taken by me with camera on a low wall, on 10 second timer, with camera on continuous burst mode.


Day 14

On day 14 I had another long (all morning) meeting at my old office, so I took my lunch break on the way back, via Darling Harbour. There are plenty of photogenic backdrops here, but there are also always loads of tourists and city office workers down here at lunchtime, so it was hard to find a spot that wouldn't have other people in the pictures. I managed to hide some people behind posts, and then I went up to the pedestrian overpass that takes people across Darling Harbour from Pyrmont into the city - I figured people up here would either be moving too briskly to notice me or taking pictures for themselves!  I was wearing my Converging Lines Brasilia dress - I really should make another of these, and take in CF below the bust!


Photo taken by me with camera on a raised ramp, then later attached to a post, on 10 second timer, with camera on continuous burst mode.


Day 15

Busy, busy day! I had a substantial piece of work due on Friday, so I put my head down and only dashed out to Martin Place briefly for photos when I was grabbing some lunch. I completely mistimed it though and ran out at the busiest time - people everywhere! Because I was a bit nervous and in a hurry I thought I'd probably stuff my photos up, so I found an attractive backdrop (which I asked permission to photograph) to distract you just in case :]. And the me made clothes? It's two Vogue/Tessuti combinations: a V8486 dress made from a gorgeous Tessuti silk, and my lush cashmere-wool V1098 jacket.  I don't wear either of these garments too often, but that's because I want to keep them nice!


Photo taken by me with camera on a bench next to a very confused young man who had to get to walk away from it all, replaced by a solicitous older man, on 10 second timer, with camera on continuous burst mode.


Day 16

On Friday we had a team yum cha, and we ate so much and so fast! Our organiser had warned us to wear loose clothes, but I think I was the only one who did so :). After lunch I raced to the top of Martin Place for a photo with the lucky wild boar (Il Porcellino) that sits on Macquarie Street.  I wore my Starry, Starry Gabby dress with a red linen jacket (I know this looks like the Tokyo jacket pattern, but it's an old Vogue Anne Klein pattern, and the sleeves aren't cut on). Not the best pictures, but embarrassing getting them as usual as the boar faces down Martin Place across a pedestrian crossing / set of traffic lights, and there are always office-y people coming and going down Macquarie Street. As well as joggers who are determined to do ALL their stretches by the boar even if your camera is clicking at them lol. As I don't think he was wearing me mades I shan't include those photos.


Photo taken by me with camera attached to railings, on 10 second timer, with camera on continuous burst mode, then a regular non-timer photo looking down Martin Place from across the road from the wild boar.


Day 17

Saturday was going to be a quiet day with a bit of kids sport thrown in, but we were woken at 7am by the sound of a large concrete mixer truck coming down our driveway to do some work for the neighbours who live behind us. I'm glad my neighbours are finally fixing up their driveway - we'll be able to have a side fence soon! - but I do wish their builders wouldn't use my back garden as their staging area. I talked to the builders about it before I went out, they apologised and said they'd fix it, but when I came back home they'd established even more equipment in my garden! Grrr! I went out again and bought some cheap plastic fencing and bamboo sticks and that was the afternoon's craft activity - making a crappy plastic fence to remind the various builders of the boundary. While I was out getting my fence supplies I took these snaps of what I was wearing - I don't know what the buildings are but the light looked lovely and I didn't think anyone else was around. Wearing my Maria Denmark Kirsten Kimono tee and my denim Grainline Moss Mini.


Photo taken by me with camera on a low bollard, on 10 second timer, with camera on continuous burst mode.


Day 18    

Sunday! I haven't been doing enough sewing lately but on Friday night I read all the reviews I could find of the Papercut Patterns Pleated Pants, on Saturday night I traced the pattern and and on Sunday morning I cut out some nice weighty denim. I won this pattern last year from a giveaway on Juliet's blog and I have been so slow to sew it up! Sorry Juliet! Anyway, for a comfortable day at home I wore another Gabby dress, this one made from a stretch fabric. Unfortunately not only have I shrunk in the last year, but the weight of the fabric has also stretched this dress out - so it's another I really need take in. In the photos below you can see I'm cutting out the instructions for the Papercut pants and celebrating unreasonably once that was done :). Small steps, small steps...


Photo taken by me with camera on a tripod, on 10 second timer, with camera on continuous burst mode.

Phew!  Another week down. I don't have too many observations to make at the moment, apart from that it's nice to see my sewing has improved over time (there were some dodgy seams back when I started, like in the silk dress on day 15) and that I obviously like blue and red!


I'm aiming to wear 10 me mades each 7 days in May. My tally for this week is 13 me mades in 8 days, including repeats, and to date that's 28 me mades in 18 days.


See you soon


Gabrielle x
Related Posts Plugin for WordPress, Blogger...