Showing posts with label boxy. Show all posts

Saturday, 8 July 2017

Guy Laroche Top (Vogue 1450)


Vogue 1450 by Guy Laroche has been waiting in my filing cabinet for a few years... I love the Guy Laroche Vogue patterns, but they often look too "Fashion" when they're first released for me to contemplate them in my wardrobe.  I'm not sure if it's that the designer looks gradually filter down to the high street, or if staring at the designer patterns for a few years makes them eventually look more normal, but I've now made the top and the skirt is on the shortest of my "to sew" lists (the physical version of the list, where fabric is matched with patterns and piled next to my sewing machine - still no guarantee it'll be made though).


This top was designed for summer, but I thought it would look great in a cashmere-wool blend. Possibly that thought was triggered by the fact that I had a nice little cashmere-wool remnant in the stash, but does that even matter? My remnant was pretty short - just 0.7 metres long but 155 centimetre wide - but it looked to me as though the top could be squeezed out of that limited yardage despite the pattern's stated 1.8 metre fabric requirements.


I measured myself and checked the finished dimensions, and went down a size to a 10. I couldn't fit the length of the fronts on my 0.7 metres, so I also cropped the top by an inch or two.

It turns out that the 10 fits when I'm wearing the same lack of layers as when I measured myself.


In all these photos I'm wearing a warm singlet and a high-waisted skirt, and in some I'm also wearing a long-sleeved merino wool top, just because it's cold here at the moment.  With extra layers on, the top is definitely a bit snugger than I'd hoped, and I haven't tried it without layers... I think I need to have another go at making it in the correct size and length, as I suspect I'll love the larger version more than this one.  Bigger is better!


The Sewing Details
Pattern = Vogue 1450 by Guy Laroche:
Very loose-fitting top has asymmetrical snap closing, extended shoulder forming cap sleeves and bias (lining) binding finishing seams and facings. 

Fabric = wool-cashmere mix, a remnant from Tessuti fabrics, along with a small piece of magically coordinating silk also from Tessuti fabrics

So, although this looks like quite a simple loose top, the design is stellar. There's a curve to the shoulder that sits beautifully when worn, and the armholes are perfection: low enough for layering but not so low as to reveal much, but also a great shape. Can you see too the front half of the armhole is a different shape to the back half? The front is slightly lower cut than the back and follows a different curve - and that means a much better fit than the common symmetric armhole, with no excess fabric getting folded under my arm as I swing it forward.  


There are these lovely darts in the back of the top too - no partying in the back, but some interest for sure!  These darts are replicated in the lining to the top. Since I'd bought insufficient lining I rotated the darts into a new horizontal seam line at the same height as the darts - but I don't seem to have a photo of this. 

Anyway, check out my dart alignment in the wool! (I had to have three attempts at the centre back seam before I was happy with their alignment, so a bit of basking is permissible isn't it?)


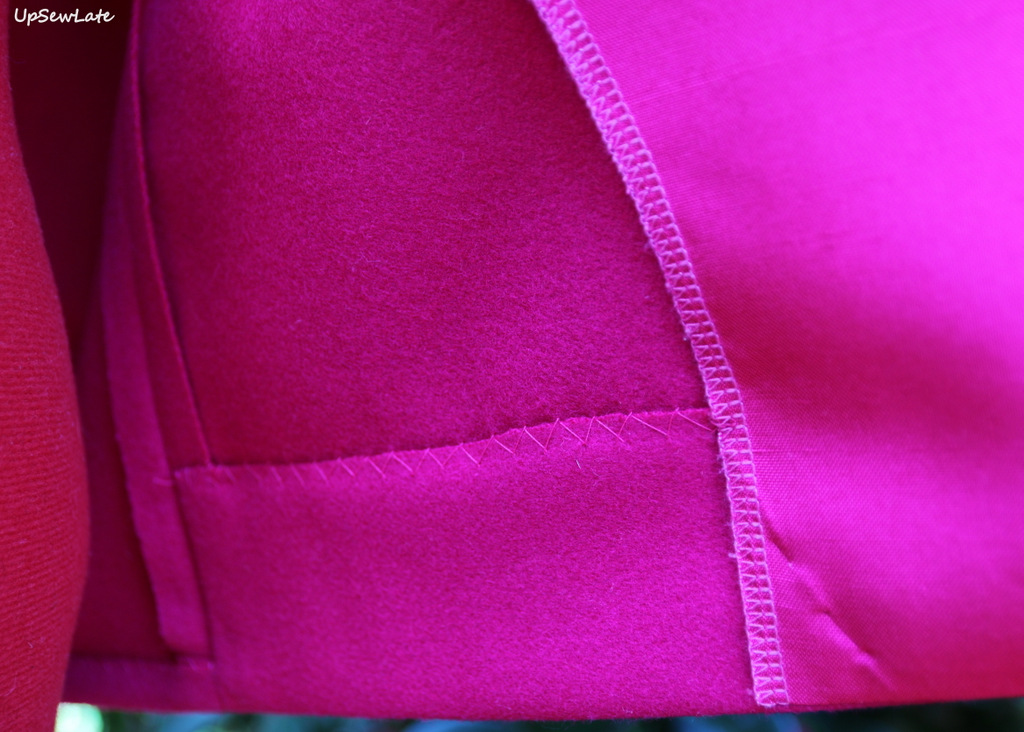
The top is supposed to be sewn with three large snaps and two buttons, but I got cold feet about the buttonholes, so my top has five large snaps. I'm super slow and not the neatest of hand stitchers, but I love the control you get with hand stitching. With the snaps I decided to start from the bottom and work my way up.  The hemlines really need to align, but at the neckline there's a crossover that would definitely mask a bit of length discrepancy if required. For the left hand side, I sewed the snaps to the wool (and not the lining), using the snap half that has an indentation (I think this may be upside down, but it seemed like this orientation would cause less of a bump to show through when the top was fastened. 


On the right hand side I sewed the snaps to the lining, but before doing so I cut out some small squares of wool that I positioned under the snaps as I sewed them in. The snaps are quite strong, and I didn't think the silk lining on its own would be any kind of match for them - with a wool backing the lining has a chance of surviving!  From the photos on the pattern envelope I assume the snaps aren't supposed to attach to both layers of fabric, though perhaps the designer garment was just sewn by someone with incredible, invisible hand stitching? In any case, sewing them to just one of the layers means a bit of movement can happen without creating too many creases on the outside (and any creases you do see in my top are therefore more likely to be related to my wearing too many layers and wearing the wrong size!). 


The pattern has you use a bias binding seam finish using your lining fabric but I didn't really have any spare lining fabric, besides which my lining was too heavy, so my lining seam edges are overlocked and my wool edges have been left raw after neatening them.  


I'm trying hard now to think what could possibly be improved in this pattern - and the only thing I can come up with is having separate lining and outer pieces, with the lining pieces slightly smaller to ensure it didn't show around the edges... not a big deal with wool as the outer layer as it stretches a little when steamed, but I can imagine this being annoying in a fabric with less give. And other than that, nothing!


Thanks for reading!

See you soon


- Gabrielle xx

Sunday, 15 February 2015

Atelier Brunette Top

Back last March when I was telling you about my boxy pink silk twill top, I said it might be the first of many more, and finally, in October 2014 (!!), just back from Europe, I made another of these tops in cotton... a gorgeous Atelier Brunette cotton I'd bought in Paris:


The top two fabrics are Atelier Brunette fabrics ("cosmic blue", and "blue moon"), and the bottom fabric is a Sarah Jane pirate girl fabric from her Out to Sea collection.

In person, the "cosmic blue" is a very pretty fabric - lightweight and fine, and designed in absolutely beautiful colours. The fact that the little circles look like pacmen wandering across a night sky (perhaps eating stars?) also apppeals to me very much :).


I sewed my top as before, with exactly the same modifications, so if you're interested in knowing more about the pattern (Vogue 8879, a very easy pattern) please do have a look at that March post.  I don't particularly want to repeat myself, so this post is going to be more about the fabric, and what a difference it made to use cotton instead of silk twill (or even cotton jersey for that matter - see this post for my mum's silk twill and cotton jersey versions of this pattern).


I wore my new top to work as soon as I could, ironed and starched to within an inch of its life... and yet here's how it looked by the end of a sedentary day in the office:


Cotton is of course very comfortable, and a loose top like this feels great in a hot climate.  But straight away you can see that the cotton version lacks the drape of a silk or stretch fabric. Without that drape, the top needs bust darts, and without that drape, the fit of the top becomes less forgiving.

I don't mind that so much though - after all, I love boxiness! What I don't like though is all the creasing - it makes it look like I did a bodgy job with the iron!


And there are even more creases and rumples on the back:


My assumption going into this project was that the fabric, being cotton, would be a delight to sew and iron and a joy to wear.  The sewing wasn't as fun as anticipated (I suppose I normally sew with sturdier fabrics, but I had to adjust my tension to avoid the seams in this fabric puckering), the ironing was a nightmare (iron and starch a section, move the top to iron and starch another section, notice new creases in the first section, re-iron the first section, ad infinitum), and although the cotton was lovely to wear on a warm day, I was disappointed at how very ordinary the top looked by the end of my work day.

Here are a couple of close ups of the top that same afternoon:


Initially I wasn't sure if the crumpling was just me - perhaps I'm not a very good ironer? - but let's be honest; I have sewn fine cottons before and I haven't had this much of a problem with clothing looking so un-ironed before!

For example, I've sewn a couple of tops in Liberty tana lawn - this ruffled one (blogged here):


and a button front, flared sleeve shirt (blogged here):  


I also made this dress of cotton voile with ribbons on it (blogged here, and also here) - this fabric did show some small creases, but I couldn't press it on a high enough heat because the ribbons tended to melt:

Ribboned cotton voile dress, blogged here and originally here
and this quilting cotton dress (blogged here, photos taken after lots of train travel on a scorching hot and sweaty day):


Hmmm. So then I did a bit of an internet search to see how everyone else was managing with this fabric, and what do you know, it looks rumple-prone for everyone!  Please check out Sew & Illustrate's tank top,  Jolie Bobines' dressBibouchka's dress, and Papivole's shirt and judge for yourself whether it's the fabric or the sewist.

I did get some advice on Instagram that I should use fabric softener when I washed the top, and that that would really help with the creasing (maybe it will?) but I feel annoyed that a cotton that cost me 18 euros a metre should need special treatment.  At that price, so close to the cost of Liberty tana lawn at Shaukat (currently about 19 euros per metre), I expect more.


I made this top for work, but I'm afraid I've only worn it twice since making it - I don't really like "rumpled" as a work look -so although this top is still in my wardrobe, it is currently classed as a fail.


Next up I have a dress to share with you that feels like a BIG win - it's a mix of a couple of different patterns coupled with a wild fabric, and I'm really excited about the way it's come together.


See you soon

- Gabrielle x


Saturday, 6 December 2014

More Simple Shapes

We're approaching Christmas - help!

By this time of year I always feel like I'm going nuts - work projects are accelerating to try to wrap up in the calendar year, the kids have a million special end-of-year concerts and events on at and after school, and then there's the scramble to try catch up with lots of different circles of friends in the last few weekends before Christmas.  Oh wait on, we have to think about Christmas presents for the extended family too, right? So while I have a super long queue of new sewing patterns I'm aching to try out, frankly there isn't enough capacity left in my brain for anything complex.

At the other end of the scale to complex, we have simple. I reckon this is THE archetype of simple tops: front piece, back piece; no facings, and no darts.

A ridiculously easy top to make from scuba knit fabric

The shape may look familiar from a few months back on this blog - it's yet another of my "simple shapes" tops! 

I wore this top last week on the day Emma, Steph, Kristy and I met up for lunch - I'd finished it the night before, and I'd been thinking I might be able to twist someone's arm into taking photos for me, but when we met up I found I didn't want to waste any of our catchup time on photos. And so these awkward photos happened instead at the end of the day, on my way home from work.  I haven't taken blog photos outside in ages - you can probably see how nervous I was feeling!  Obviously the sunlight was very bright that afternoon, and all the photos I took were a bit blown out - but the fabric colour is spot on and I think you can still get a feel for both the fabric and the shape of the top...

Back view, boxy scuba knit top
Oh dear, I didn't realise my skirt was twisted around! There is no centre back seam on that skirt...


Fabric

I picked up this cheap scuba knit fabric in Spotlight a few months ago when they had a crazy pattern sale on. The colour is terrific BUT the fabric pilled substantially on the side where my handbag moved against it within an hour of my putting the top on for the day. And that was on its inaugural wear too - very disappointing!  I'm glad I didn't try to make something special from the fabric, and I'm really glad I only bought a metre of the stuff!

Close up, self-drafted boxy top in scuna knit fabric

Pattern 

No purchased pattern; of course not - it's such a basic shape!

Of course it does take a bit of effort to draw a simple pattern shape the way you like it, and no doubt it would take even more effort if you were fussy :P.  But if you want a simple knit top like this for yourself and you're not too fussy, it is very easy to draw up a 'pattern' for one - just make sure you measure yourself first!


Fitting

Here's a photo that shows you the shape of this top as compared to one of my earlier attempts - you can see the main change I made was to the slope of the shoulders, though I also raised the neckline and lengthened the top.

Adjusting the shoulder line on my boxy top

I made this change to the shoulders after doing a bit more retail research into the shape I liked, backed up with simple logic. I wanted the fabric to fold deeply on itself at the underarm area, and make a smooth slight downward curve from my shoulder. My original 'pattern' had sharply angled shoulder seams, and these made for folds in the shoulder area when I raised my arms - but when my arms were by my sides there were only small folds under my arms. For more exaggerated underarm folds (doesn't this sound ridiculous when analysed!) I needed more room in the shoulders - more of a natural shoulder line, as this would make for more slack from shoulder to underarm.


The following photo adds nothing; it's here purely for light relief. Note my wry smile as I gently hold the bus in the air by its wheel rim - with no perceivable effort!

How to lift a bus by its wheel rim, while wearing homemade clothes

The verdict? Although it's very basic, this simple boxy top, with shoulders curved downwards, and creases where the sleeve shape folds, is is exactly what I was after. I do realise I was originally planning to make the final 'pattern' into a brocade top, but now that I'm happy with the pattern that aim is feeling less important. I guess enjoying the journey was enough...


See you soon

- Gabrielle x


Tuesday, 25 November 2014

Boxy Hibiscus Top: Simplicity 6742

Sometimes my sewing ideas charge ahead without regard for the facts, the constraints - the stuff I should know by now! Does that happen to you too - or are you a fast learner?

This time around, my idea was to pair a summery boxy top with a flared skirt - essentially a square capping a triangle - theoretically, the idea seemed a cracker! But unfortunately the whole idea is predicated on the existence of a narrow waist, somewhere around the apex of that theoretical triangle, and I ain't got one of those no more.  So this combination doesn't look nearly as good as I'd hoped - I know the photos prove it.

A boxy top with a flared midi skirt
You've already seen the skirt (posted here, and thank you for your lovely comments, I haven't finished replying to you but I will!), so I'll tell you now about the top I whipped up to go with it.

I still thought it was a good sewing idea!
Pattern


I used a second hand sewing pattern - you can see it pictured below. I know it looks terribly '80s (and it's dated 1985), and I know many people hate '80s fashion, but if can you look past the flickback hairstyles and dated jewellery, there are gems out there in 80s fashion land!

This old sewing pattern is all about boxy 80s shapes, but I think they look fashionable again - the top looks quite modern, and I think the skirt could also be very appealing in an eyelet fabric (hmm yes, I *do* have one planned already, thank you for asking!). Actually the pants would probably look good too in a black crepe if you narrowed the leg width...

Simplicity 6742, a classic 1980s outfit pattern
The top is described succinctly as a "loose fitting waist length top". That's pretty accurate but doesn't tell you enough.

To me the top feels cropped - it is waist length, but because it's such a loose top there is a high potential for waist exposure. So it's not cropped but it might flash your midriff like a cropped top does. The pattern also has no bust darts, which helps keep it super boxy, but I think you'd need to add them if you were bigger than a B-cup and wanted the top to fall properly.

The sleeves look cut-on but are made from a separate pattern piece, and the neckline is not just a simple V-neck - it has two inset pieces that form the V and that attach to the V shape of the top as well as to the facings for the back neckline. Unfortunately these details don't come across on the pattern envelope. I've taken a couple of close-up photos of the front neckline, but I know it's hard to see details in this busy print - squinting at the hibisci (or is that hibiscuses?) reminds me of eye tests!

close up of the V-neck from the outside
close up of the V-neck, inside out

Fabric

The fabric is a lightweight cotton; I bought about 3 metres of it at Lincraft last year when I was planning to make a summery shirt dress for the "Fall for Cotton" challenge. My plans changed when I realised I didn't love the fabric enough to spend a serious amount of time on it (you know, buttons and top stitching) - FYI I ended up maing this cotton dress from a vintage Vogue pattern instead.

Anyway, back on topic! I guess this is a quilting cotton? The fabric is a bit stiff, but seems to soften up with heavy-handed ironing. I still don't know how much I like the fabric - enough for a top, obviously, but if I say I'm tempted to make what's left into a skirt please stop me!

Back view, boxy summer top

Fitting and Pattern Adjustments

Fitting? Say what? This top really is very loose, so I didn't need to do any fitting!

I sewed the pattern exactly as the instructions told me, and now I WISH I'd made it slightly longer, the better to hide my midriff.

There's that lesson about measuring stuff again, isn't it - you'd think I'd have learnt it making the skirt, wouldn't you!

Is it a crop top?
There is one other thing I should have adjusted and which I did adjust when I made this top again last week.  The pattern tells you to cut out the inserts for the V-neck on the bias, then interface them before attaching them to the neckline. The fabric wanted to stretch out on the bias, naturally, and a bit of interfacing was not enough to stop it.  Is there any reason why the neckline pattern piece would need to be bias cut? All I can come up with is that it might look good to have your fabric print or weave angled against the straight grain bodice. Again, it may be hard to see this in the photos, but my bias-cut neckline does not want to lay flat, and to my eyes looks slightly warped. 

Second time around with this pattern I cut these neckline inset pieces on the straight grain and they behaved so much better! That second top is not yet photographed - stay tuned.


Likes / Dislikes

That V-neck was fiddly to construct, but I really like it, and the neckline construction steps in the instructions were clear and even clever. So that's a couple of definite likes! I also really like the general shape of the top and in particular the wide airy sleeves.  I reckon this boxy shape would look amazing in a thick fabric (scuba fabric, anyone?) though it would be quite challenging to make a neat version of this neckline with a thick fabric.

The length of the top, however, is something I don't like - well not on me. I do think it would look amazing on someone with a tiny waist, maybe paired with a pencil skirt, but on me it just accentuates a short waist and a generally thick area :(. And I am not about to cut down on chocolate.

Side view, this is how the top wants to fall

OK then, so that's a wrap! I'll be back soon with more summer sewing - still nothing too challenging I'm afraid - I'm having too much fun with squares and triangles! 


See you soon

- Gabrielle xx
Related Posts Plugin for WordPress, Blogger...