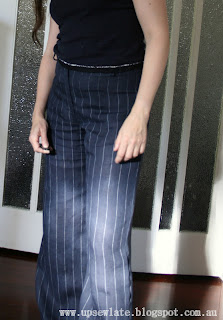
Quite hard to photograph together with the top so white bright and the pants so inky dark!
The top is made from V1310, the relatively recent Chado Ralph Rucci pattern (the one with the photo of a severe looking model in a column-like burgandy skirt and loose white top). After my recent ooh-this-feels-too-tight issues in a "semi-fitted" Vogue size 12-graded-to-14 dress, the ultra loose fit of this (also "semi-fitted") size 14 Vogue top was unexpected, although I guess part of that may be down to my fabrics.
 |
| tucked up hem |
 |
| free hem |
Being cut on the bias, my neckline was very keen to stretch out. I tamed it with narrow transparent elastic, the sort I usually sew into the shoulder seams of knit tops, and made it very slightly gathered. I topstitched the facings in place with a sliver of facing showing all the way around to give the neckline a decorative edge, but I don't think you can really see it...
 |
| spot the serger tension error! |
Time: About 2-3 hours
Cost: $12 all up: fabric about $12 on sale at Lincraft; sewing and serger thread $0 (already used in other projects); pattern $0 (second use); and elastic $0 (leftovers).
*****************
The pants have been lying around as an UFO in my sewing area for ages... I'm sure they were originally ironed and carefully draped somewhere for attention "soon", but by the time I got back to them they were a scrunched up mess. A happy surprise amongst the crumples - the fly was finished, top stitched, and even nicely basted together to wait for the waistband to get sewn on. When I tried them on I remembered why they had become a UFO - they got too tight midway through the sewing! They should hopefully get a bit looser in the near future... if I get myself out of this chair and do some exercise :-)
No, but seriously, that's the best looking view of the pants! And the colour is about right.
With my camera sitting on a chair on the coffee table in the middle of this room, I am getting some leg foreshortening happening and I do not like it:

Anyway, you can see that they nearly fit me already (and I only did the getting out of the chair part so far!) and that the stripe matching is OK. I had to change tops because my camera wasn't coping.
I've made these pants before (here in grey wool and here in black stretchy stuff) because the pattern (V1098, an Anne Klein pants and jacket pattern - ooh and I made the jacket in yummy turquoise cashmere a while back) seems to generally fit, and is one that's easily taken out or run in along the side seams. And I've got to the point now where I just grade the waistband up or down to fit the width I've sewn the pants :-).
Here you can see the details: belt carriers, a neat fly, waistband drafted to fit and cut to match the stripes as well as possible on the curve:
And the sign apparently means Beware of the Dog!
Cost: About $30: fabric a lovely big remnant from Tessuti - call it $25; sewing thread $3; pattern $0 (fourth use); 2 buttons $0 (part of a vintage buttons gift); and zip $2 from a little local haberdashery.
*****************
Has anyone else been having troubles with Blogger lately? I've been struggling to sign in for about a month (this is a known problem in the Blogger forums but the solutions haven't worked for me to date, so I'm using a strange workaround) - but worse still, over the past week I've found I can't reply to comments! Please accept my sincere apologies for what certainly may look like rudeness. On the subject of replies though I read in a Blogger forum that many people reply to comments by emailing the commenter directly - is that right? Is that what works?
Anyway, thank you very much for reading my ramblings, and if you do comment I will TRY to reply.. .


