Friday 27 January 2012

Broderie Anglaise + Linen: V1175 Donna Karan (Mark 2)


It was over a year ago that I first made a wearable muslin of this amazing Donna Karan Vogue pattern:


and I have worn that dress so much that it is becoming limp and weary.

I always intended to make it again, and finally I have:


Mark 2 is a little different from the original. This time around I've used a pretty broderie anglaise* for the contrasting front and back bodice, with a stone-coloured Irish linen for the skirt.


As the skirt fabric is heavy, I've left it unlined, and I've made the pockets from lining fabric.  I enjoyed the unusual hemline created by omittting the skirt "puff" first time around (in the pattern, the skirt outer is sewn to the skirt lining and this creates a bubble or puff effect), so I did the same again with mark 2.

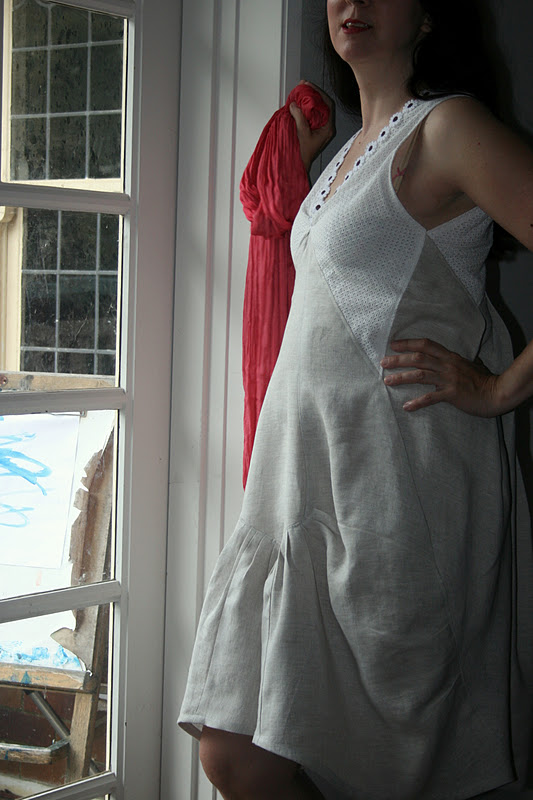
See how the hem rises in front? Contrasting fabric also highlights the interesting shapes.
This is a straight 12, and very roomy around the waist and hips so perfect if you have pear tendencies. 


Pleats and shaping at the back

And at the last minute I took inspiration from the Prada top shown on the Feb. '12 cover of Vogue UK:


and hand sewed some extra daisies to the front neckline (this photo also tells you why my summery Sydney photos were taken inside):


Result? I love it!

Shall I make another? Maybe one for parties?

This is such a clever pattern... but it's not especially hard. It's rated Average; there are some places where you need to sew carefully and get the fabric pieces aligned correctly, but there are no ridiculously complex techniques needed.

*: the Prada top shown on the Vogue cover above is described as being made of broderie anglaise, so that's what I'm calling my fabric too.  I did do some internet searching to try to understand the difference between eyelet and broderie anglaise but it remained unclear to me.

-----------------------------------------------------------------------------

I'm considering applying Carolyn's approach to collecting statistics about the cost of my sewing habit - actually Carolyn has decided not to keep sharing this info per garment, and this may be a one-off for me too, but taking note of these facts even if I don't share them certainly makes me appreciate that sewing is neither a cheap nor a quick exercise for me.

Total cost $48
  • pattern: $0 (second use therefore counts as free)
  • lace from stash: approx $12 I think (designer remnant from The Fabric Shop, marked down due to lots of marks on the fabric that didn't wash out)
  • linen from stash: $20 or less (less than 1.5m, bought on sale)
  • lining from stash: 1m piece, so at most $8
  • white thread: $0 (existing roll that was already half-used)
  • daisy trim: $8 for 1m from Lincraft

Total time 8 hours
but would probably take 5 if you had enough fabric + a serger, and if you didn't add extra steps
  • Cutting out this dress took me about an hour, but I had to place the bodice pieces between the marks on my lace, and I didn't have anywhere near enough linen for the skirt as drafted. I ended up being able to fit the skirt back, skirt front and part of the skirt sides (ie the really big pattern pieces in this pattern) onto my fabric, and then used the oddly shaped leftover bits to cut out the rest of the skirt sides in 4 more pieces. This took a lot of pattern piece jiggling, and my skirt then had extra seams to match up and sew.
  • My sewing machine's 3-step zig zag is probably slower than a serger would be. One day... 
  • I love pleats, geometric shapes and puzzle-like garment construction, but they make for a slower than usual dress to sew. 
  • I added lots of top stitching (imperfect but slow going) and hand stitched the daisy trim on the neckline.

Gotta run!


Photobucket

Wednesday 18 January 2012

Ralph Lauren "Beach Pajamas" Muslin

I've spotted a few blog posts lately with pictures of lovely 1930s beach pajamas - such as Q's Daydream Vintage's recent post - and was surprised when it dawned on me that they must have "inspired" the 1989 Vogue Ralph Lauren pantdress pattern I've been planning for ages to make. Here's another post from Q's Daydream Vintage on 1930s wide legged pants - beautiful!

And here's what my pattern envelope looks like - and when I originally made this up in a lightweight navy blue linen for my young skinny self, it even looked like this:


However, I am no longer a size 10 in Vogue patterns :-).  I'm quite a bit bigger than that now... so I had a stab at grading the pattern up, and tested the fit with a muslin:


The full length back view photo just highlights an ugly utilitarian bra that probably shouldn't have been involved, and the crossed over straps looked fine, so here's a cropped pic from the waist down. Ignore the extra length in the waistband:


This muslin represents:
  • original size 10 pattern graded up to about a size 12 at the shoulders, then a size 14 everywhere else
  • removal of front waist pleats which were accentuating my belly - this takes the waist size up to probably an 18 (gah! must stop with the biccies!) 
  • removal of gathers where bib top meets waist band - I wanted more coverage at the sides
  • removal of in-seam side pockets which weren't sitting flat
  • addition of about 3" in leg length
When I look at these photos the "fit" (should that be "loose"?) looks OK to me except in the top, which is (1) not providing enough coverage at the sides and (2) needs dart adjustments or adjustment in the way the bib meets the waistband at the sides to get rid of some of excess fabric at the sides. I may need to go back to a size 10 for my narrow shoulders (pear, anyone?) and I may need more length depending if I want the original above-ankle look or a more up-to-date longer look. 

So still to do:
  • correct the darts and/or adjust seam between bib and waistband at sides
  • widen top from underarm level and down, so that it provides better coverage down the sides
  • consider adding about 2" more in length
I think it's going to be pretty nice, but it would look brilliant on someone skinny...

After staring at these pictures a lot I am also now wondering if I should just make this pattern up just as wide legged trousers - perhaps that would be a more practical version as well as more flattering on my biscuit-padded shape?  My real fabric will be a heavy dark navy linen.  I guess if I make this up as a pantdress I can always remove the bib top later on if it looks too appalling...? If you have a view I would love to hear it, although of course whatever decision I make will be my own fault.

PS I noticed Ralph Lauren using this pants shape again for 2012! Check out Vogue UK's report from his Spring/Summer 2012 RTW show... especially picture #5.

Monday 16 January 2012

Another Little Dress

I guess sewing dresses for my daughter must be one of my forms of sewing procrastination, because rather than keep going with my muslin for my 1980s Vogue Ralph Lauren all-in-one (more on that to come in a separate post) I've gone and made another.


Of course she says she loves it - smart kid! Positive feedback keeps the dresses coming...

The details:

  • the pattern is # 148 from BurdaStyle 06/2010, in a lengthened size 110cm. Exactly as for the last dress I posted. And the extra length is exactly as requested, long enough that the boys at kindy won't catch sight of her undies when she's running around (this seems to be a new concern).
  • the fabric is a very lightweight voile that I picked up recently at Lincraft (they still have heaps - also in a blues/purples version). It's fully lined (not part of the pattern) in a coordinating pale pink voile. 
  • instead of 2 pieces of angled lengthwise trim as suggested in the pattern, this time around I handstitched a little piece of daisy trim on the neckline - a small piece of guipere lace, also from Lincraft (but quite expensive for them). 


Look where I got the idea for the neckline trim from: a gorgeous Little Leona by Leona Edmiston t-shirt my daughter was given for Christmas:


I think I prefer the finish on this fully lined version to my earlier one with bias bound edges - makes for such a straightforward but neat-looking little dress....


Sunday 15 January 2012

The Crafty Side of Last Week

Last week I worked 5 days, went to the gym 3 times, and went out for 3 meals, and still sewed a lot. The other thing I did was to ignore the internet - excepting google reader on my phone (where I can add a star but don't add comments, because the tiny phone keypad makes me write such absolute gobbledegook).  If you were one of the people that left me a lovely comment, I'm really sorry not to have replied yet -  I just don't seem to be able to multitask! My late evenings can be spent reading and commenting/replying/blogging OR sewing, and not both.  But next week I'm having time off work so I will be catching up.

Here's the craft side of what I made last week.

A couple of cushion covers:


My first Nicole Mallalieu pattern, the super-simple zipped pouch  - this one my purse test:


Then a pair of zipped pouches for my sister in law's upcoming birthday (it's OK, I'm just about 100% sure she's never read this blog).  If I can, I'll try to make a matching little bag too.

The outer of one is the lining of the other, and vice versa:


These pouches were made from the zipped pouch pattern in Ms Mallalieu's "You Sew, Girl" book.  I have to admit I felt like an absolute dunce making these - even though they were rated just Advanced Beginnner, it took me ages to understand what I was supposed to be doing.  I think I was distracted by the colourful photos illustrating the instructions; so different to the B&W words and line drawings of the Big 4 :-).

My purses are a bit wonky - obviously homemade - and I managed to set one of the zips too low!  I hope they're good enough for a gift.

Sunday 8 January 2012

A New BurdaStyle Girl's Dress

My daughter is shooting up like a rocket - and because she's growing so fast she requires replacement dresses. I kind of wish I could just whip us t-shirt style basics, but I guess that wouldn't satisfy either of us.

So here's the latest:


It hasn't photographed very well in the bright daylight, so here's a closeup:


This dress was made using pattern 148 from issue 6/2010 of BurdaStyle in a size 110cm height significantly lengthened as specificied by the client. I didn't really have enough of this fabric (or the trim,come to that) for anything more than a mini dress - hence the blue linen band around the bottom (scraps from my recent beach skirt).

Arm holes and neck hole are finished with a darker coloured bias binding, which I'm getting better at yay!

I finished this up late last night and wasn't sure if it was going to be a bit snug through the shoulders and torso so I added a button tab (gives a tiny bit more room in the back shoulders) and a very adult zipper concealed down the left hand side seam.


I had expected the blue linen band would be a bit of a problem. I was specifically instructed yesterday to use pale pink linen, because otherwise the dress would be "blue all over" - but  the pale pink looked awful! Luckily my little client is not too fussy so long as the end result is pretty.
I got a few more "orders" yesterday for more dresses and skirts from back issues of BurdaStyle and Patrones Ninos, and we had even got as far as matching stash fabrics to patterns. However, I'm going to try to leave the pretty stuff aside for a little while as I really need to sort out some grown up trouser fitting issues so I can finish sewing these (graded up substantially !!!) before summer ends:


Photobucket

Thursday 5 January 2012

Up Sew Late in 2011

Over the weekend I went back through my 2011 sewing. I was more productive than I would have guessed! It looks like it was a good year. Among the "ups" were participating in Sherry's RTW sewalong (even though I didn't finish my jacket), taking part in Zoe's Me Made March 2011, and becoming part of a terrific and very kind sewing community (thanks readers and commenters!)  

Now probably more for my sake than anyone else's, here's a pictorial round-up from this blog - I've tried to include everything made in 2011 that I also blogged in 2011 (including a couple of not-quite-finisheds), but I may well have missed something. The pictures click through to a larger versions in Picasa but don't link back to the original posts.

Dresses


Jackets / Suits / Coordinates


Skirts / Pants


Tops / T-shirts


Kids Clothes / Costumes / Cushions


It would be true to say I like a bit of colour!

---------------------------------------------------

Now for anyone interested in how I inserted the above tables of clickable images that doesn't already know how, it's all about the html code, and it's not hard.  I hadn't ever had anything to do with html code before this evening, although I do the occasional bit of programming in other languages for work - but really, it seems easy to copy the structure of the html code.

Click the Edit HTML tab at the top of your draft post instead of the default COMPOSE tab, and you'll see your post as it looks in code.

The basic html structure you need to use for a 3 x 3 table is as follows - you type this when you're in the Edit HTML view:

<table>
<tr>
<td>Row 1 Col 1; </td>
<td>Row 1 Col 2; </td>
<td>Row 1 Col 3 </td>
</tr>
<tr>
<td>Row 2 Col 1; </td>
<td>Row 2 Col 2; </td>
<td>Row 2 Col 3 </td>
</tr>
</table>
 
Try this in the Edit HTML view, and see what it gives when you click over to the Compose view - you should end up with this:

Row 1 Col 1; Row 1 Col 2; Row 1 Col 3
Row 2 Col 1; Row 2 Col 2; Row 2 Col 3

To insert clickable links instead of text, you need to type in html addresses for your photos. I'm not going to provide you with my photo addresses, but this example is the one I really learnt from... 

My photos were in Picasa. For each photo I wanted to include I selected the photo, then clicked "link to this photo" in the RHS pane, then selected size (eg Small) and link properties, then copied the html code generated under "Embed image". For each photo you get a unique piece of code which looks like this:

<a href="https://picasaweb.google.com/lh/photo/XelQhjnbNmP-Nocx85XS2Z29sxFvL0bHS71vkIlVgXQ?feat=embedwebsite"><img src="https://lh5.googleusercontent.com/-W-fK4kirX7g/TNaS93wzHuI/AAAAAAAAACQ/KC2C-rBQeAA/s288/V1128_AnneKleinNY_top%252526pants.jpg" height="288" width="273" /></a>

To include the photos in the table, you just insert these crazy pieces of html code into the basic structure above. Done!
Related Posts Plugin for WordPress, Blogger...