Sunday 28 February 2016

Vintage Pattern Pledge 2016

This year I'm once again joining the Vintage Pattern Pledge hosted by Marie and Kerry - I love vintage patterns and I have quite a few, but I need a gentle prod to actually sew from them rather than just drooling over them.

Last year my pledge was to sew up at least 4 of my vintage or reproduction sewing patterns, but 3 is all I managed - a 1940s dress, a 60s cape, and an 80s top:


It doesn't sound like much, does it!

However, there were two more "half" garments; vintage dresses I started and didn't complete.  So this year my first priority is to finish these two off before they become proper UFOs (unfinished objects):


Vogue 8974

McCall 6581

I've already sewn up an 80s midi skirt for our continuing summer weather, so that's going on my list too:

Vogue 1387 (John Anthony)
And my daughter has put in a request for me to sew her this next dress - I downsized a size 12 copy of this pattern for a dress for her a couple of years ago, and she still loves the style:


Judging by my efforts last year that's probably going to be plenty, but I want to add an extra challenge for myself, should I find myself with loads of time and energy on my hands.


I have two small boxes of very special vintage patterns, patterns from anywhere from the 1920s to the 1960s, that I really should think about sewing.  Here are a few of my favourites:

Simplicity 2647

Simplicity 2844

McCall 7023

McCall 7260

Vogue 100 Ronald Peterson

Vogue 1556 Yves Saint Laurent


Putting it all together, here's my pledge:


I, Gabrielle of UpSewLate, pledge to sew at least one more vintage midi skirt from an 80s pattern, to finish sewing the two vintage dresses I started last year, and to sew my daughter the 1970s dress she's requested. And as an extra challenge, I'll aim to sew at least one of the vintage patterns I normally just drool over.  


And I'll be back soon with a modern bit of sewing that my son graciously photographed for me today.


Happy sewing


- Gabrielle xx


Saturday 20 February 2016

Weekend Chambray (Vogue 8993)

So... after about a month of indecision, I've decided to Just. Wear. It.

"It" being this dress, of course, which I've had ironed and ready to go for all that time, and which looks much better than I expected - if a little old fashioned - in these photos my daughter took for me the other evening.


Here's the dress: Vogue 8993, view B, in full length mode:


View B is midi length - which is to say mid-way between knee and ankle. The pattern envelope gives the finished garment's back length from the base of the neck to the skirt hem for view B as 126 cm (49.5") in the size 14.  I'm about 5'8" tall and when I held the pattern tissue against myself the skirt looked to be the length I wanted, so I didn't adjust it at all.

View A is the same dress, lopped to just below knee length; a couple of inches longer than this:


which I suspect makes for a more attractive garment from behind!

Speaking of which, isn't this back view plain? Even twirling didn't help!  I feel like the back needs some of those front skirt pleats, though I guess that would mean using substantially more fabric...


Hmm, perhaps that plainness wouldn't be noticeable in a busy print... but as you can see, I used a very plain blue fabric, a stretch chambray fabric from The Fabric Store.

On the positive side, with a plain fabric you can see the seam lines clearly, and marvel at the alignment of princess seams and skirt pleats or darts. That is, I can marvel - that alignment took a bit of effort!


I'm very happy with the way the front bodice fits in the upper chest - I haven't added any darts but I did make some adjustments to the fit as I went.  The collar wasn't tricky to sew, though I had to adjust mine after fitting the upper bodice, but I found it tricky to sew the lined v-neck neatly.  My tendency is to be too cautious and not sew close enough to the point; I had to do this part of the dress in a couple of passes to get my stitches right up to the point.


However, I can see I've got wrinkles at the sides of the bodice and some extra fabric under the bust too.  It may be that the bodice is a bit long, but Vogue pattern bodices are usually the right length on me; more likely is that when sewing the lining to the outer at the waist seam I've accidentally made the lining a bit short.

And those armholes, described as "cut in" on the pattern envelope, are also "cut down" (not mentioned on the pattern envelope).  I'm sure it's the style, but I don't particularly like low cut underarms!


When I was fitting the bodice I noticed I had excess fabric in the upper back, probably relating to bad posture, so I pin fit darts from the neckline to take out the fullness. The bodice is fully lined in cotton voile, and on the lining I've used pleats instead of darts in the upper back as I wanted to give the non-stretch lining some ease given that the dress outer fabric is a stretch woven.


You can see in that photo above that I used long strips of interfacing on the seamline before sewing in my invisible zip - they help so much when your fabric has a bit of stretch!

The dress has pockets in the side seams, with the pocket bags sewn into the waist seam to anchor them and reduce stretching out where the side seam would otherwise take all the tension from pocket use,    


And there's heaps of room for striding about, given those deep front pleats and the "A" shape of the skirt:


I love these shoes! They're just from Nine West, not expensive. I bought them late last year thinking they'd go with something else I was making (not finished yet, but it's a similar length), and I really like them with this dress. I've barely worn them yet, which is why they look so unblemished!

Overall. this dress seems nicer on than I expected based on trying it on as I sewed it.  I love the neckline, and I really like the length and width of the skirt. I'm not ready to make the "yay or nay" call just yet though, because I'm not 100% sure, and when I'm not sure I often make the wrong call (like with this Inari dress that I said I liked, and which I now dislike intensely, and these mustard pants that I thought were a terrible fit, but which fit me much better than my RTW pants).


Pattern: Vogue 8993, view B

Size: size 12 bodice, size 14 skirt, both taken in

Fabric: Stretch chambray from The Fabric Store, and coordinating blue cotton voile to line the bodice.  Interfacing from Tessuti fabrics.

Modifications: None other than adding darts in the upper back for fit. Oh and using an invisible rather than a regular zip.

Future changes:  Next time around I would raise the armhole and make the bodice looser.  I might also raise the skirt to about knee length, and fabric yardage permitting I think I'd add a couple of deep pleats in the back. And I might add belt loops. as I think this style of dress would suit a narrow belt.


This next photo is just silly, I know! Taking photos while you joke around with someone is so much more fun than just using the remote :).


Thanks for reading, and see you soon!


- Gabrielle xx


Sunday 7 February 2016

The Simple Things

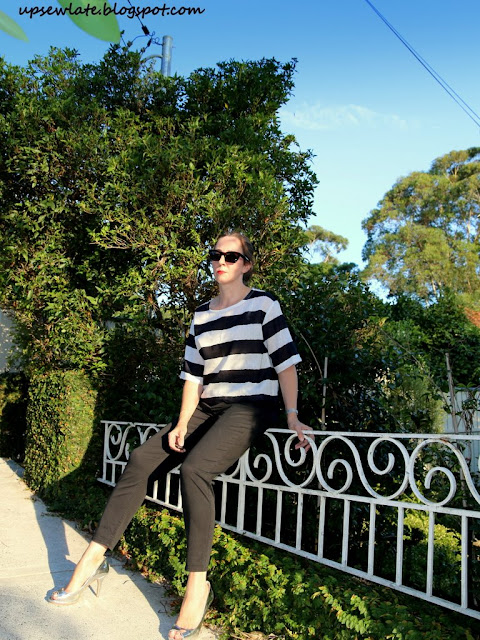
You wouldn't know it because I've been a slack blogger, but this is my third S1366 top, and it was finished ages ago, before Christmas. The first was made from the pattern with no adjustments, and had to be given to my mum, who has wider shoulders than me.  Number two was a successful test of a narrower boatneck, but is made from such a boring fabric that I can't bring myself to wear it, let alone blog it.  Third time around, fabric AND fit came together happily.


As you can see, it's a simple shape - dropped shoulder, boat neck, loose elbow-length sleeves and a loose, dartless bodice, all of which mean a nice quick sew.  The pattern gives you a top which is longer than what I've made here, but this time around I wanted a cropped top that would sit outside of skirts and pants.   My hope is that this length will camouflage my short waist, which is located very close to the bottom of my rib cage. Whether or not that works, the shape seems to go with everything from jeans and shorts to pencil skirts and cigarette pants. 

In these photos I'm wearing RTW pants that I wear to work a lot - and guess what, they fit me worse than those Burda pants I was complaining about a couple of posts back!  I can't believe I've been confidently wearing these pants while decrying the mustard pants... ARGH!  Anyway, we're all still learning, right?


I sewed the top in a size 12, which is supposed to fit a 34" bust yet which has a finished bust measurement of 41.5".  That is such a lot of ease that I would suggest going down a size from your measurements. My bust size is currently about 37", halfway between the size 14 and the size 16, and the fit on the size 12 feels right on me.

The fabric is a cotton I bought from Tessuti Fabrics a while ago, a Ralph Lauren-esque classic in navy and cream stripes, though the stripes waver in a way that feels more interesting to me at the moment than a straight line stripe.


Because it's sheer, I also sewed up the camisole that comes with this pattern - but in these photos I'm wearing the top with an old RTW cami.  

I've finished the neckline with cream coloured cotton bias binding (a self fabric would have shown through), and I've french seamed the main seams and overlocked hem edges before turning them over and top stitching.   The stripes are matched up on the side seams (and the sleeve seams that you can't see) - with such a wide stripe there was no way I wouldn't!


OK, so the top is good, the pants not so much.  Onto the camisole.

I sewed the camisole up in a size 12, assuming it would be designed to fit under the matching top of the same size.

My fabric this time around was a mid-weight cream coloured satin that I picked up ages ago at one of my local second hand stores.


As with the top, the pattern for the cami was extremely simple - the front and back are identical, and the design relies on a bias cut to fit to whatever shape it needs to fit.  Even the rouleau straps proved easily done.


The pattern envelope says that the size 12 cami, for a person with a bust of 34", should have a finished bust measurement of 36.5" - and if you recall, the size 12 top has a finished bust measurement of 41.5".  In other words, the camisole is intended to provide a smaller fit than the top, and should have been snug (though it's bias cut, so not unpleasantly snug) on my 37" bust.


And yet it's too loose. I imagine fabric type plays a big part here; perhaps my fabric is too drapey, but I didn't expect the camisole to fit me like this.  Although by keeping my arms by my sides I can disguise the problem, there's excess fabric both at the sides of the camisole and in the front and back necklines and it just feels way too big.  I don't think taking it in at the side seams is a solution, as this will also pull the straps out - I need to make this another size smaller!


Since I have other camisoles that fit, it's not a huge problem - I can still wear my stripey top.  The one thing I hadn't thought about when I made the top was that IF it has to be worn with a camisole, unless the camisole is cotton it's going to be too hot for summer.  We've been having a humid summer, and I do a lot of walking on my way to and from work each day, so I don't like to wear extra layers that I can't easily remove and carry as I walk.  I might see whether a cotton voile camisole makes it more suited for summer, but if not, I'm sure this top will get lots of wear come autumn.


Thanks for reading!


See you soon
- Gabrielle x

Tuesday 2 February 2016

Jungle January: Kielo Wrap Dress


Kielo wrap dress?   Certainly.

Jungle print?   Is an Aussie-bush-floral-sort-of print close enough?  With a touch of rope?  The rope part sounds right - but is that going to be enough to swing it?

January?   I finished this dress on the 31st January, and did quite a bit of its sewing in January, but it was started months ago. And it's being blogged in February (only just February though!). Is that January enough? 


Let's have a look at some garment photos, and we'll just assume all the paperwork's in order.


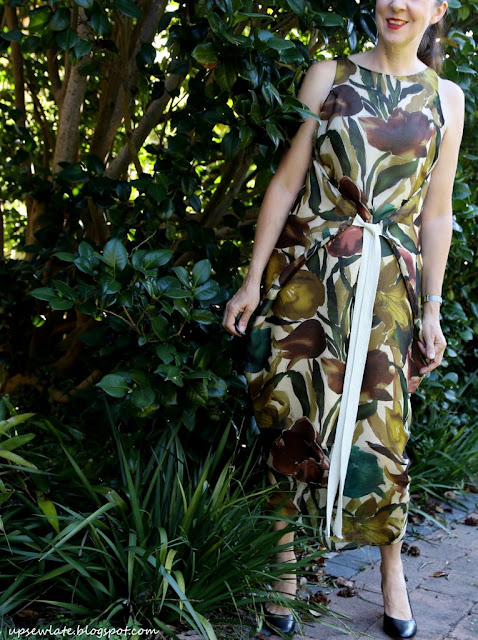
First up, with the ties at the front:


Then with the ties at the back:


And then with the ties as hand entertainment, or <<amuse-mains>>: 


So, as you already know, this is the Kielo wrap dress by Named patterns.   Judging by all the versions of this dress I've seen on other people's blogs, this dress pattern is a bit magical - it works in knits and wovens, full length or cropped, sleeveless or sleeved, and on all body types.

I bought the paper version of this pattern some time last year (or maybe even the year before), traced my size (EUR 38), and then waited to think of the right fabric.  Looking at my traced pattern pieces now, I don't think I added seam allowances - I'd only skimmed the instructions when I traced the pattern, and the snippet about adding seam allowances was in the middle of a paragraph that I didn't read properly - and this is probably why my dress is very fitted around the lower legs. Oops!

Removing about 7 cm from the hemline to bring the dress to a length I prefer to maxi length didn't really help, so if I make another Kielo I'll have to remember to add seam allowances and I might also make the slit in the centre back higher for easier striding.

The fabric is one that I've been holding in the stash for a long time - possibly a few years even.  I bought it from Tessuti fabrics, initially just a small remnant, and then more because I loved it and the remnant didn't look enough for a dress.  It feels soft and drapey and natural, and I vaguely recall it being a silk cotton mix.


My beautiful fabric was too transparent by itself, so under the dress is a 3/4 lining in a medium weight champagne coloured satin lining. The lining was made as another Kielo dress that stops at about knee length, just above the walking slit, then sewn to the dress proper at the neckline and armholes.

If you look closely you can see where the fabric's background colour darkens, below knee length, where the champagne coloured lining ends.

When I was sewing the outer and the lining together my fabrics stretched out in the shoulder straps and neckline, but I took the shoulders up about 3 or 4 cm and that fixed the problems without messing up the design.


My side seams also stretched and moved as I sewed them - I don't sew fine fabric too often, so I was probably being too cavalier with it - and that movement made me decide to skip the back darts. I think their absence is absolutely fine in this light fabric.

The natural rope ties were sewn into the seams, and the points where these ties come through were later hand stitched to the points of the lining.  The ties are wide and made of cotton - I think this a kind of webbing that's sometimes used in bag making, but please correct me if I'm wrong -  and I'm really happy with the way they juxtapose the airy dress.


To save cutting into my second piece of this fabric I pieced the upper back of the dress.  I wasn't able to match the print so I matched the colours instead:


And that's it - an imperfect dress that I'm very happy with!


-------------------------------------------


And now I have a question for you, my clever readers.

I've been invited at short notice to a fancy cocktail party with people I don't know (I'll be going as Mr UpSewLate's plus one), and I'm wondering, would this dress be appropriate, or would it be better to go the traditional route with something knee length and fitted - or something else entirely? What would you wear to a cocktail party?


Happy sewing, and see you soon


- Gabrielle x

Related Posts Plugin for WordPress, Blogger...