Showing posts with label vintage. Show all posts

Tuesday, 2 May 2017

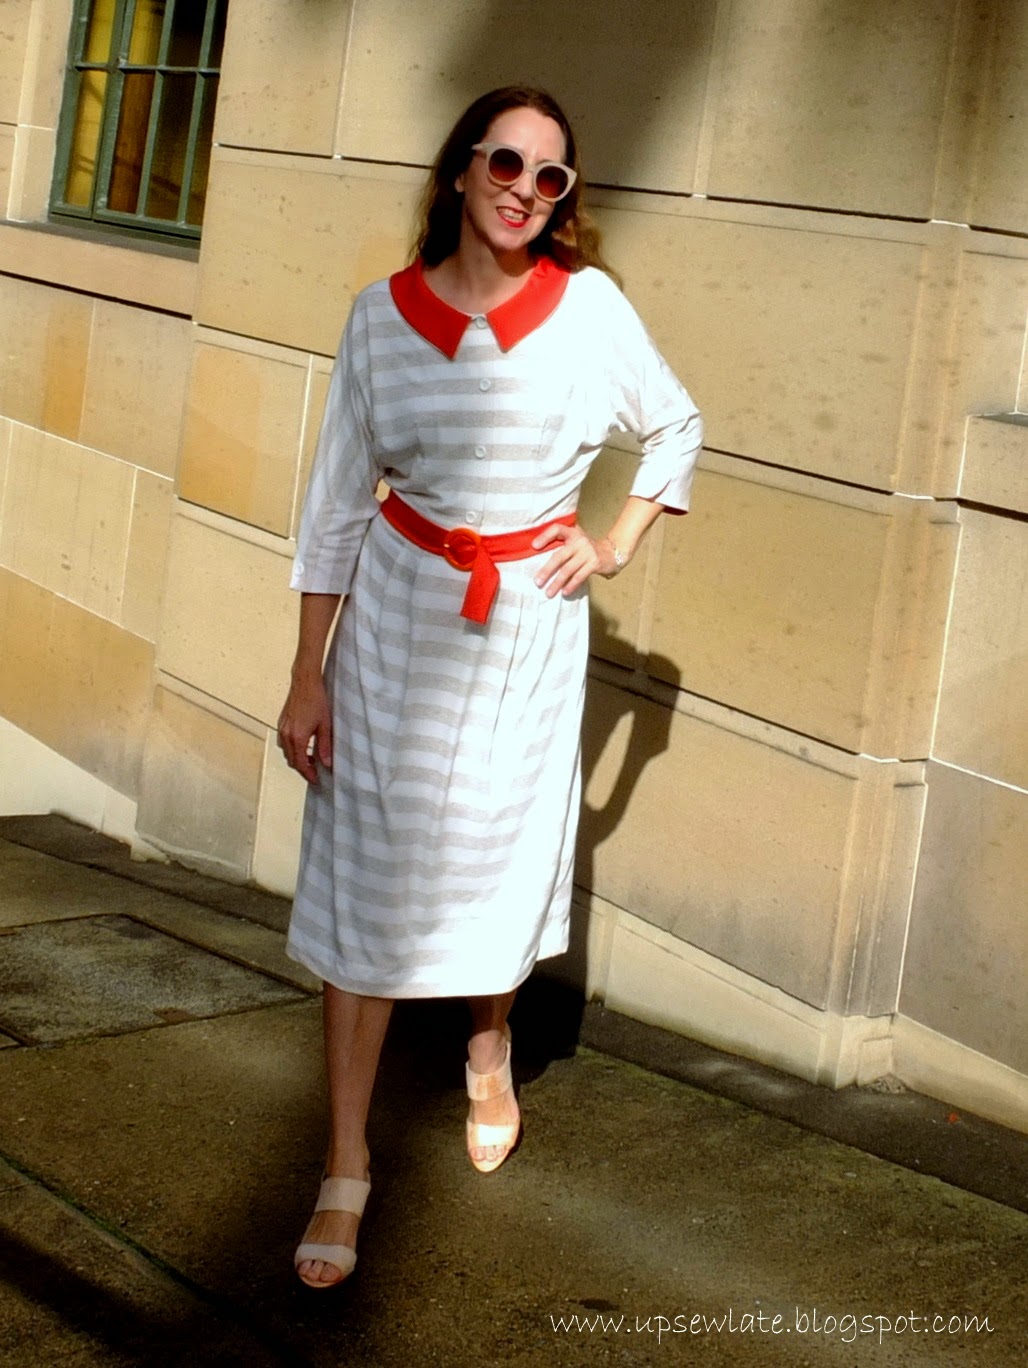
D&G Sundress: Vogue 8974

There was an icy wind blowing down the street the other night as I walked home from the station, trying very hard to imagine being warm. Despite the sunshine in these photos, Sydney weather has turned the corner, and the evenings have a bite to them.

I thought about this summer dress, waiting to be blogged, but frankly it didn't warm me up at all...


...all it did was remind me I needed to get cracking and write the blog post!!


The dress is Vogue 8974 which I imagine you've already seen blogged here and here, or in one of its many other blogged incarnations.  I started sewing this dress back in 2015 (!!), tweaking a muslin till the fit was perfect, but when I applied my adjusted pattern to the good fabric (Dolce & Gabbana textured cotton from Tessuti Fabrics - and no, pretty sure they don't have any more of it), the fit was completely off, and much looser than in my muslin.

I focused on aligning the centre front and back chevrons, then put the dress aside till the following summer.


In 2016 I got thinner, and when I came back to this dress the fit was even looser.

I sewed the main seams, set in an invisible zip in lieu of side snaps, moved the shoulder straps to line up the stripes (oops, a cutting out misalignment) and then spent hours and hours pinning and re-pinning the dress to take in all the saggy areas.

And then I put it aside again, wary of committing to so many adjustments.


I got it out AGAIN a few months ago, and hooray, I'd gained lots of weight and the dress now fit me perfectly!  #silverlining


Unfortunately by the time I'd finished up all the hand stitching on the inside of the dress (sewing opened seams flat, attaching facings to seams,sewing up the hem... ) I'd gained yet more weight, so in these photos you are not seeing that wonderful moment of perfect fit; you're seeing my "this is slightly too tight but I'm smiling anyway" version of fit :(.  Bugger.  

At this rate though I am hopeful it could fit brilliantly next summer ... or the one after?


Pattern

Vogue 8974 is a nice little pattern - the dress has interesting lines, a fit and flare profile that's a bit different from the usual, and I think it looks good on a variety of figures. It's a fun one to use with a striped fabric, and it's not super hard to sew.  The pattern includes instructions for side snaps to fasten the left side of the dress, but this is easily swapped for a zip, and you can also omit the belt if you don't happen to have belt-making paraphernalia to hand.


I haven't tried the little unlined jacket pattern that comes with the dress but I think it looks pretty sweet too. I was originally thinking to make a matching jacket with the piece of fabric I have left over from the dress, but then that might just be stripe overkill.

If I make the jacket, or make the dress again, there is one point I'd like to change: I'd add interfacing. How modern, right?  The pattern only shows the belt being interfaced, and while I noticed this vintage feature in time to retrospectively interface the dress facings, the upper edges of the bodice and the side seams, I wish I'd noticed before sewing the strap tubes.


Fit / Size

Arghh. Well, fit is the real challenge with this dress pattern. I found it was a bit of work to adjust the bodice to fit nicely, with darts in the right place, straps laying flat (I didn't quite achieve that - I needed a fitting friend for the back) AND side bodice not too low or high under the arms. You might be lucky and the dress might fit you out of the envelope, but I think it'd be realistic to go into sewing this dress expecting lots of try-ons and adjustments as you go.  For the record my dress is mostly a size 12-14, but ranges from size 10 above the bust to size 18 at the waist.


Modifications

I made a few "modernification" modifications to the pattern:
  • An invisible zip instead of side snaps - I'm too lazy for side snaps! 
  • Front straps without buttons (couldn't think of what sort of buttons I'd want)
  • Moved the front straps to align the stripes (they shouldn't be set back from the "V" but should continue its line), and next time I'd angle the back straps to make them sit flush against my back
  • Used my overlocker instead of turning under and stitching down seam allowances on the facings
  • Used interfacing on bodice edges, side seams and facings
  • Added height to the bodice as when the dart was in the right place the bodice cut looked too low 
  • Skipped the belt in favour of showing off the chevrons at the waistline


From memory I think I also changed the grainlines of the pattern - I really, really wanted those chevrons down the front and back, but that meant cutting the centre front (CF) and centre back (CB) seams on the bias.  I intended for the chevrons from the bodice and the skirt to meet at the waist in a double ended point, but I mustn't have measured carefully enough when I was cutting out, and that double point doesn't quite work out.


MIA

On a completely different topic, in case you were wondering where I went between February and April... I went nowhere; life just got crazily stressful, both at work and at home.

The full time job I mentioned towards the end of this post grew a couple of months ago when my colleague in the team left the company for an amazing overseas role, and I've been stretched trying to cover both our roles ever since.  We've recently been interviewing to fill the position, which was going to report to me (yay, a manager job!), and I was hopeful we'd be making a job offer in the next few days, but on Thursday night I was given the bad news that my Department has decided to save money by not filling any vacant positions for the rest of this FY.   I'm not sure what I'm going to do now, but I know I'm not prepared to kill myself for another 6+ months doing two jobs.

On the home front things are going nicely at the moment, but that's after a couple of pretty intense months with my daughter spending a few weeks in hospital, my son starting high school, the cat developing severe allergies, and my dad and his partner both in and out of hospital for surgery and tests. My daughter is hopefully having a preventative operation in a few weeks, and dad's having more surgery next week, but hopefully after that the health worries will ease off.

So - that's why I was MIA! I used to think sewing was my form of relaxation, a contrast to the frustrations and stresses of work and family life, but it turns out that when the stress is ramped up I just don't have the mental bandwidth to sew.


#VintagePledge2017

And back to the sewing... Marie of A Stitching Odyssey has been running the Vintage Pattern Pledge since 2014, and I joined in last year (somewhat unsuccessfully, you could argue) and the year before.

Here's all I managed last year against my vintage pledge:

Vintage Vogue skirt
Vintage DVF dress

This year I'll be having another go at pushing myself to sew from my vintage patterns - and I'm delighted that after three attempts this dress finally counts towards my pledge!

During 2017, I, Gabrielle of Up Sew Late, will sew up or finish sewing at least four of my vintage or reproduction sewing patterns. 


I'll try to blog again soon - I've got swimmers, frocktails dresses and a couple more tops to share with you as soon as I can get my photos in order :).


Happy sewing

Gabrielle xx

Friday, 16 January 2015

Broderie Anglaise V-Neck

You'd be excused for assuming I don't learn from my mistakes...


In late November I blogged a boxy cropped hibiscus print top, and I think most of you agreed with me that it was a bit of a dog. The fabric itself was fine, the shape of the top was interesting, but the combination of fabric and shape wasn't that great, and it just looked "off" on me. Bearing all that in mind, yes, I've made another of those boxy tops!


The thing is, I made this top around the same time as the first, and the hibiscus print top was only ever intended as a muslin for this one, the one that had drawn itself into my brain as a "must sew". By the time I'd photographed and judged the hibiscus version, number two was nearly done - I loved the look of these quieter fabrics together, so I just finished it up and here it is!

Interestingly, this one seems to look a LOT better on. Or is that just my imagination? Is it just that I much, much prefer these fabrics? The shape is exactly the same - the only change I made to the shape was to lengthen it a couple of centimetres through the body.

I'll let you compare the two versions for yourself - same shoes, different skirt, and nearly the same camera angle...


Hmm. It's not just my imagination.  Those couple of centimetres did wonders for my waist! 

OK, a couple more of these dodgy photos from the back - sorry, but I find photographing white clothes quite a challenge - and then I'll tell you about the fabric and show you some close ups of the top laid flat:


Fabric
The broderie anglaise that's the main fabric for this top is a large leftover from a designer remnant that I originally used in the bodice of this dress (oh, I loved that dress!). The fabric came from The Fabric Store here in Sydney a couple of years back, but I think I've seen something similar there - albeit with a larger pattern - in the last few months.

Broderie anglaise having all those little holes in it, I thought I'd best underline the front bodice. For the underlining I used some cream coloured linen left over from this top (hmm, I didn't love this when I made it), and that linen is also used in the sleeve cuffs and in the neckline band. Leftover fabric scraps feel like they're free, don't they - the fabric costs have already been attributed to the projects that came before! - so I'm calling this 100% free fabric.


Here's a close up of the inside bodice, at a side seam so you can see the difference a layer of linen makes to the broderie anglaise. The extra layer of course makes the fabric more opaque, and a layer of linen is more pleasant than lining fabric when you're dealing with hot, sweaty summers....


Pattern
As you may recall, the pattern is the one pictured below, a classic 80s shape if ever I saw one (trust me, I've seen quite a few up close).  It's supposed to be loose fitting, and waist length - check, check! You don't have to make it in a white fabric unless you want the look of that pattern envelope girl, though to really get the look you also need to invest in large plastic accessories.... Maybe next time?

And this cheap pattern is of course another sunk cost. Making it a free top, right?

Simplicity 6742, a classic 1980s outfit pattern
I said it last time, but I really like the way this V-neck is constructed! I know my close-ups in the hibiscus print were headache inducing, but I think the way it's been put together will be easier to see in this fabric.

The first of these next two views shows you the v-neck from the outside of the top (ie fabric right side), and the second view shows you the v-neck finish on the inside:

V-neck from the outside
V-neck construction, on the inside

Fitting and Pattern Adjustments
No fitting required with these loose, that-looks-too-big style of patterns :).

As I mentioned above, there was one change I made to this pattern that made a noticeable difference - I just lengthened it a few centimetres to around hip length. The other less striking change I made was to cut the v-neck pieces on the grain rather than on the bias, and this vastly improves on the original; version two of this top sits nicely on my shoulders :). So I did learn from the hibiscuses! 


Likes / Dislikes
As before, I really like this V-neck :). I love the shape of the top, and I think I'll be wearing it with this knee length skirt as well as with the slightly longer pink skirt blogged here. I suspect what makes it work so much better is that this top covers my waist - when a top cuts off at your waist, I guess that's where people's eyes are drawn!

There's still one annoying flaw with this top: those linen sleeve bands are creasing up like crazy! I did consider interfacing them as I was sewing this top up, and decided that interfacing would have made them too heavy. That may have been the wrong call :0.

Don't worry, it doesn't have to be perfect! 
OK, I think that's enough rambling about this one - there's one more 2014 top I want to blog soon, and after that we can talk about colourful 2015 dresses!


See you soon

- Gabrielle xx

Saturday, 28 June 2014

Mad Jaywalking

The Tessuti Fabrics Jaywalk competition? Yes, I entered too, and this is what I made in a mad, crazy weekend rush:


All very bright and striking with the orange backdrop, but below are my "official" entry pictures, taken a little earlier in my lunch break on the Tuesday of the competition deadline - in which you can see the dress just a little better, though still not that well:


That's front, side and back sorted then, right? Oh I know, you can't see the dress very well - but honestly I have to blame the photographer (shhh, that's me).  I think I need to do a basic camera course, maybe even the same course several times over - does anyone have any recommendations for a short course in Sydney?


I'll show you the details bit by bit, since evidently I can't show you the details on me!

First of all, the pattern is this McCall's beauty from the 1950s:


I chose this pattern after a lot of thought - I know it seems a crazy choice for a competition involving stripey stretch fabric, but as I didn't expect to win I wanted to make something that I would really like. When I played with the Jaywalk fabric I had in mind a picture of a vintage shirt dress in muted stripes, and all (d1-3) those (d4-10) selfies (d11-18) in (d19-25) May (d26-31) just amplified my love of the "narrow bottoms + loose top" silhouette. Where's the fun in sewing something you don't like? The red dress on the pattern envelope looked like THAT kind of silhouette :-), though my skirt hasn't worked out anywhere near the illustrated shape. So I used the stretch striped Jaywalk jersey to make something not recommended for stripes, and perhaps not so suited to stretch fabrics - but it's a dress I wore to work the day after completing, and that I'm sure I'll keep wearing. {Breathe out.}

I don't have much experience with proper vintage patterns, so I did a lot of paper measurements before any cutting. Interestingly I was able to sew the pattern (in a vintage size 16 - and I'm about a size 12 in the Big 4 these days) with minimal adjustments, although arguably the fit I've achieved is too loose - or perhaps more suited to a woven incarnation of the dress.  According to the vintage pattern envelope I should have been a size 14 in the bust (and I probably should have been wearing a bullet bra!) and a few sizes up in the waist and hips; the bust is a bit loose and there was quite a nice amount of ease at the waist and hips.  


The pattern was classed as easy back in the day, and it's really not particularly tricky for an experienced sewist though there are quite a few details. It's simply a belted shirt dress, with an invisible zip in the side seam, a buttoned bodice front (it's a proper 2-piece shirt front, but as there's also a side zip I didn't make my buttons functional), and buttoned triple-darted sleeves.  I tried not to take any short cuts, and I cut out and sewed the whole dress to the best of my ability - what more can you do?

The orange fabric you see is a stretch cotton, also from Tessuti Fabrics. I was initially going to make the collar with the orange fabric underneath, but on trying the bodice both ways I found I really preferred having the orange upper-most - apparently having the loud orange on display makes the muted Jaywalk colours easier for me to wear :).


Both the belt buckle and the buttons are vintage, picked up ages ago at a second hand store - and I still have heaps of the buttons left!  When I got up to making the belt I was running out of time, so I tried to wing it and insert a long piece of buckram that I'd cut to size into the sewn belt tube. Unfortunately it proved impossible to insert the buckram without it creasing really badly and making the belt look a mess, so I now have a soft belt :). The buckle is a vintage one that I cut the fabric to fit, and I've just double stitched a row of those little "o" shapes with my machine to make buckle holes. I have made belts before and made them properly, so next time I'll have to check one of my sewing bibles as to the correct method!  

And back to the subject of collars, my experience is that precise cutting out makes a huge difference to the look of a garment, but particularly with collars, where a little asymmetry or deviation from the drawn curve is so noticeable. Collar points are noticeable too - mine aren't that good.

I pinned and pressed the collar so as to have the Jaywalk fabric peeking out from under the orange collar, giving the effect of piping. You can see in the next photo that the effect of this is that on the neckline, the orange fabric hangs past the Jaywalk fabric.


The seams are nearly all sewn with a twin needle straight stitch (lengthened) and finished with an overlocker. The shoulder and arm seam, continuing to the cuff, is stabilised with lightweight ribbon rather than clear elastic, as the seam doesn't need any give:


Here's the invisible zip in the side seam - to sew this in I started by interfacing the seam allowances, then basted the zip in with my regular machine foot and a long stitch length (and lots of pins and pencil markings to help me match the stripes). I finished with the invisible zipper foot and a regular straight stitch. I think it worked out well:  


The cuffs are faced with the same (stretch cotton) fabric as used for the contrast collar and belt, and are under stitched as well as catch stitched to the seam allowance to keep them from rolling out. I did the same with the collar but didn't take photos of it! 


In the next photo you can see the sleeve pleats - which are a bit pointless in a soft, stretchy fabric!


I added a waist stay with the aim of helping to support the weight of the skirt fabric and prevent it from pulling on the bodice, though I'm not sure how well it's working:


And of course there's some stripe matching. Side seams, shoulder seams, arm seams, and skirt panels. The skirt front has soft folds that align with the bodice darts, and the back skirt is made from 4 separate panels that align with the centre back seam, with very slight bodice pleats. I managed to match the stripes across the panels pretty well, though not perfectly:


So that's it!

There was a lot of sewing in this dress, all a mad, crazy rush the weekend before the competition deadline. Started late, finished late (the night before the due date), took photos in my lunch break on the due date, and sent my photos in a few minutes before crunch time. Crazy. And I have to admit (to myself mostly - you probably already knew) that sewing deadlines are just not fun.

Hopefully I'll be wearing this dress lots come Spring (and finding or making myself a dolman sleeved jacket to go on top).  I'm glad I made it, I'm happy with the care I took with it, and I'm super pleased to have used a lovely vintage pattern. Will I enter the comp next year though - and will you?


See you soon
Gabrielle xx


Friday, 27 September 2013

To the Gallery: 1940s Cotton Dress


Ta da! Here's my TMS vintage effort for the month of September - and also my Fall for Cotton entry (is that a bit cheeky, or super efficient?!).


Not sure if you can see any details - it's quite a plain little dress; a very simple 1940 silhouette courtesy of Vogue 8811, - but we were having such a hot, bright Spring day that my outside photos were a bit washed out (I've darkened these significantly).

I originally made and blogged about this pattern last year (back here) as a crunchy, exciting pewter coloured taffeta, but that version only fits when I'm at my thinnest, which is not necessarily when I want to wear it. This version differs in more than fabric choice: I graded it up in the waist (necessity), left the neckline pretty close to the original pattern instead of scooping it out and adding a collar, and in the spirit of proper vintage sewing, made those shoulder pads myself from layers of cotton wadding with a darted fabric cover.


Can you guess where we took these photos? And by "we" I mean my kids... Well obviously it's a gallery, but this is the Art Gallery of NSW. Culture - and so much of it for free!


Naturally I wouldn't have had this smug expression on my face if I'd realised one shoulder pad was trying to break free... what a goose!

Ignoring the wayward shoulder pad, you may be able to see that the shoulder pads are pretty much just a reflection of my natural shoulder line.  I suspect now that they're supposed to give a slightly extended shoulder line - but I really don't know what's right for the 1940s.

I know I'm not showing you photos of all these details, but my back button is vintage, the press stud it's hiding is vintage, and the belt buckle is vintage (probably a different vintage, but it was the best match I had to hand). I have to say this is probably the worst belt I've ever made - I should've used something heavier than interfacing, I don't know what I was thinking. Maybe I'll make a new belt with some buckram inside it... And I don't know that this is a vintage feature or if I was just half asleep, but I didn't see instructions for any interfacing to be used apart from in the belt so that's the only place I used it - and of course in the belt it's completely insufficient.


The invisible zip which you really can't see in these photos IS pretty invisible and is modern, and the fabric is modern - Japanese quilting cotton from Lincraft, bought in a panic when I was trying to get this project done early. The fabric is (of course) cotton, and having pored over a bunch of 40s dresses on the internet and in books, I thought the floral pattern looked suitable for the period.  I've never sewn for myself with quilting cotton before, and I was worried that it would be too heavy or have poor drape. This particular cotton is lightweight and drapes well after a wash, but I don't know if it's going to have the longevity of a fashion fabric. I hope it does, because the dress feels lovely and breezy on a hot day, while still looking kind of smart.  


As you can probably tell, the weather was really hot - Aussie mid-Summer hot. Heaven help us if Summer is hotter than Spring this year; the bush fires have already started! 


So why did it take so long for me to make a simple cotton dress?

Well, the above dress is not the one I started out making.  I was originally trying to make this pattern:

click for source
I had the pattern in the right bust size, and I graded up for waist and hips. Then I made my muslin, and WOW the fit! It was absolutely appalling! There were a good 2 inches of what seemed like excess fabric in the front upper bodice, and another 2 in the back! Now I know I have narrow shoulders and a small bust, but surely the women of the 1940s didn't have such broad shoulders...

Without really knowing what 'good fit' was in the 1940s, I then spent a lot of time thinking instead of sewing. It was possible that the style of the time was for a lot of excess fabric around the shoulders and bust (hmmm maybe a bit of ease was considered stylish... but probably not this much), but another real possibility was that McCalls back then were known for their out-of-control vanity sizing (hey, maybe it was just as much of a hot topic then as now).

I pinned out the excess on my dress dummy, but then I got cold feet.


I've had this muslin on my dress dummy now for a few weeks, and I've decided that regardless of how authentic to the 1940s this fit is, I like it. I want to make it like this (but regular length) in a crepe or silk satin; something really drapey. 

Related Posts Plugin for WordPress, Blogger...