Showing posts with label McCall's patterns. Show all posts

Saturday, 15 July 2017

I Will Follow (McCall's 7542)

Well I won't usually.  Usually I'll apply my utmost self-discipline to avoid following the social media trends, because I reckon I'm usually tempted to follow only because everyone else is (peer pressure, yes, the force is strong), and that's not a good enough reason really :).


However, this time around the trend was a pattern (McCall's 7542) that looked to tick a lot of boxes for me:
  • Great sleeves: tick
  • More than one variation I'd like to wear: tick
  • Easy without looking like fast fashion: tick
  • Mashable with other patterns: tick
  • Different from other patterns I own: tick


This time around (I'll definitely use this pattern again, even if only for the sleeves) I sewed a variant on option E, which is the option with lower bubble sleeves gathered into the upper sleeve with an exposed seam (no idea of the correct terminology, sorry!). In my version the border between upper and lower sleeves is a regular seam, and that lower sleeve isn't a bubble but a single layer of fabric.

As you'll see I used a couple of fabrics for this top.  I had small and rather lovely piece of geometric wool from The Fabric Store, and it wasn't quite enough for the top, so I coupled it with a small remnant of black ponti for the back of the top.  I love this geometric fabric so much - and it reminds me of a beloved geometric silk from The Fabric Store that I sewed into a summer top a couple of year sago (post here).  The top only needs a single button, so the small purple button comes from my button stash. I think this particular button was inherited from my mother-in-law, who used to wear quite a bit of purple.


I sewed this top in a size 14 - a size bigger than I'd sew in a Vogue designer pattern - because I suspected the McCall's sizing might be more consistent with the Vogue basics line, and I'm more of a 14 than a 12 there.  It's still looking a little tight in these photos, but I expect the fit will be looser when my thyroid levels get back to normal. 


A few people have mentioned the top length in their reviews, and this is something to be aware of before you cut your top out: as well as being quite fitted, it's short!  My version of the top is cut out in the longer of two lengths, but it's not that long. Before whipping this up from a special fabric I'd really recommend measuring the bodice and sleeve widths and lengths. The fact that I've used a stretchy fabric for the back of my top effectively gives me more width, but my lower sleeve is nearly twice the drafted length of the bubble - the original would have hit me at just below elbow length. 


All up, this one's a fun and versatile pattern - highly recommended, and I look forward to trying the trumpet or tulip sleeves soon.  For more examples of this pattern sewn up have a look at Alex's striped viscose version here, Kabunta's blue and pink versions here, Carmen's teal tulip-sleeved version here, and Erika's pale pink accordion pleat sleeved version here.  And there are loads more on Pattern Review of course :).


Ahhh I love geometric fabric...  


See you soon!

- Gabrielle x

PS apparently it's become just about impossible to comment on my blog lately - I'm so sorry if you've been trying to do so.  I do have Disqus installed, so this should be working, but apparently it's become twitchy. Short of uninstalling Disqus and losing lots of lovely interactions, do you know of a good solution for Blogger?  For now, I'm contactable via email (corbettgabrielle .at. gmail .dot. com) and through the bloglovin comments system. Thanks in advance! 

PPS I just went over to the Disqus site and had another go at fixing things - and for now it seems to be working. If you're having similar issues, I logged in to the Disqus site and then under the Settings menu selected Installation.  My Disqus widget looked OK, so I moved on to step 2 (import Blogger comments to Disqus) and then cicked on the button for a one-time import followed by clicking to sync comments. Can you please let me know if things go pear-shaped again? Thanks!


Saturday, 28 June 2014

Mad Jaywalking

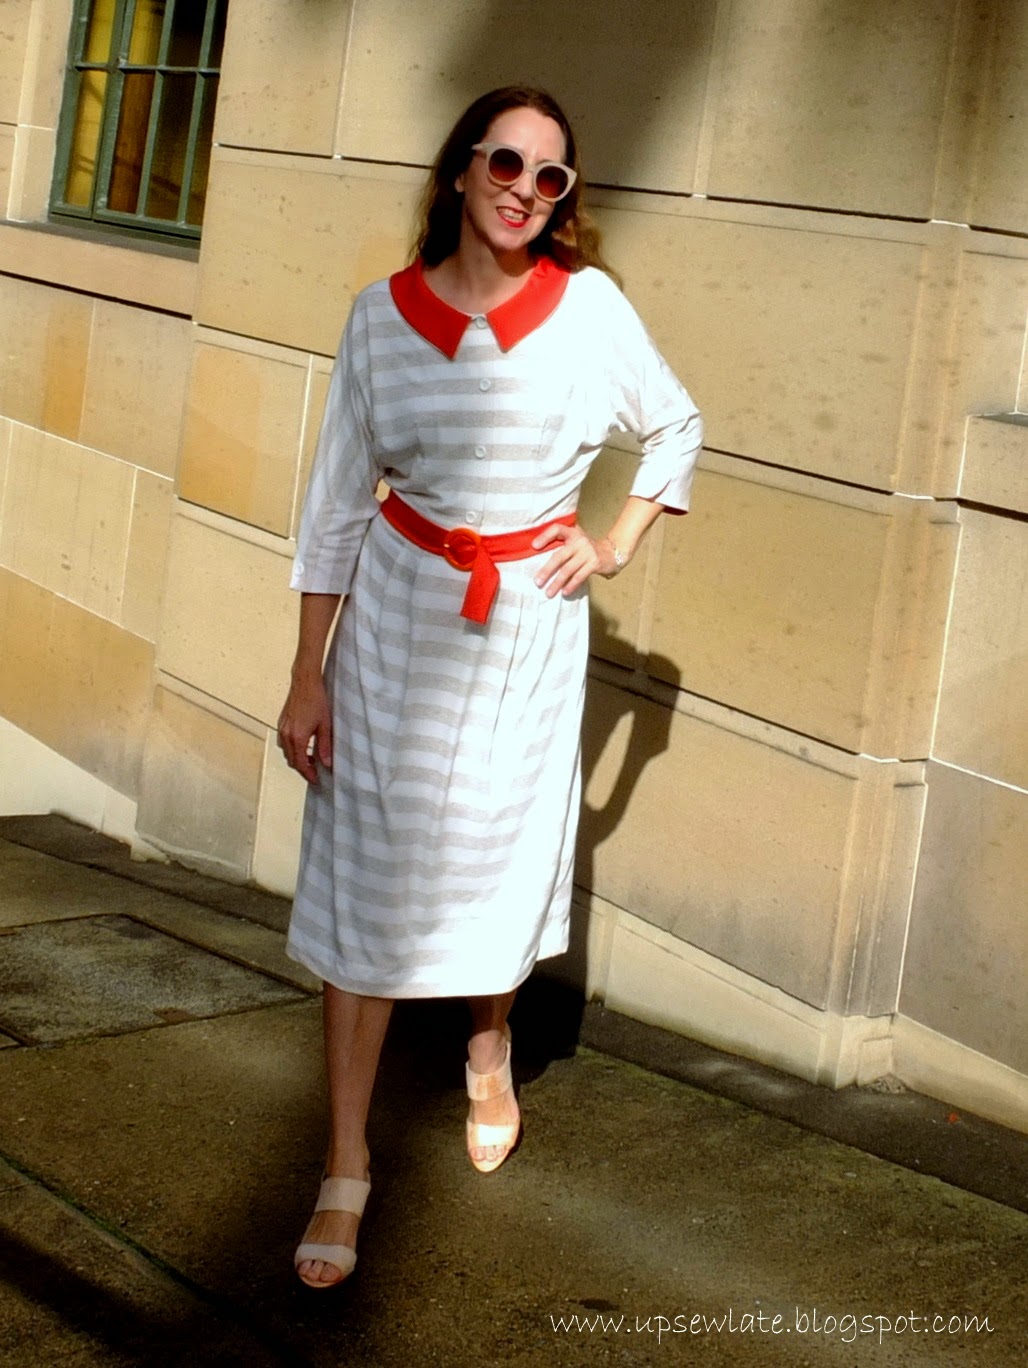
The Tessuti Fabrics Jaywalk competition? Yes, I entered too, and this is what I made in a mad, crazy weekend rush:


All very bright and striking with the orange backdrop, but below are my "official" entry pictures, taken a little earlier in my lunch break on the Tuesday of the competition deadline - in which you can see the dress just a little better, though still not that well:


That's front, side and back sorted then, right? Oh I know, you can't see the dress very well - but honestly I have to blame the photographer (shhh, that's me).  I think I need to do a basic camera course, maybe even the same course several times over - does anyone have any recommendations for a short course in Sydney?


I'll show you the details bit by bit, since evidently I can't show you the details on me!

First of all, the pattern is this McCall's beauty from the 1950s:


I chose this pattern after a lot of thought - I know it seems a crazy choice for a competition involving stripey stretch fabric, but as I didn't expect to win I wanted to make something that I would really like. When I played with the Jaywalk fabric I had in mind a picture of a vintage shirt dress in muted stripes, and all (d1-3) those (d4-10) selfies (d11-18) in (d19-25) May (d26-31) just amplified my love of the "narrow bottoms + loose top" silhouette. Where's the fun in sewing something you don't like? The red dress on the pattern envelope looked like THAT kind of silhouette :-), though my skirt hasn't worked out anywhere near the illustrated shape. So I used the stretch striped Jaywalk jersey to make something not recommended for stripes, and perhaps not so suited to stretch fabrics - but it's a dress I wore to work the day after completing, and that I'm sure I'll keep wearing. {Breathe out.}

I don't have much experience with proper vintage patterns, so I did a lot of paper measurements before any cutting. Interestingly I was able to sew the pattern (in a vintage size 16 - and I'm about a size 12 in the Big 4 these days) with minimal adjustments, although arguably the fit I've achieved is too loose - or perhaps more suited to a woven incarnation of the dress.  According to the vintage pattern envelope I should have been a size 14 in the bust (and I probably should have been wearing a bullet bra!) and a few sizes up in the waist and hips; the bust is a bit loose and there was quite a nice amount of ease at the waist and hips.  


The pattern was classed as easy back in the day, and it's really not particularly tricky for an experienced sewist though there are quite a few details. It's simply a belted shirt dress, with an invisible zip in the side seam, a buttoned bodice front (it's a proper 2-piece shirt front, but as there's also a side zip I didn't make my buttons functional), and buttoned triple-darted sleeves.  I tried not to take any short cuts, and I cut out and sewed the whole dress to the best of my ability - what more can you do?

The orange fabric you see is a stretch cotton, also from Tessuti Fabrics. I was initially going to make the collar with the orange fabric underneath, but on trying the bodice both ways I found I really preferred having the orange upper-most - apparently having the loud orange on display makes the muted Jaywalk colours easier for me to wear :).


Both the belt buckle and the buttons are vintage, picked up ages ago at a second hand store - and I still have heaps of the buttons left!  When I got up to making the belt I was running out of time, so I tried to wing it and insert a long piece of buckram that I'd cut to size into the sewn belt tube. Unfortunately it proved impossible to insert the buckram without it creasing really badly and making the belt look a mess, so I now have a soft belt :). The buckle is a vintage one that I cut the fabric to fit, and I've just double stitched a row of those little "o" shapes with my machine to make buckle holes. I have made belts before and made them properly, so next time I'll have to check one of my sewing bibles as to the correct method!  

And back to the subject of collars, my experience is that precise cutting out makes a huge difference to the look of a garment, but particularly with collars, where a little asymmetry or deviation from the drawn curve is so noticeable. Collar points are noticeable too - mine aren't that good.

I pinned and pressed the collar so as to have the Jaywalk fabric peeking out from under the orange collar, giving the effect of piping. You can see in the next photo that the effect of this is that on the neckline, the orange fabric hangs past the Jaywalk fabric.


The seams are nearly all sewn with a twin needle straight stitch (lengthened) and finished with an overlocker. The shoulder and arm seam, continuing to the cuff, is stabilised with lightweight ribbon rather than clear elastic, as the seam doesn't need any give:


Here's the invisible zip in the side seam - to sew this in I started by interfacing the seam allowances, then basted the zip in with my regular machine foot and a long stitch length (and lots of pins and pencil markings to help me match the stripes). I finished with the invisible zipper foot and a regular straight stitch. I think it worked out well:  


The cuffs are faced with the same (stretch cotton) fabric as used for the contrast collar and belt, and are under stitched as well as catch stitched to the seam allowance to keep them from rolling out. I did the same with the collar but didn't take photos of it! 


In the next photo you can see the sleeve pleats - which are a bit pointless in a soft, stretchy fabric!


I added a waist stay with the aim of helping to support the weight of the skirt fabric and prevent it from pulling on the bodice, though I'm not sure how well it's working:


And of course there's some stripe matching. Side seams, shoulder seams, arm seams, and skirt panels. The skirt front has soft folds that align with the bodice darts, and the back skirt is made from 4 separate panels that align with the centre back seam, with very slight bodice pleats. I managed to match the stripes across the panels pretty well, though not perfectly:


So that's it!

There was a lot of sewing in this dress, all a mad, crazy rush the weekend before the competition deadline. Started late, finished late (the night before the due date), took photos in my lunch break on the due date, and sent my photos in a few minutes before crunch time. Crazy. And I have to admit (to myself mostly - you probably already knew) that sewing deadlines are just not fun.

Hopefully I'll be wearing this dress lots come Spring (and finding or making myself a dolman sleeved jacket to go on top).  I'm glad I made it, I'm happy with the care I took with it, and I'm super pleased to have used a lovely vintage pattern. Will I enter the comp next year though - and will you?


See you soon
Gabrielle xx


Related Posts Plugin for WordPress, Blogger...