Looking through my wardrobe I found four different types of vents - your preference might be for the simpler types, but perhaps you'd still like to see some other options?
The simplest type of vent, vent 1, just has the seam allowance turned under and top stitched in place:
The next one, vent 2, is only slightly more complex, with the seam allowance turned under and top stitched, but also an overlap between the front and back seams of the vent:
Vogue 2634 (2002) shirt in light-weight linen (sorry, but I don't think I ever blogged this shirt)
Then there's the vent (vent 3) which is faced by a deep hem, in this case overlapping with the other side of the vent, though the following jacket also has some of these sorts of vents in centre back and in the sleeves that aren't overlapped:
RTW textured linen jacket
and finally there's the vent, vent 4, which is self-faced with a mitred corner:
and here's a RTW example of this last type of vent too:
This last vent is the sort I used in my recent Inari dress (blogged here), and it's the type of vent I'm going to show you how to add to an existing pattern. You can easily apply this technique to add attractive vents to patterns that don't include them, and of course you can apply the technique to vents in other places than side seams. Oh, and I'm sure once you've followed the detailed steps a couple of times you'll be able to wing it without needing to draw the extra facing pattern around your original pattern...
_____________________
Assemble the pattern you want to modify, a sheet of plain paper for every pattern piece you're modifying (a front piece and a back piece in my case), a pencil, an eraser, sticky tape, paper scissors and fabric scissors (not shown), a fabric marker (not shown), pins (not shown) and a transparent ruler.
Start with your pattern with its vent markings - I'm using a fake pattern I've drawn on butcher's paper; it's rough as guts but will serve the purpose.

Use your ruler to draw a new deep hem, several centimetres out from the original garment edges. I'm starting my ruler at the garment edge and marking points that are 6 centimetres out, but you can choose a different width - just make sure you keep it consistent.
Extend these lines past the garment edges at the lower corner of the vent. and also a couple of inches beyond the start of the vent.
and also extend them above the vent marking. Draw a horizontal line from the original vent marking to the edge of the new facing.
Draw an upper edge to your facing, at least a couple of centimetres above the horizontal to the original vent marking. I like to angle the top edge of the facing, but you can also just draw it perpendicular to the seamline or parallel to the horizontal line you just drew - both are shown in the next photo. Note: the pencil lines shown below should extend to the original pattern's seamline, and shouldn't stop at the original pattern's edge.
The deep facing you've drawn around the vent is all you need from your pattern - so now use your scissors to trim the plain paper back from the lines you've just drawn.
Pin the modified pattern to your fabric and cut it out. I've only shown the pattern pinned to the fabric for the back of my garment, but I'll also apply all these steps to the front of my garment.
Fold the right sides of the fabric together along the original pattern's garment edge - remember to include the original pattern's seam allowance. You may want to push a couple of pins through the pattern and fabric to mark the corner and the lower edge of the garment, as you can see I've done in the photo below. Bring the fabric edges so they meet exactly at the corner.
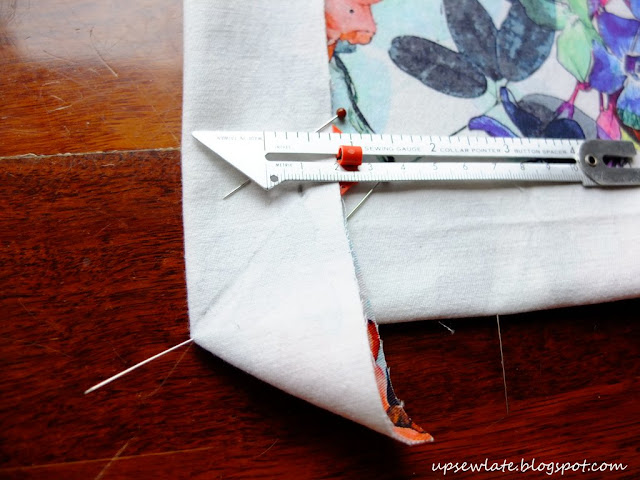
Now carefully fold the corner down and draw a line along the 45 degree angle from the outer to the inner folded corner. I would normally suggest using a water soluble pen that you've tested on a scrap of paper, but on my fabric I've used lead pencil. Use a ruler (or seam guide as shown) to measure 1 centimetre in from the cut edge and mark - this is the depth at which you'll fold back the fabric later.
Pin the 2 layers of fabric at the corner together and sew them together along the 45 degree angle you just drew, from the mark that's 1 centimetre in from the cut edge to the corner where you can see my pin sticking out. If you've used a pin to mark this corner, please take it out before you sew this short seam.
Trim the angled seam and press it open. This is the mitre join on your facing, and by trimming it and pressing it open you're minimising bulk in the corner of your facing and giving yourself a better chance of a sharp looking corner.
Turn a 1 centimetre seam allowance on the now mitred deep hem, wrong sides together, and press in place.
At this point if you haven't sewn the two sides of the vent together you may want to do so, as once the facing has been pressed we'll be top stitching it.
In the upper corner of your facing, above the original vent marking, snip the fabric to just before the stitching line. My photo shows a snip that isn't deep enough - I needed to snip this a little further - and I could have stitched the side seam further. Press this top edge of the facing down.
Turn the mitred hem inside out so your new mitred seam is on the inside, as is your turned under seam allowance.
Press the facing, making sure its depth is consistent. If your corners don't look sharp enough, this is the time to adjust them (yes, I should have fixed mine!). On a flat surface, now pin the facing in place ready for top stitching.
Top stitch on the inside of your garment following the edge of your new facing. I like to use an edge stitch foot and a stitch length of about 3 for this step, but if you take it slowly you can achieve a neat result with just your normal machine foot (and in fact even with my edge foot, the fact that I rushed this step means my top stitching doesn't look great).
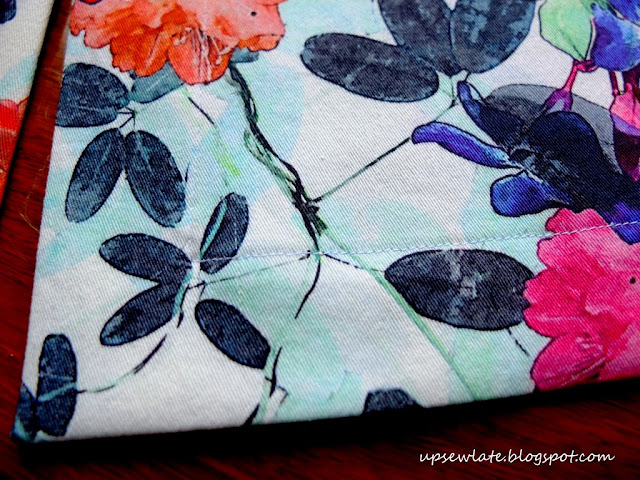
Turn your garment to the right side, and check out your mitred, self-faced vents:
So what do you think - do you like mitred self-faced vents? What's your favourite type of vent to wear, and what's your favourite type of vent to sew?
See you soon
- Gabrielle


No comments:
Post a Comment