Showing posts with label stripe. Show all posts

Monday, 4 August 2014

Simple Shapes

If you sew, do you shop? For clothes, that is? Or do you just "inspiration shop"?  I have to admit to rather enjoying shopping for clothes: I enjoy stumbling across interesting shapes and fabrics, and seeing how those shapes and fabrics change when they move from hanger to body. These days I make a big effort to restrain my impulses though, and I try to treat much of what I find as research for future makes - though it's probably extremely annoying for sales staff :).

So where is this heading? Well a few months back I went inspiration shopping, and I found an amazing top. A heavy brocade top, just longer than waist length, with an unnaturally sloping shoulder line and tapered kimono sleeves that were constrained by those strange sloping shoulders. I wish I had a photo of it! I absolutely loved it. I tried it on, loved it even more. I resisted - "I can make that!", I thought, though I couldn't pin it to a pattern.

That evening I drew some sketches of the shape I'd tried on. I'd tried to get a rough idea of the angle of the shoulder line that day in the changing room by using hand lengths and finger lengths to work out how much it dropped off and how quickly, and I'd tried to keep my own basic measurements in mind for waist, bust, shoulders and neck-waist length. My first muslin (in a metallic polyester) was unwearable - I couldn't even get it over my head! - but what about number 2 (in a stretch terry)?


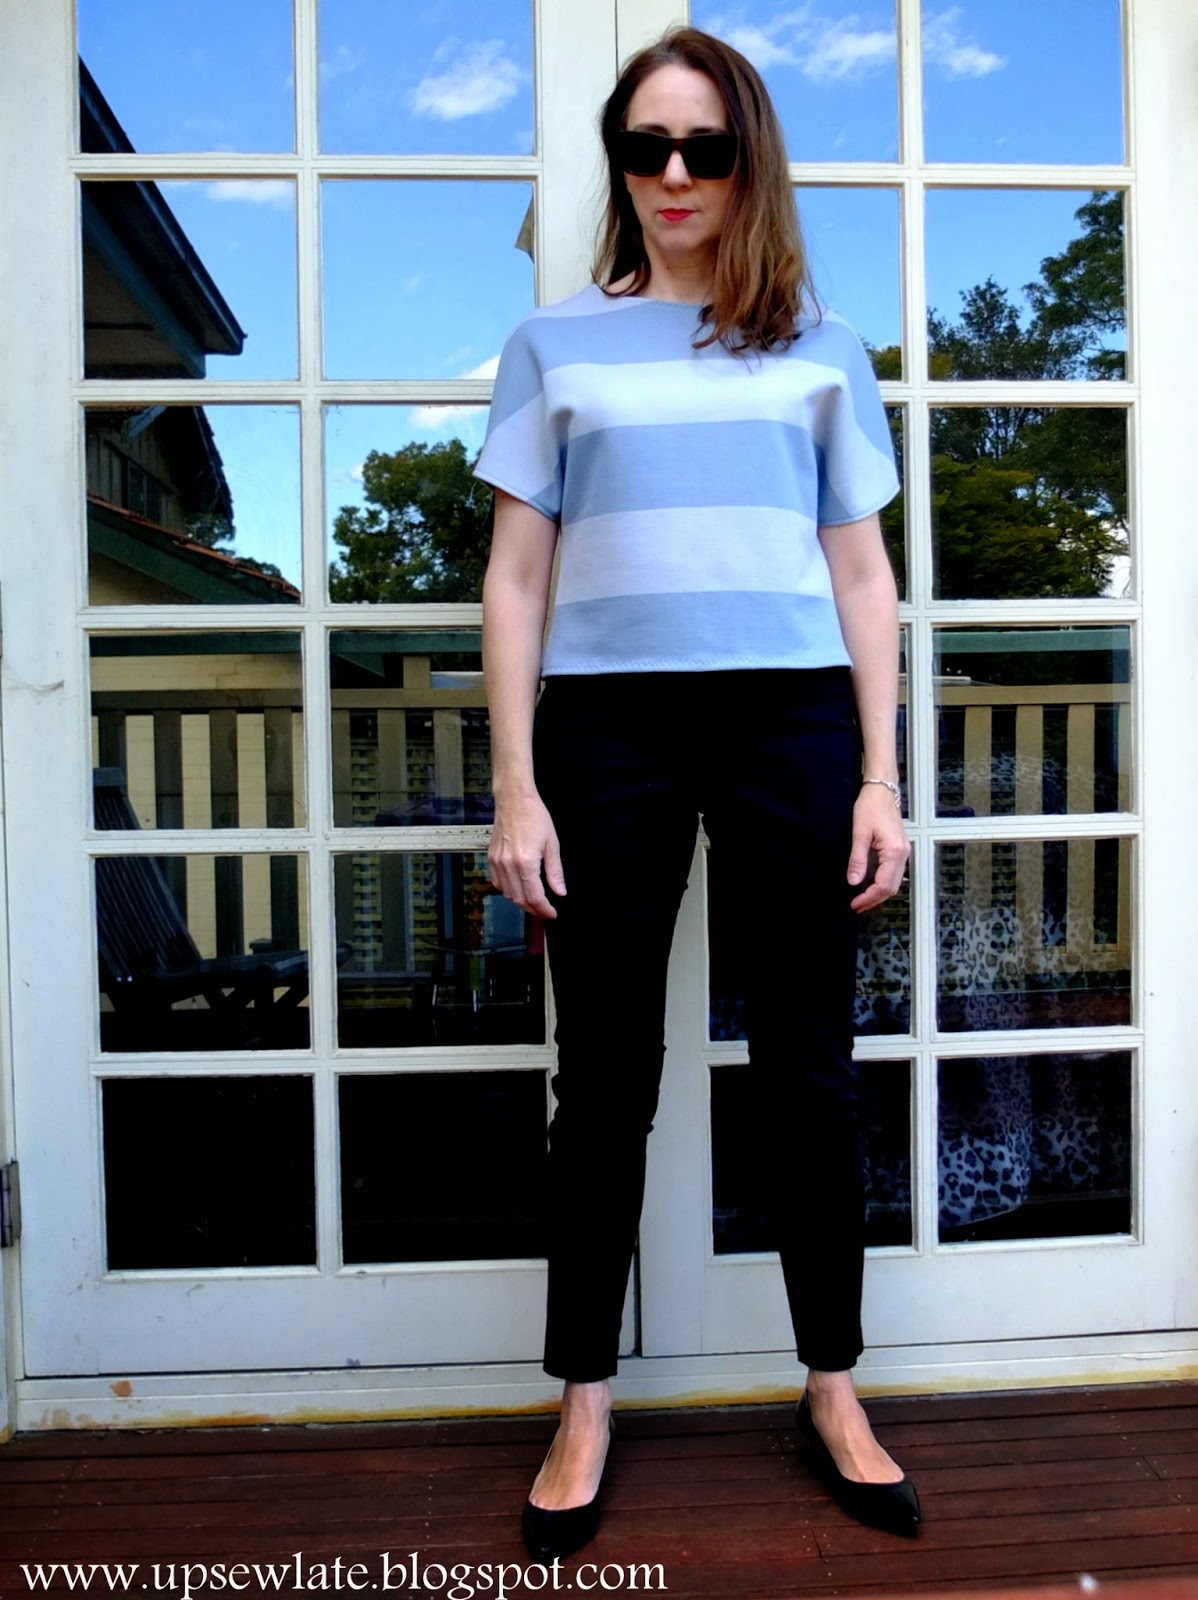
Well I quite like number 2, and it fits me, but stretch terry is not brocade. This top is approximately the right shape but smaller and milder than my inspiration. It's kind of cute, but a question struck me once the top was made:

                  just who needs a cropped short-sleeved sweatshirt? 

Hmm.


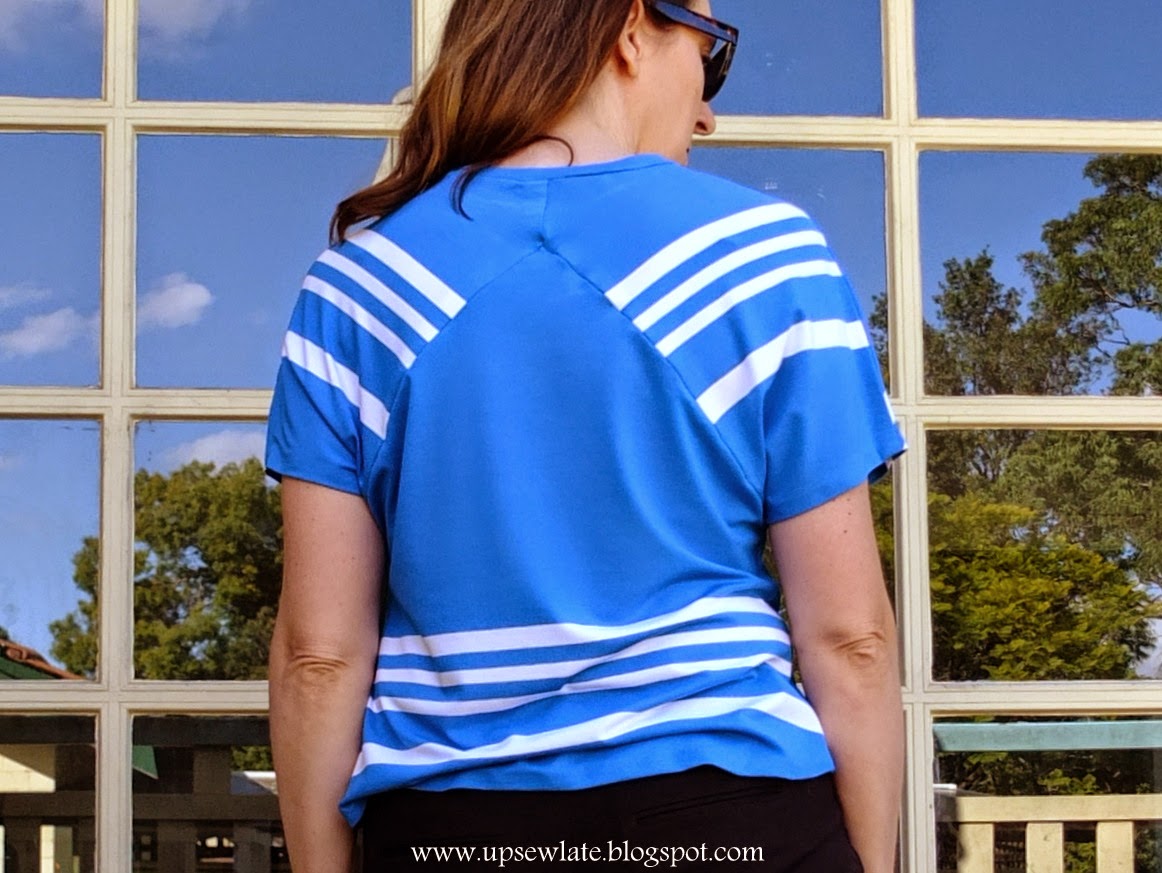
The below photo shows the top inside out, with the camera held directly above the top (ie the angles aren't distorted). You can see that the shoulder line really is quite angled - and if you look in the topmost photo above you should also be able to see it in the way the horizontal stripes get cut off.


You can also see what a shoddy, quick piece of sewing work this was - but it is just a muslin!


Moving right along to the third version. Still not in brocade...

Before working on getting my sketch closer to the inspiration shape (ie more exaggerated!), I decided to make up another stretch version, this time with a bit more commitment. So this time I used a prized piece of jersey from Tessuti fabrics - prized because it's such a terrific colour PLUS it has stripes!


You can see that the top looks quite different made up in a fabric that drapes... and you can hardly tell that the shoulder line is angled!


Regular stripes weren't enough; I wanted the stripes to make angles, and to make my shoulders look bigger. I roughly drew the shape I wanted, then folded my pattern piece down the centre back and at angles that would encompass shoulders and sleeves:


I was concerned that the fabric might stretch out along all those seam lines, so I went nuts with the clear elastic and stabilised everything - the shoulder seams, the short vertical seam in the upper back, and the angled shoulder seams.


You may notice I didn't overlock my edges (no need), and that the seam lines where I didn't want any stretching were sewn with a straight stitch before having the clear elastic sewn in. No apologies; that's what works for me :).

And here's how that looks on:


The hems were just pressed in place with steam-a-seam as I didn't want the look of stitches. We'll see how well that lasts!


I like this top more than the terry version, but I think it needs taking in at the waist and hips so as not to pool. And I have to admit I haven't been wearing it - though perhaps I will when we hit summer? 

And what about version 4, in brocade? Great question! To be honest, the original photos I took of these tops a couple of months ago were so dire (I was bone tired, I hadn't ironed them properly, the weather was appalling, and there was a LOT of mess in the photo backgrounds) that I had this idea pegged as a bit of a failure, and lost interest. Then someone on twitter recently was asking why more sewists didn't post their sewing failures, so I retook the photos intending to do a roundup blog post of these tops along with a couple of other recent disappointing sewing projects, and whaddayaknow, I actually like them.  So I guess the brocade top project is still a possibility... Has that ever happened to you? 


See you soon
Gabrielle x


Monday, 28 July 2014

Silver Twist, B5650

Wahoo, don't you just love a swishy midi skirt? I've been wanting to make just this shape for such a long time!

Swishy midi skirt B5650
This skirt!  The flare feels just right, and the below the knee length hits a vintage-referencing sweet spot. Can't you imagine cutting a rug in this skirt?

Say what? Cutting a rug means dancing vigorously and extremely well. I've read that the term originated in the 1930s; when couples danced the jitterbug on carpet it looked like they were cutting it up with their feet.  Minnie who's a hep cat now did cut a rug, and it sounds like such a fun thing to do... I want to see that movie now!

I want to learn the jitterbug! B5650
A simple chambray skirt, yes, but there's a twist. A silver stripe. Chambray plus silver - utility meets disco!

Originally the skirt was going to be a pale pink stretch cotton, and the next one may be just that - but there's been so much chambray in the sewing blogosphere, so chambray jumped to the top of my queue. And then I saw a photo of a silver midi skirt in a fashion mag - too easily influenced - so the silver melded with the chambray, via a sporty stripe. 


Utility meets disco, chambray + silver B5650
This pattern, Butterick 5650, landed in my lap via the second hand shop. Fifty cents? Sold! The pattern illustrations really didn't grab me, but the line drawings had potential...  The pattern includes this skirt (view A), a gathered, looser version (view B), and a pair of gathered waist tapered pants (view C).

Imperfect hemline - B5650
My skirt isn't perfect, far from it. I was in such a rush to turn my idea into something tangible that I took a few shortcuts:

  • I didn't check the finished measurements for the skirt - should have, and it's a bit tight.
  • I hemmed the skirt according to the cutting out line - should have hung it overnight and adjusted it, as I can see in these photos that it's not straight.  
  • I cut out my double layer silver rectangle, checking grainlines just once - should have double checked as the silver fabrics are very slightly off grain.  
  • I ignored grainline recommendations for the chambray, instead placing grainline on centre back and parallel to the silver panel in the front. This made my zipper insertion and silver panel insertion easier but may have messed with the hang of the skirt. 

It's what I imagined - B5650
Checking out a fence - B5650
But despite the imperfections, I have to say the skirt pretty much looks as I imagined it.

It's a little tight across my winter layer (waist and hips), but it should fit nicely when the warm weather melts the winter layer away.

Sewing for summer - B5650

I mentioned some "shouldn't have"s above, but there were a few other changes I made to the straight size 14 pattern that I'm absolutely delighted I made:
  • I swapped out the regular zip for a dark blue invisible zip - and yes, it's invisible :).
  • I left out the pockets. Side pockets on a hip skimming skirt just add bulk! 
  • I added a little length, 'cos I'm a little taller than average. 
  • And not least of all, I added a silver panel down the centre front. Party time! 

No side pockets - B5650

This skirt has worked out well enough, but I've learnt a lesson along the way.

Just because a pattern terms itself "Fast & Easy" doesn't mean you can skip the basics. Like following grainline recommendations, for example. Like checking finished measurements, for another. Version 2 is going to be by the book, I tell you!


See you soon!

- Gabrielle xx

Thursday, 10 July 2014

The Denim Detail: Papercut Patterns Pleated Pants


After a ridiculous amount of procrastination and many substitution projects, I started making these Papercut pleated pants a couple of months ago.  I'd been delighted to win the pattern last year in a giveaway held last year by the very lovely Juliette (yes, all giveaway holders are lovely, but she seems particularly lovely) of the Crazy Gypsy Chronicles; I was mad keen on pleated pants - still am - and desperate to get the pleated look as seen on the cool pattern envelope.


It's a gorgeous package: recycled paper, cool graphics and photography, and a clearly drawn and instructed pattern. The pattern is described as "A pleated pant with a slim fit leg, wide shaped waistband, fly front opening, back darts and side pockets" and that's exactly what I wanted - I wanted pants just like the ones on the pattern envelope!

There was a problem. You know how the sizing of these pants is really huge, and everyone has to take the pants in by 2 sizes to get down to the size they intended to make? Yes? Well apparently that problem got fixed! I had no idea. Unfortunately pattern companies don't do version control, so when you buy a pattern you can't tell if you're getting the pattern that everyone reviewed last year or an improved version...

[Hmm, why don't pattern companies use version control? Wouldn't it make sense? And wouldn't it be great for the pattern buyers of the future to be able to tell whether they're getting the limited edition first print run, or the original release, or the revised and improved version?]


Anyway, suffice to say having read all the reviews I could find, and having checked out all related photos, I very deliberately cut the pants out 2 sizes smaller than my measured size. They looked small, but many had gone before me, so I was utterly confident I was on the right path.
Until I couldn't even get them on!


And so a design feature was born of necessity. 

I'd cut the pants out of my good denim (bought from Minerva fabrics last year - and boy was the delivery from the UK speedy!), and there was no back up plan (arghhh, I need to learn a few tricks from risk management). So I measured the extra width to grade UP 2 sizes at the hips, and upper inner thighs. I had enough length of fabric for 2 continuous rectangular strips for my outer leg seams (this is just the reverse side of the denim), and I pieced some smaller pieces of fabric to make continuous narrow rectangular strips for the inner leg seams (same side of the denim so as to keep this extra detail less noticeable).
I like how the contrast strips on the side seams bring the pockets in from the side; they feel like they're perfectly placed for my hands in this position.


But can you see why the design feature is also a problem of its own?

It's entirely my own fault - with that extra width, the pants have ended up too wide at the ankles. As I'm sure you know, legs are more of an upside down skittle shape than a rectangle, so if you're adding width to grade up a leg size, you shouldn't grade up by the same amount at the hip as you do at the ankle.

Overall the fit is pretty good for "out of the envelope" - the compensations I made took the pattern back from an XXS (!!) to about an S, which is the size that corresponds to my waist and hip measurements, and the excess lower leg width is largely (hehe) my own doing.  There is some pulling from the back - the fit on my backside feels too snug compared to the loose comfort of those pleats in the front - but then again I wasn't able to add width at the crotch seam to grade up this part of the patternThe leg length is OK for my height (about 5'8" with a short body), though I don't have enough length for a deep cuff.


Oh and I used too long a fly zipper and my zip comes up onto the waistband, so the (3) hooks and eyes that go over it make for a very secure waistband, but I find this interesting and unusual rather than problematic. I don't have a photo of this, but I'll try to take one and add it for your interest and amusement :).


So what I have now is some really cool pants that I just don't love. I know these photos make the pants look good, but the pants do NOT look that good when I wear them in real life. I do like the pattern, and I'm thinking of making the pants again, this time in the correct size and without any extra ankle width, but this pair have ended up just a bit too wacky... 

 Hopefully some time in the magic wardrobe will make me love them more?


Thanks for reading and see you soon!

- Gabrielle x

PS A few of my Instagram friends have been waiting a long time for this blog post - thank you for your patience guys!


Related Posts Plugin for WordPress, Blogger...