Showing posts with label Papercut patterns. Show all posts

Sunday, 28 December 2014

Undercover, No Hood

I suppose my earlier blog post about the Undercover Hood pattern sounded a bit negative - but I liked it enough to whip up a second Undercover top straight after the first!

Please excuse these pathetic photos; I had a very hard time photographing this top, but since I made it several months ago I decided I really should blog it anyway rather than waiting for my photographic skills to improve. 


This time around I used the precious pink ponte from Tessuti Fabrics that I'd intended for a StyleArc Philippa top (see this post), and sewed up the top without the hood, without the pockets (again) and with cropped sleeves. My plan was to pair this top with my pale pink midi skirt - the colours match perfectly and I assumed the skirt and top would look as good on me as they did in my imagination :). Unfortunately the shapes look pretty unflattering together, so instead I'm showing you the top how I'll actually wear it to work, with a fitted floral RTW skirt.


Leaving the hood and pockets off, the Undercover pattern becomes very similar to the Grainline Linden pattern. I suspect one difference would be in the lengths of the two tops, as Jen of Grainline Studio seems to draft for shorter than average women and Katie of Papercut Patterns seems to draft to fit taller women. The Linden does also look to have shaping at the waist and bigger neckline, and there may be subtle differences in the raglan seam placement and sleeve width. but these would be simple adjustments to make to whichever pattern you started with. I don't see anything wrong with two pattern companies issuing similar patterns, but if you already have one of these two patterns I really don't think you'd get much out of buying the other!


I prefer this version of the top to my first one - this time around I used the right seam allowance (1cm, not 1.5cm as I sewed first time around), so the top feels much looser. I also like the deep hems and 3/4 sleeves very much; I think these make the top look quite smart for something that feels so comfortable.


I don't have too much more to say about the pattern that I haven't said before...

One thing that did strike me this time around, with a more structured fabric, is that the raglan seam is sitting quite high. My sizing in tops is usually pretty standard, but I feel like this top is too short in the section from bust (the bottom of the raglan seam) to shoulder. If this part of the top were longer, with the end of the seam moved down closer to the bust, the sleeves could be wider and more "slouchy" (well that's what the pattern description says about the top), and perhaps bust darts could have been rotated into the raglan seam to reduce some of the folds around the underarm and bust area. Maybe I've got this completely wrong - I'm no fit expert - but it's something I might experiment with if I get sick of my current sewing projects...  

These next couple of (darkened) photos show you where the raglan seam sits on my body, and how its placement above the bust results in excess fabric above the bust and some awkward folds:


In this next photo you can see the general shape of the top as compared to a truly slouchy top (I haven't blogged the white top yet, but it was made using the same pattern as used for my garish hibiscus top):


And in these next two close ups you can see the texture of the fabric and the true colour of the top - it's a pale pink, pretty much the same colour as my pale pink midi skirt:


The top is by no means a great fit, but this is one of those rare cases where the top looks better in real life than it does in photos, and I know I'll be wearing it heaps when the weather cools down after summer. 


See you soon

- Gabrielle x

Tuesday, 23 December 2014

A Cosy Undercover Hoodie

About two months ago when we got back home from our lovely European holiday I went on such a sewing binge. I think I sewed about 5 garments in 2 weeks, and that included a couple of Papercut Undercover Hood tops. Back then Sydney was cool and rainy, and I thought summer would never arrive; cosy sweatshirts seemed really sensible...


Papercut rate this a "rookie" level pattern and describe it as follows:

"Versatile slouchy fit sweater, make as a hoody or as a sweater with neck binding.  With the option of full or cropped length, you can take it from casual hoody to cute cropped sweater worn with high-waisted jeans or skirts. It is raglan style with long wide sleeve and hem cuffs. It has a lined hood, and a centre front pocket. A great basic for any wardrobe, good for layering or on its own."

I made the hooded, full length version in the size M, which was the best match to my measurements. However, I think I may have turned this into a size S by using a 1.5cm instead of the designated 1cm seam allowance, which could explain why my hoodie is not at all slouchy. The information about the seam allowance to use in this pattern was on the top LHS of the very initial page of instructions, but I'd ignored this page because I thought it was just talking about the cutting layout, which I like to optimise for myself. So - if you're new to Papercut patterns, learn from my mistake - read that first page as carefully as you do the sewing instructions! 


The "rookie" classification is pretty spot on if you ask me. This is a very basic pattern - front and back are virtually identical, hood outer and lining are made from the same pattern piece, and cuffs are simple rectangles. No special fabrics are needed, and there are no special tricks or techniques in the instructions.

The pattern is very attractive with lovely graphics, and I know it's hard to get simple shapes just right, but I honestly feel silly for spending money on a pdf pattern for something so basic. Anyway, I've made the hoodie with a few simple modifications and I think it's a keeper - a nice wardrobe staple, and snuggly to boot.


In the original Papercut photos of the hoodie,I thought the hood might be a bit short, though it's hard to tell with that gorgeous mane of hair obscuring most of the hood. So to avoid that pulling up on the shoulders you get from a too-short hood, I added about 2" in length to the hood. Maybe I have a long head, but I like the resulting fit - my hood at least is slouchy!


As you can see I left off the centre front pocket - I did this based on difficulties I've had sewing kangaroo pockets neatly on kids' fleece hoodies, and also because I know I prefer to use side pockets at hip length.

Instead of making the cuff for the body of the sweatshirt from a single rectangle with a seam at centre back or at one side seam, I made this cuff from two rectangles; one for the front and one for the back of the sweatshirt with side seams continued from the body section. I thought this would look better, and obviously cutting two half-girth rectangles is gentler on your fabric requirements that cutting a single full-girth rectangle...


Still on the subject of cuffs, I found the instructions for sewing the cuffs unnecessarily complex so just looked at a sweatshirt of my son's to work out what needed to be done (and it was very simple). The sleeve cuffs on this pattern are quite deep, which I like - if you prefer a standard RTW cuff length they're of course very easily shortened but you may then need to add length to the sleeves.


Probably the most interesting modification I made was in sewing the hood. The same pattern piece is used for both the hood outer and the hood lining in this pattern, but I think it looks a lot neater if the lining fabric doesn't come all the way to the edge (and this applies to skirts, jackets etc too). I could have removed some width from the hood lining on the edge where the hood opens, but the quicker approach was to just sew the outer to the lining with different seam allowances. I used a 1.5 cm SA for the lining and a 1 cm SA for the outer fabric, and this gave me about 0.5cm of turned under fabric at the hood opening.  I then trimmed the outer fabric in the seam, then pressed the trimmed seams to the inside with the hood opened out flat. Finally I top stitched the opening about 2.5cm in from the edge.


In my opinion the Papercut pattern hood pattern desperately needs something between the hood and the body; something to hide the seam allowance. If you dig out a RTW hoodie or do an image search on hoodies, you may see the little trick that I would have expected to see in this pattern: the strip of self-fabric or coordinating binding that covers this join on the inside. This detail then implies top stitching around the neckline, which I guess then means top stitching lots of other areas of the top for a consistent look, but I do think it would have made for a higher level of finish.

I absolutely loathe altering completed projects, so even though this bugs me I'm not going to fix it - I'll just be crossing my fingers that an overlocked seam doesn't pop up at the neckline when I wear the top.


I think it's interesting to compare this hood design to that in an old Vogue designer hoodie pattern I picked up secondhand for a few dollars on etsy and sewed up back in 2012. The Vogue pattern was designed for woven fabrics, but included details like a deep cuff on the hood opening, flat felled seams and top stitching throughout, facings for the back neckline and an interesting sort of placket for the front neckline that neatly hid the join between hood and body. These two hoods are like chalk and cheese!


OK, onto the fabric. My outer fabric, a soft and cosy cotton knit of the kind I've seen described as French terry by American bloggers, is from my local Tessuti Fabrics shop, and was originally destined to be part of a StyleArc bomber jacket. I only used about a metre of this outer fabric (a very wide fabric though). The hood lining is a thin, t-shirt weight cotton jersey bought ages ago from The Fabric Store here in Sydney - this warm, orangey coral colour is one of my favourite colours, and there's enough left for a coordinating t-shirt if I get around to it! The lining fabric is not an ideal match to the outer because it's a lot stretchier than the outer, but I loved the look of the two colours together and couldn't find anything I preferred in my stash.


I know finding coordinating ribbing can be quite a challenge when you're making a sweatshirt or hoodie, but one of the pleasant surprises in this pattern was that there was no call for ribbing. The sleeve and body cuffs are simply rectangles of folded over fabric, the same fabric as used in the sleeves and body. I was a bit dubious about whether this would work, but it seems absolutely fine - I'll definitely try to keep this in mind for future sweatshirts!


I think that's all I have to say - quite a lot for a simple pattern!

Overall I like this pattern, but I don't love it. I made another Undercover top straight after this one (but one with more of a Grainline Linden flavour); I'll try to get some photos of that one soon!


See you soon


- Gabrielle xx


Thursday, 10 July 2014

The Denim Detail: Papercut Patterns Pleated Pants


After a ridiculous amount of procrastination and many substitution projects, I started making these Papercut pleated pants a couple of months ago.  I'd been delighted to win the pattern last year in a giveaway held last year by the very lovely Juliette (yes, all giveaway holders are lovely, but she seems particularly lovely) of the Crazy Gypsy Chronicles; I was mad keen on pleated pants - still am - and desperate to get the pleated look as seen on the cool pattern envelope.


It's a gorgeous package: recycled paper, cool graphics and photography, and a clearly drawn and instructed pattern. The pattern is described as "A pleated pant with a slim fit leg, wide shaped waistband, fly front opening, back darts and side pockets" and that's exactly what I wanted - I wanted pants just like the ones on the pattern envelope!

There was a problem. You know how the sizing of these pants is really huge, and everyone has to take the pants in by 2 sizes to get down to the size they intended to make? Yes? Well apparently that problem got fixed! I had no idea. Unfortunately pattern companies don't do version control, so when you buy a pattern you can't tell if you're getting the pattern that everyone reviewed last year or an improved version...

[Hmm, why don't pattern companies use version control? Wouldn't it make sense? And wouldn't it be great for the pattern buyers of the future to be able to tell whether they're getting the limited edition first print run, or the original release, or the revised and improved version?]


Anyway, suffice to say having read all the reviews I could find, and having checked out all related photos, I very deliberately cut the pants out 2 sizes smaller than my measured size. They looked small, but many had gone before me, so I was utterly confident I was on the right path.
Until I couldn't even get them on!


And so a design feature was born of necessity. 

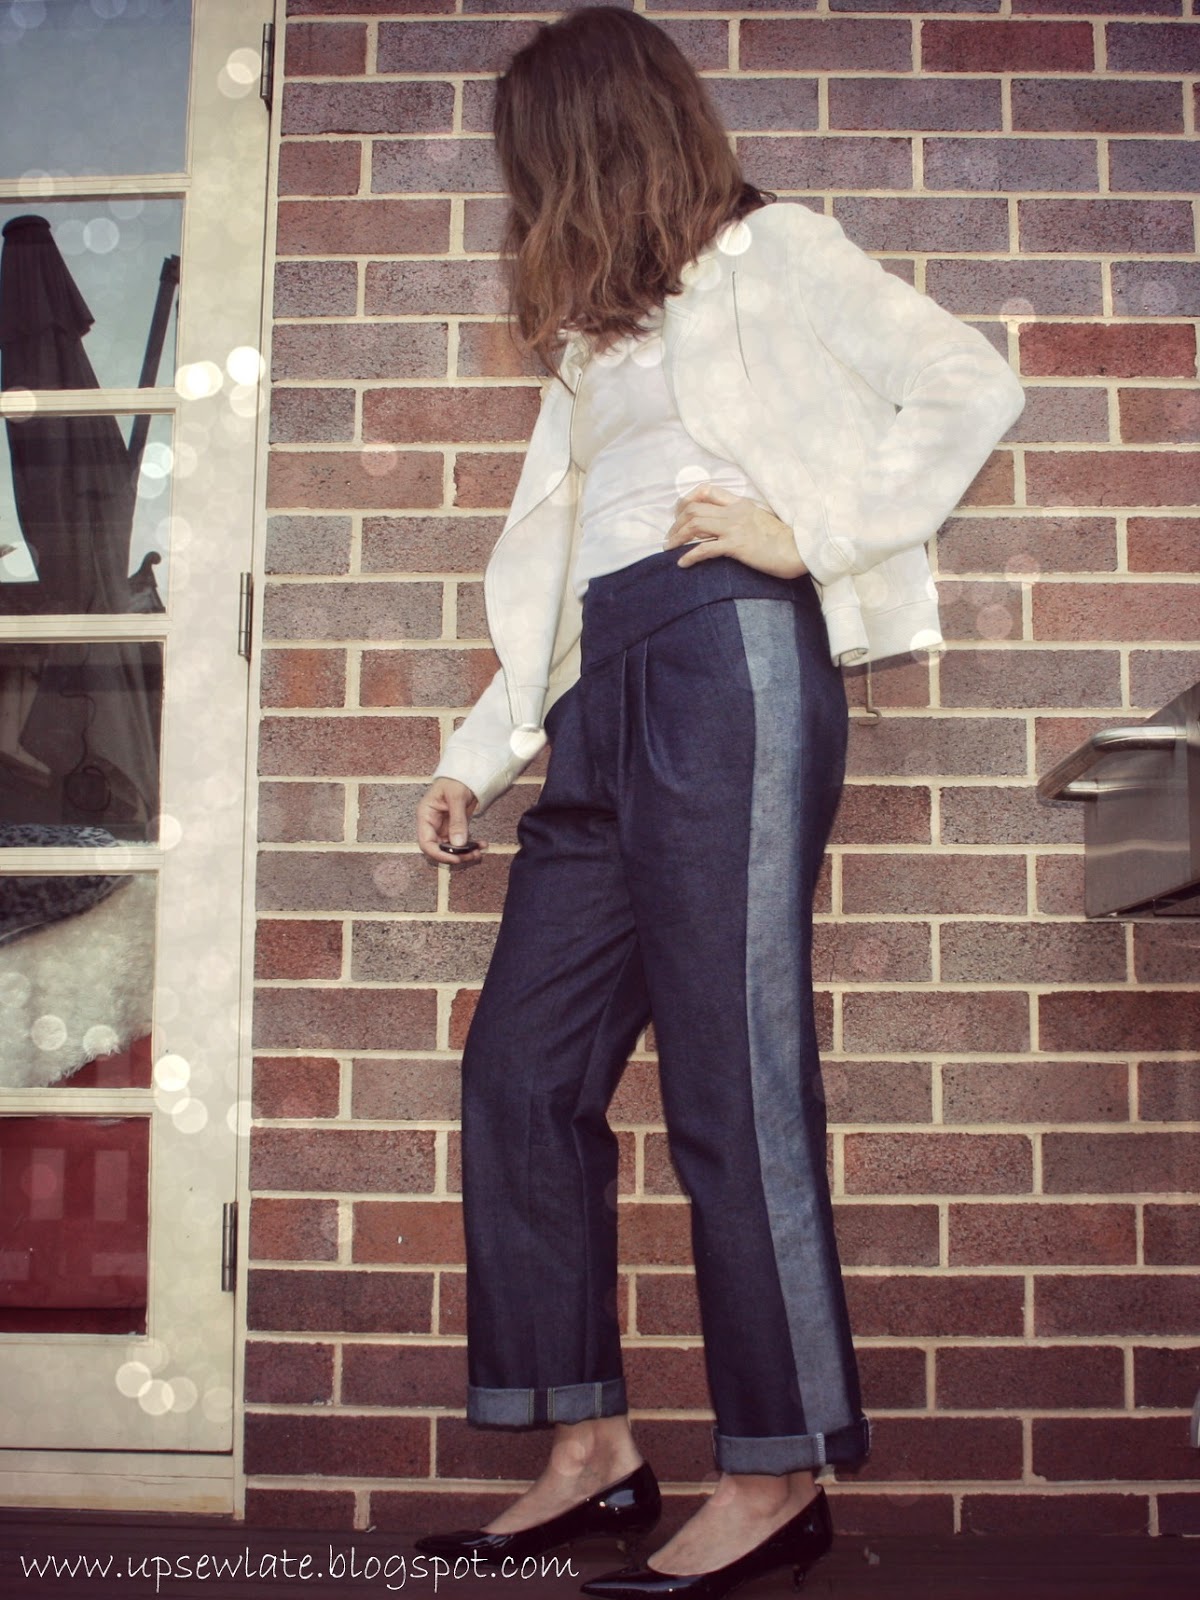
I'd cut the pants out of my good denim (bought from Minerva fabrics last year - and boy was the delivery from the UK speedy!), and there was no back up plan (arghhh, I need to learn a few tricks from risk management). So I measured the extra width to grade UP 2 sizes at the hips, and upper inner thighs. I had enough length of fabric for 2 continuous rectangular strips for my outer leg seams (this is just the reverse side of the denim), and I pieced some smaller pieces of fabric to make continuous narrow rectangular strips for the inner leg seams (same side of the denim so as to keep this extra detail less noticeable).
I like how the contrast strips on the side seams bring the pockets in from the side; they feel like they're perfectly placed for my hands in this position.


But can you see why the design feature is also a problem of its own?

It's entirely my own fault - with that extra width, the pants have ended up too wide at the ankles. As I'm sure you know, legs are more of an upside down skittle shape than a rectangle, so if you're adding width to grade up a leg size, you shouldn't grade up by the same amount at the hip as you do at the ankle.

Overall the fit is pretty good for "out of the envelope" - the compensations I made took the pattern back from an XXS (!!) to about an S, which is the size that corresponds to my waist and hip measurements, and the excess lower leg width is largely (hehe) my own doing.  There is some pulling from the back - the fit on my backside feels too snug compared to the loose comfort of those pleats in the front - but then again I wasn't able to add width at the crotch seam to grade up this part of the pattern. The leg length is OK for my height (about 5'8" with a short body), though I don't have enough length for a deep cuff.


Oh and I used too long a fly zipper and my zip comes up onto the waistband, so the (3) hooks and eyes that go over it make for a very secure waistband, but I find this interesting and unusual rather than problematic. I don't have a photo of this, but I'll try to take one and add it for your interest and amusement :).


So what I have now is some really cool pants that I just don't love. I know these photos make the pants look good, but the pants do NOT look that good when I wear them in real life. I do like the pattern, and I'm thinking of making the pants again, this time in the correct size and without any extra ankle width, but this pair have ended up just a bit too wacky... 

 Hopefully some time in the magic wardrobe will make me love them more?


Thanks for reading and see you soon!

- Gabrielle x

PS A few of my Instagram friends have been waiting a long time for this blog post - thank you for your patience guys!


Monday, 26 May 2014

MMMay14 Days 19 - 25

Sorry everyone, it's nearly over - normal blogging will resume soon!

Day 19
 On Day 19 I wore my "Love my 'Lisalex" dress to work with a favourite little RTW linen jacket. The dress was obviously too tight when I first made it, but this year it fits, though you really can't tell from these photos.  Not a good move to leave your MMM photos till you're on the way home, especially when wearing black!

Also, note to self: dark alley ways don't help!


I tried to get a photo out in the open but there were so many people going past - so embarrassing - sorry, that's another fail!


Photos taken by me with camera attached to a railing, bench, whatever via my gorillapod, on 10 second timer, with camera on continuous burst mode.


Day 20

Learning from my mistakes, day 20's me made was photographed at the start of the day on my way in to work.  Actually this isn't something I made, it's a top my mum made, but my MMM14 commitment lets me include other people's sewing (yes, I know that's a bit cheeky...)


Photos taken by me with camera attached to a railing via my gorillapod, on 10 second timer, with camera on continuous burst mode. 


Day 21

On day 21 I went for a walk to Circular Quay at lunch; I was planning on using the "Coathanger" (the Sydney Harbour Bridge) as a backdrop but because the lunchtime light was terrible for photos in that direction I flipped my camera around and used the city as a backdrop. I was wearing a silk twill skirt made from Vogue 1174 (which is a dress pattern, but very easily altered into a skirt pattern, and seems to suit a variety of fabrics) with an altered green silk RTW top (my mum's alterations though, not mine) and green cotton RTW jumper. I haven't been wearing this skirt lately as it had become too loose, but it only took 5 minutes on the sewing machine in the morning to add a couple of centimetres to the pleats - and whooshka, a skirt that fits again! I also hadn't realised it went with this lovely vibrant green; yet it's so much better a match than the teal blue I was wearing the skirt with last year!


Photos taken by me with camera attached to a bench via my gorillapod, on 10 second timer, with camera on continuous burst mode.


Day 22

On day 22 I wore my Vogue 1193 "Out of Darkness" dress - it probably looks OK from the front, and with a belt, but this dress is getting seriously baggy! I've included a photo that shows the side on baggy view, but if you look back at the original post you'll see this dress was meant to - and used to - fit like a glove! 

These pictures were taken in a big rush which is why I couldn't manage a proper, relaxed smile. I'd scoped out a nice backdrop on my way to get lunch at a foodcourt, but when I went back there 15 minutes later the place was cordoned off for a televised interview with some bigwig! Lesson learnt for next time: photos first, food second.


And here's the baggy view:


Photos taken by me with camera attached to a railing via my gorillapod, on 10 second timer, with camera on continuous burst mode.


Day 23

On day 23, a Friday, my manager and I had the pleasure of catching up with a colleague who's now on maternity leave and her darling little daughter.  Do you remember Marylene, who took the bulk of my photos for me in Me Made May 2013? I was wearing my "To the Gallery" vintage Vogue 8811 (reissue) dress with a boxy red linen jacket made from an 80s/90s Vogue 1325 pattern.

Marylene very kindly offered to take some photos for me, and I also got to borrow her daughter for a few minutes - isn't she gorgeous!


Photos taken by my colleague Marylene., with camera on continuous burst mode.


Day 24

Day 24 was just a regular Saturday with kids sport and a few jobs to get done. The weather was still beautiful, so I wore this linen top (unblogged, and I made it years and years ago; it's made from a Vogue pattern but I can't recall the pattern number and I know it'll definitely be OOP) with my Tessuti patterns Anita ponte pants and a necklace my daughter made me for Mother's Day last Sunday. I'm not going to show you a back view, but suffice to say these pants really need a longer top; the fabric is not really thick enough and it appears I've inadverdently done "leggings as pants". Oops, won't happen again!


Photos taken by me with camera on el cheapo tripod, on 10 second timer, with camera on continuous burst mode.


Day 25

Day 25 was a very productive day - I practically finished my Papercut patterns pleated pants! If you follow me on Instagram you'll know I started them last weekend, and there have been some dramas along the way.  After reading everyone's reviews I went boldly ahead and cut them out 2 sizes smaller than my measurements... well, guess what? The new prints of the pattern aren't as big as the original prints, and the sizing is now true! So these pants now have "feature" stripes down the leg outers, and hidden stripes down the leg inners. They do seem to fit though, which is a relief.

Oh yes, and I wore another Vogue 1174 pleated skirt in aqua linen (hmm I've made this pattern about 4 times I think...) with a grey pleated t-shirt made using a vintage Advance pattern. It's still warm weather here...


Photos taken by me with camera on el cheapo tripod, on 10 second timer, with camera on continuous burst mode.


I'm aiming to wear 10 me mades each 7 days in May. My tally for this week is 10 me mades in 7 days, including repeats and a top made by my mum, and to date that's 38 me mades in 25 days.


See you soon


Gabrielle x
Related Posts Plugin for WordPress, Blogger...