Showing posts with label how to. Show all posts

Thursday, 29 December 2016

Top 5 of 2016: the Hits

Taking a lead from Gillian, here are my personal top 5 from 2016:


The flying squirrel Rachel Comey dress (V1482) - I don't wear this that much but I LOVE it; it feels really special on and is incredibly comfortable and eye-catching (in a good way, I hope).


My D&G inspired polka dots and carnations dress - a great work dress, and one that gets a lot of compliments too:


My Japanese seersucker checked Gabby top - I wear this soooo often, and I don't care that Mr UpSewLate hates it (too shapeless apparently, but I won't listen to that!):


My Tessuti Chloe pants and Vogue 8877 linen top - love these as a combination but also as separates. The pants go with everything, and the top feels very designer-ish even with basic jeans:


And another Rachel Comey dress, the super summery Vogue 1501:


I'm sensing a colour theme here... I seem to be a bit obsessed with blues! 

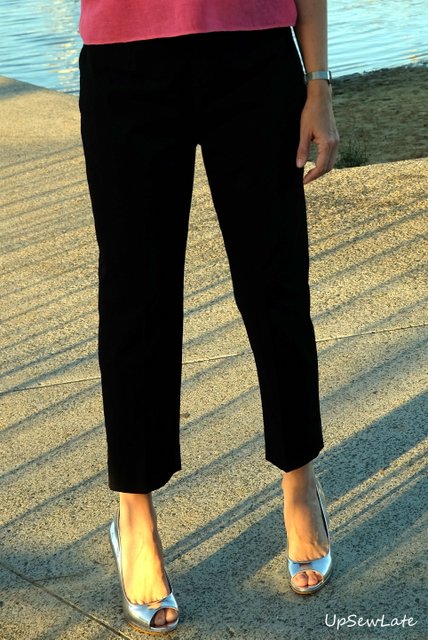
Honourable mentions also go to my StyleArc Edith top (worn very frequently), the Vogue 1264 black pants shown in this post (a work staple, and I should really wear the cute vintage top more often), and the Vogue 8993 dress that I would be wearing now if I hadn't put on a bit of weight - these are all favourites too - and in terms of post popularity, I guess I should include my only "how to" (on mitred self-faced vents). 


It may look like 2016 was all beer and skittles, sewing-wise, but that's of course not the case - I made several garments that I'm not at all interested in wearing, and I'll share that list with you soon. 


1


Till then, happy sewing!


- Gabrielle xx

Tuesday, 20 October 2015

Inari Dress

About 5 months I saw Amy's version of the Inari dress and was smitten. Winter was already looming though, and I had the usual backlog of sewing projects to distract me; and so months went by.  Then winter passed, and I started to get my sewing backlog under control. Time to sew something new! 

After the long wait, my Inari dress had to have something in common with Amy's; I chose geometry, though really our dress fabrics are quite dissimilar. 


When I first sewed this dress up I wasn't sure if I liked it or not.

Printing problems from the start of the project shouldn't have coloured my opinions of the dress, but they might have. When I printed the Inari PDF at 100%, the 10 cm test square was a 9.5 cm square, regardless of the program I opened it with.  Eventually I just printed the file at 105% and recycled lots of paper. Grr!

And the dress itself?  I like the obnoxiously brightly coloured fabric, a mid-weight cotton from The Fabric Store, but was disappointed with myself for not having noticed the repeat in the vertical lines: three coral lines, one pink, three coral lines, one pink...  How hadn't I seen it when I was aligning the heights of the patterns?  If I'd noticed I would have centred the dress on the vertical colours, for example having the middle coral bar running down CF rather than just off to the side. And having the pink bar running down the the middle of CB rather than just to the left:


Maybe you can picture the fabric shifted slightly left in these photos? 

Ha, no; no need really!  It did irritate me when I first spotted the mistake, but I'm fine with it now - getting more relaxed with age, I think!

And I really like the general shape of the Inari dress, but the fit - well, as I'm sure you can see, the fit is just not good in this fabric. The pattern instructions say the dress can be sewn up in "a light or medium weight fabric, inelastic or with stretch", but I suspect the pattern is best made in a slinky woven or jersey.

My dress is sewn in the next size up (EUR size 42) from the one that corresponded to my bust size (EUR size 40), but you might notice in my photos that there looks to be excess fabric at the front of the dress, where the sleeve meets the bodice.   I actually muslined the dress in my correct size, and found it quite tight across the bust - to the point where my arms felt a bit restricted - and that's why I went up a size for the 'real' dress.


Going up a size gives me more room, but hasn't fixed the fit.  As you can see in the next photo, when my arm is by my side there's excess fabric, begging to be taken out by a dart and a change in the armhole curve (cutting it in further), and when I lift.my arm the low armhole / shape of the arm scye means that the sleeve pulls on the dress:


I do realise that the Named pattern makers know how to design darts and more closely fitted sleeves (of course), and that the dress has therefore been consciously designed like this, but for me this design decision detracts from what is otherwise a lovely pattern.  I love the cocoon shape of the dress and the side vents, but if I make this dress again I'll be substituting in the upper bodice and sleeve from a different pattern.

By the way, please ignore the grumpy look on my face in most of these pictures - it's called being concerned a neighbour's going to come down that driveway at any moment!


There were a couple of minor changes I made to the pattern too, ones that didn't affect the fit.

First off I widened the sleeve cuffs - and probably that was a mistake, as I prefer the narrower cuff on everyone else's Inaris - and secondly I made mitred self-facings for the side vents.

The last pattern I made that had side vents in it, my DKNY jungle top, had the same basic fold over and top stitch finish that the Inari pattern suggests (though admittedly the Inari has deeper hems), but look at how that finish turned out in a slinky polyester:


This sort of finish is so flimsy - look at how my vertical hem is wobbling and folding back on itself!  


This time around I caught myself in time; I remembered the vent finish that used to be standard in sewing patterns back when I was an avid beginner - the mitred self-facing!

The mitred self-facing on a side vent is essentially a deep hem all the way around - not just on the horizantal hem - and one that's finished on the inside so that even if the vent flips open no seams are visible. What's more, its construction does away with the bulky square of multiple layers of fabric you get in a regular vent.

Here's how the mitred self-facings turned out on my Inari dress:


Apologies for the rumples - I had ironed the dress vigourously before wearing it, but apparently not vigourously enough! 


These days deep hems seem to be shorthand for luxury - extra fabric on the inside of your garment that no one's going to see.  Deep hems give weight to hems, making them less flimsy and better anchoring the garment; the hemline becomes beautifully stable.

If you look around in RTW, and even in most modern patterns you'll see that the narrow seamed side vent is the norm.  I don't know why that is, but my first guess would be that it's about efficient cutting out of garments in a production environment; about the cost of a few centimetres of extra width.

But if you're going to draft a deep hem for home sewers, why would you skimp on the side vents? Actually, why would you (other pattern companies!) draft side vents without any decent facings?

I'll stop 'venting' for now, but I have dug out an example of a lovely mitred self-faced vent (sewn a couple of years ago from an designer 80s pattern) that I'll try to photograph and share with you in the next day or two - and in case it's useful for anyone, I'll list the basic steps so you can make your own.


You've got a few issues, but I do like you, Inari dress!


See you soon


- Gabrielle xx

Saturday, 11 December 2010

Vogue 1098 Anne Klein Pants in Stretch


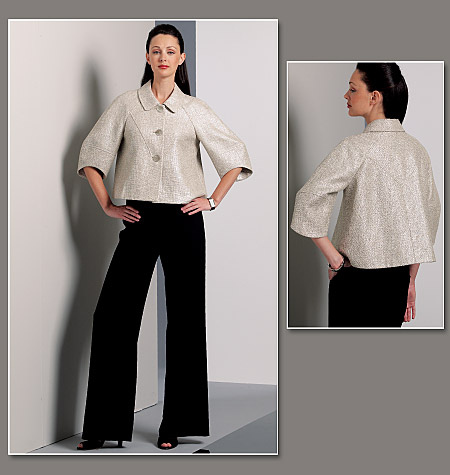
I've been tending to make dresses lately, and before that it was tops and shirts, but in the interests of balancing my wardrobe it's time for a pair of trousers. Vogue 1098 (Anne Klein New York), which I kind of bought for the jacket, looked to be a flattering cut.


Here's what the pattern pic showed:


I made up a test pair in a very loud linen (a cheap find at Lincraft - at the time I thought I could use it for clothes for my daughter, but I don't think I could stand it even on her). In a size 12, I added about 10cm extra length to the legs, and in the waist /hips area I sewed deep into my extra-generously cut side seam allowance. The trousers basically fit, so FYI I've permitted myself less garish fabric for version 2, shown below. This is what the test pants look like without a waistband - please excuse my au naturel dishevelled state:


While cutting out the pants again in a good quality black rayon /spandex /other man-mades fabric from Tessuti, I somehow misplaced the pattern instructions.  I searched through the insides of many, many pattern envelopes, but to no avail.  I really do not know how to make trousers without instruction, but luckily I just happened to have an excellent multi-media book about trouser construction: David Page Coffin's book "Making Trousers for Men & Women".  This book suggested a different order of construction than I've seen in other Vogue patterns (although I don't recall the detailed instructions for this pattern), but it seems pretty logical.  Basically, after cutting out and 'finishing' the main pieces (NOT the small detailed pieces, which you're instructed to cut out later in case you want to make some modifications), you proceed as follows:
  1. darts, pockets
  2. front opening ie zip front
  3. side seams, and finishing for front pockets
  4. waistbands (and any pleats) - sectioned waistband to allow for easy adjustments
  5. in-seams
  6. centre-back seam
  7. hems

I think this will help ensures fit around the hips and waist early on, with room for adjustment in the centre back seam later if needed.  The book also has loads of great tips for zips, pockets and waistbands but I read these after cutting out my fabric pieces including separate fly facing and shield, so I wasn't able to sew with a cut-on fly extension or try a cut-on waistband as suggested.

Now of course a cut-on fly extension is less bulky than one that's sewn on (yes, that makes sense), but it also turns out that Sandra Betzina's famous basted-seam approach to sewing in a flat, fly-front zip assumes your fly extension is cut-on!  Disaster?  Actually, no; you can easily adjust the method for the sewn on fly facings and shield that your regular pattern tells you to cut out.  I don't know if anyone reading this would be interested to see the details of applying this method to a cut-on fly, and I suspect most of you are better sewers than I, so unless someone screams out for the info I'll omit it.

This is the fly - a solid metal one  - and you can see that from the outside it looks reasonably neat. The inside is a bit messy, I know, but only YOU are going to see that:


spot the error ...

I then basically followed the order of construction given above. Side seams, in-seams, and centre back seam.  Compared to the fly this is easy stuff, but I had to redo my side and centre back seams several times. Initially the pants were too loose on me because I hadn't factored in the stretch factor, then I took them in until they felt just right, then I read someone blogging on the perils of making stretch pants too loose so I took them in again, then they were too tight, and then I unstitched like mad and hopefully got them back enough. Phew.

David Page Coffin suggests that it's good to divide the waistbands at centre back so that the pants can easily be adjusted if you change girth. Again, how sensible! So I didn't use the waistband pattern piece, but instead cut out waistband pieces to match the fitted waistline. Actually I cut out a waistband in 4 pieces (and matching lining in 4 pieces) so there is heaps of room for me to grow or shrink and be able to adjust my pants to fit... but I know this is overkill, and my waistband is not that great. Hems last of all - finished on the train to work this morning. The old bloke sitting next to me didn't look too impressed.

And here are some more 'tried them on' views:

Gee that jacket fits badly - but I didn't make it!

I spy a Pilates mat!


The lighting in my house is really poor but I think the trousers have ended up too tight. Maybe the fabric will stretch, and maybe going to the gym will make a little difference in the right places.  Unfortunately too I've ended up with no fabric between the underside of the zip and my person (the error) - clearly I shouldn't have basted the facings to the upper edge of the pants and then sewn the waistband on top of that; but I just can't get myself interested in fixing it so the left side facing sits under the zip. Hopefully the zip will be friendly and not bite me. I do like the fact that for once I have trousers that are long enough with heels - "A Pip, A Ray", as my daughter says - and am already planning the next pair: in a heavy navy linen, and not so tight.
Related Posts Plugin for WordPress, Blogger...