Saturday, 31 March 2012

OWOP: Days 4-7

Continuing on with the one week, one pattern theme...

Day 4 was sunny but with a chill in the air...

Can you spot the difference with my other OWOP pictures?


Oops, no skirt!

I didn't know what to wear. I didn't want to wear the stripey skirt to work on two or three consecutive days, I hadn't finished the work version of the pattern that I'd started, I hadn't started sewing my printed silk version, and I knew I shouldn't wear the casual linen one.

At least this outfit is very me-made: I made the pants, the top, and the jacket. And I was very cosy.

Day 5:
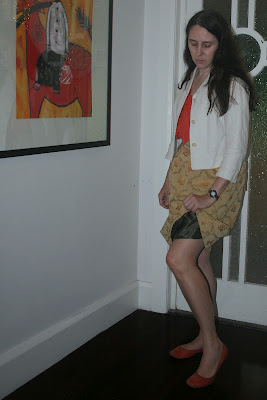
I wore my new skirt - I said above it was a work version, but you could also call it an armchair version because that's what the fabric was probably intended for. I don't know if this looked odd for work but no one said anything.

I wore it to work like this:


a bagged lining


but the day quickly warmed up, and jettisoning the jacket improved my outfit no end:


Anyway I love this fabric; I bought it years ago from an interior decorator sale or something (pre-kids, back when I had time to find and attend unusual sales).

It's heavy and rich looking, but on the wrong side there are a lot of loose embroidery threads so this incarnation of the skirt needed proper lining to stop me pulling the threads with a clumsy foot. So this skirt has a bagged (dark green) lining, which I am very happy with. The pocket lining is gold, cut from leftover bits from a kid's costume.

The other pattern changes I made were to reduce the pleats in the front, since I didn't have enough fabric for the pattern width, and to make a tie from the waistband in centre back. I don't seem to have done very well with the tie though as I forgot to leave room for a knot - so the waistband isn't properly snug now. I might need to go back and add a concealed fastening on the back waistband...

I don't think I'm going to blog the sewing details separately, so I'll just mention it quietly here - this skirt was FREE to make! Third time with a pattern = free, all the fabric was leftover from other projects (to tell you the truth I had bought this fabric to make a couple of lovely bolsters. There was quite a bit left over), and I even used up lots of half spools of thread and half used bobbins (serendipitous?).

Day 6:
My stripey skirt again. I just didn't have time to sew up the patterned silk version that I had cut out, and being tired and fluey it didn't seem sensible to burn the midnight oil.

On about Monday my partner commented that my skirt didn't really fit - too baggy across the rear - and when I checked myself out and looked carefully at the pattern envelope I saw he was right. I think I cut this skirt out extra large, expecting it to shrink; it didn't, and I ended up needing to insert elastic in the waistband. So I'm hoping this skirt is the largest of my trio and that the others are not too baggy from behind.

For a change I've paired this with something spotty and green - doesn't that sound nice!

There's good reason for face cropping...
 

It was late when I took my photos and the light was low but this is what the skirt + jumper look like together up close: 


Day 7:
Back into casual mode for Friday... possibly too casual for work's dress code, but I suppose a single trespass would probably be OK. And one of my Marketing colleagues gave me a skirt unsolicitation :-)

... and jump!
pose ...


And just as I'm getting used to skirts, skirts, skirts, we are all done! 

It hasn't been as intense as a me made month, but I have learnt something about my wardrobe.  Looking through my photos I realised that this skirt is not as flattering a shape as I had thought - at least not for someone with a high, wide waist.


For those who read my last post and might be wondering, my mum is still in hospital but after having some fluid aspirated from the lining around her lung her breathing is a lot more comfortable. Also the specialists seem to be making progress in finding out why that fluid was there - it's definitely an auto-immune disease - so hopefully within the next week they'll be able to give it a name and we'll find out if this is something that can be managed. 

Sunday 1st April 

Thank you so much for your kind thoughts; I think my mum is going to be OK.  Her specialists should be doing some final scans tomorrow and then starting her on steroids for the auto immune disease - there has been no sign of anything other than auto immune issues so far.

I've had some more bad news though. Today my father was also rushed to (a different) hospital. His partner says he has a blocked bowel and has been vomiting blood; it sounds pretty serious. I know a sewing blog is not the place for this, but you guys feel like dear friends and I don't think I'm going to be able to focus on sewing until my family has got through these crises.

Tuesday, 27 March 2012

OWOP: Days 1 - 3

I decided ages ago to have a go at Tilly's OWOP challenge - but I'd thought to have a bit more variety sewn up in time.  I currently have two skirts made from Vogue 1174 (yes, well spotted, it's a dress pattern), one that needs some finishing, and a fourth cut out.

Evidently there has been other stuff going on than sewing in my life. It's true - there have been camping, sewing room electrical issues, tiredness and flu. Less flippantly though my mum has been really ill: 2 weeks ago she quietly checked herself into hospital via the emergency department for painful breathing problems. She was discharged 5 days later with antibiotics and time off work but without an opinion as to what was (still) wrong, and after a week at home she was in a very bad state. She was rushed back to (another) hospital in an ambulance on Saturday morning, and the staff at the second hospital seem to be actively trying to work out what's going on.  The obvious but terrible contenders (pneumonia, a clot on the lung, cancer etc) have been ruled out, but there's a reasonable chance of an auto-immune disease being implicated. We're very anxious for the underlying cause to be identified so it can hopefully be treated.

So. I have been reading lots of blogs and adding heaps of stars in Google Reader but I'm really behind with my commenting, and with my sewing and blogging... 


Without further ado here are my OWOP days 1 - 3.

Day 1: What you might wear if you had thought it was going to be a regular weekend day at home... obviously OK too for accompanying your mum in the ambulance to hospital.


I hadn't planned to hop into the ambulance with my mum, but I think being a "+1" was useful.  I imagine it must be nice to have a close family member or friend with you when you're being rushed to hospital, but it also seems worthwhile to be able to help answer some of the detailed medical questions for paramedics, nurses and doctors on the trip and when you arrive at the hospital.

This skirt was originally blogged here.


Day 2: What you might wear after you slept in and missed your son's first soccer match of the season. Sorry!

You might wear this in the afternoon to take your daughter to the GP to get stitches in her eyebrow after she slipped over on her Fuzzy Felts and hit the coffee table (she was very brave). You might then wear this to visit your mum in hospital.

This skirt was originally blogged here.  I added some elastic in the waistband to correct the loose fit, since it didn't shrink in the wash as anticipated.


Day 3: What you might wear to work when you hadn't planned for the weather to get cooler again.  A small jacket helps, but stockings would have helped too.

I hadn't realised how similar this is to Day 2.

You can see that my daughter is fine and able to lead the dance as usual. She just has a small bandage over one eyebrow - a visual reminder to her kindy friends that they should play gently with her for now, and a good coverup for spidery looking black stitches. Her dress is from a sweet 1950s pattern; I'll write that up soonish.


Thanks for reading this!
Gabrielle

Sunday, 4 March 2012

1950s Long Tall Sheath (Vintage Vogue)


OK, now this one I am happy with.


This dress has been hanging around in its completely finished and *gasp* ironed state for about 10 days, and has nearly been worn to work a few times (alas, too cold,wet or windy for it), and nearly worn out to dinner twice (alas, not dressy enough). The fact that I keep putting it on and trying to wear it despite the weather and the occasion tells you I love it.


The pattern is Vogue 1137, a 1950 vintage pattern reissue, made as a straight size 15 - which is to say it's a size 14 but sewn with 1cm rather than 1.5cm seam allowances down the sides. Oh, the mad thrill of sewing without a muslin!


Unfortunately between directing my son and using the self timer I haven't managed very loveable photos. I have to blame the weather - this rain just won't go away! To be honest we did have a few hours of sunshine today but they were desperately needed for some outside jobs (you'll see a giant blue tarp on the lawn - that was part of it) that were a higher priority than blog photos :-(.

I managed to sneak these photos in just before the rain started up again...


Do you see how GREEN and healthy the garden looks? It is L.O.V.I.N.G. this summer.

But the dress. Yes, the dress.

It's much more fitted than I usually manage (a psychological block that I MUST get past for Julia Bobbin's Mad Men dress challenge!) but the dress is extremely comfortable, and I don't feel too exposed. Look everyone, a genuine smile!

-----------------------------------------------------------

So how long?
About 5 hours. Yes, I know I'm a slow coach. But on the other hand it's been a long time since I've had to do any unpicking - so there!


And how much?
A mere bagatelle! 


$22.50 tops. All up.


$18 of fabric (a half price remnant from Tessuti fabrics), and $2.50 for a reel of thread. The bias binding was a leftover, and the zip has been in my stash for ages - which means I bought it second hand or on sale. We can call it $2 but it might have been 50 cents :-).
-----------------------------------------------------------
 
Pattern Review

I didn't follow the pattern instructions and only really glanced at them to check for danger zones, so I can't tell you if they're any good or not - but with this sort of  straightforward construction there's not too much scope for calamitous errors.

I did find one surprise with the pattern though, which was that there seemed to be less ease than usual for a Vogue pattern - either that or it's supposed to be extremely snug and foxy? Maybe so! FYI these days I sew a size 12 bodice in Vogue patterns (and a 14 below the waist), but the fit you see above approximates to a size 15 everywhere - and I wouldn't call the bodice particularly loose.  So if you're thinking of making this I'd recommend you measure the pattern widths first.

I made a couple of changes...
  • Smaller side seams - of necessity :-) - thank goodness I gave myself "extra" fabric to play with by cutting out too big!
  • No hand sewing - I did glance at the instructions to see if they included a neat way of sewing the lining to the bodice outer but they didn't. They seemed to suggest sewing front bodice to its lining, back bodice to its lining, then hand sewing front to back at the shoulder seams, followed by neatening up the lining pieces on the inside shoulder seam. In my experience this approach often looks messy. Instead I sewed outer to outer at the shoulder seams, and facing to facing at the shoulder seams, then sewed the outer and facings together along the neckline. I turned the dress right side out and then pinned the arm hole seams together as far as I could reach in towards the shoulder seam. Sewing these seams with the machine took a couple of steps working up from the lowest points of the armhole and required some care close to the shoulder seams where there wasn't much room for everything else to stay out of the way. I think there are some good explanations of this method out there in the sewing blogosphere but I have to admit I didn't look it up - just tried to think about the dress in 3d terms.

  • Self-fabric facings rather than full bodice lining. My fabric is a stretch cotton and I figured a non-stretch lining would strain at the seams and also make the dress too warm. I made a facing shape by basically tracing the bodice pattern pieces and drawing a wavy line that allowed for at least 6cm below the lowest underarm point and lowest part of the neckline. My facing ends just above the bust darts and I intentionally made it a little tighter on the bust than the bodice. And look what I also did - matched up the stripes on the outer and facing pieces!
    This sort of detail just makes me feel good :-)
  •  Order of construction - I like to join bodice front to skirt front, and bodice back to skirt back, before sewing the side seams. This lets me check stripes are matched on the waist seam without having copious amounts of fabric hanging either side of the needle, and also lets me fit the dress in one lovely long side seam. Especially since I'm bigger in the hips than in the bodice I don't want to sew side seams for the top and bottom parts separately - they might not be the same size at the waist seam!

  •  Sway back adjustment - I took out a wedge from the back bodice waist seam to remove some puffiness that turned up in the bodice back when I tried it on in pins
This shaped waistline becomes a horizontal on me
Back bags be gone!


  • Straightened the side vents along the fabric stripe

  • Left out the self fabric belt. Just for now. I have the coordinating belt buckle ready to go but am feeling nervous about this step - so am doing without for now. 

-----------------------------------------------------------


The Verdict? 


A fitted dress like this - once it fits - gives you the opportunity to vary the ease, the neckline, the skirt shape and the length for some very different looks.

I love it.  I'm tempted to make another, shorter dress in a very different fabric.
Related Posts Plugin for WordPress, Blogger...