Wednesday, 31 July 2013

Unreasonably Unseasonal: Summer Jacket

My head is full of sewing ideas, but new ideas keep pushing in. It's hard to keep track - I'm not a fast enough sewist, so I've resorted to wrapping patterns + scribbled drawings in their designated fabrics.

Yes, this is winter down under :). Temps around 20+C / 70+F ...

One plan that I am determined to keep hold of is to make a cream-coloured cropped cashmere jacket - sounds indulgent, doesn't it, but I found 2 coordinating remnants in my stash, and after a trip to Tessuti (they have no more of it!) I'm sure I've convinced myself there's enough.


I've got some patterns earmarked for the cashmere jacket, and I know my size, but fear of cutting into my lush, expensive cashmere led me to the idea of a wearable muslin from one of the pattern contenders...

...which led me to make this decidedly summery jacket in the middle of winter!


Although I guess some of you may want to point out we don't have a real winter per se in Sydney ;)


I don't know what the flowers on this fabric are supposed to be, but the lighter pink is a great match for my neighbour's magnolias (is that what they are? I'm not a gardener!). 

NEARLY pattern matching on the centre front

This next photo shows the colours a bit better - and shows that I managed to sew a snap on neatly for once, although I didn't turn the points out properly:


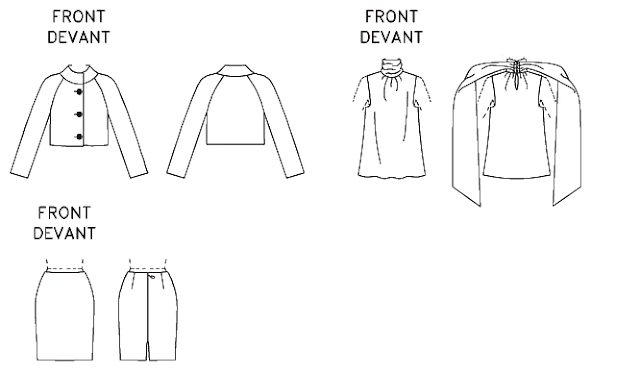
This pattern, Vogue 1127 (suit + blouse by Badgley Mischka) is rated Average, but the jacket is very straightforward - loose fitting with darted raglan sleeves, and only the sleeves are lined. The rating might be for the floaty blouse it comes with; it wouldn't be for the straightforward-looking suit skirt. There's minimal interfacing: nothing like the level of stiffening you'd need for a tailored jacket, and even with the stand up collar left off the facings work out neatly.  Notches, curves and lengths in the pattern pieces align nicely and the pattern pieces are really logical; no puzzle solving required.  All the jacket seams are finished with bias binding, which you're instructed to make yourself (I just used pre-made stuff, whatever I had to hand) which means the pattern is ideal for non-serger owners. If you've never made a jacket, this might be a good pattern to start with; success will come easily.


But the thing is, this may not be a top contender for my cashmere jacket after all.  I want a full lining in my winter jacket, even if it is cropped, and I want more room for winter layers and movement. Also I'm pretty sure cold hands need pockets.


I like having no collar though, even on a winter jacket - makes it easy to wrap a scarf on top.


The original pattern has a standup collar but I didn't think this would be great on. Maybe for someone else with a nice jawline :). The original also had full length sleeves, but I only had 1.10 metres of my heavy linen to play with. I've also left off some buttons, just because.


As a wearable muslin, I'm calling this a success. It'll be totally wearable in Spring and Summer, and I know it'll go with a much loved coral sillk top:
 

I can also imagine it made in a softer fabric, with the fronts folding back on themselves... and it would be super-easy to make contrasting turn-backs on the sleeves.

I think I know what I really want from my cashmere jacket now.


I'll leave you with a couple of interior photos so you can see how easy this little jacket is to make :)


and an exterior photo too just because those flowers nextdoor are so pretty:


See you soon!

- Gabrielle x

Saturday, 27 July 2013

Under the Influence...


I made a couple of sporty-looking tops!

First up is the blue version: blue merino with cream and orange merino bands on the front. This lot of concrete and tiles are in an alley opening near my office...


I really like this mixture of sporty / casual, matte fabric with a work / evening, shiny fabric :) - whether or not it's office appropriate is another question.

Incidentally, this is exactly the same fabric as used for my son's skiing layer top, and it's not itchy. 


And then there was this orange and cream merino version, easier to make with a vertical band, but made in more of a rush and super late at night so that the hem and top stitching are a bit disappointing (WARNING: No top stitching after midnight!). This time the concrete and tiles belong to the Sydney Opera House.


Two coordinating tops, just in case I discover a long lost twin or something crazy like that.  I can't really wear them together!

 Both  tops were made using Burda 02/2011, pattern #106, in a more fitted size than I usually wear (ie one size down).  I sewed separate bands around the wrists and neckline for the blue version, but the orange version just uses foldover + twin needle stitched hems. Both were stabilised with clear elastic at the neckline and shoulder seams, and the wrists on the blue version also got clear elastic. The bands definitely look neater than the foldover style of hems, and the elastic in the wrists of the blue top seem to be working really well in preventing the opening from flaring out.


Back in May when I sewed these tops there was lots of subliminal sport floating around.  Mr UpSewLate was watching the Giro d'Italia late at night. My kids were watching and dancing along with Lazytown. I became obsessed with the idea of tight long sleeved tops with wide contrast bands - and it didn't click that I'd been influenced till Maria asked!


photos from here and here


I'm currently finishing a cute little summery jacket and am contemplating a silky summer dress to go with it. My house is FREEZING cold though, and my hands feel like icicles; I don't know why I'm making summer clothes - I should be making mittens! Brrr

see you soon

Gabrielle x

Wednesday, 17 July 2013

Beating Cold Weather with Cool Pants

School holidays have just ended here in Sydney, and we took the opportunity to take our kids on a proper winter holiday - they'd never seen snow before! 

We decided to travel to Mt Hutt, near Christchurch on the South Island of New Zealand. I'd been keeping tabs on Andrea's blog through late May and June - and she was talking about really cold weather and even snow :).  

Two days before we left I mentally reviewed our clothes for cold weather.  Mr UpSewLate has an internal heating system that keeps him toasty even at ridiculously cold temperatures, so he was fine. We were all OK for ski clothes, but I wasn't sure about the non-skiing days...  how cold would it be? Would my jeans be cosy enough?  I didn't think so...


The threat of cold weather was a great excuse - I'd been planning these pants for months, even before I saw Rachel make the same pants from the same fabric! (What can I say, great minds think alike??).

The fit on my earlier Anita pants turned out to be quite wrinkly under the butt area (oh really, I didn't show you that photo?) - as usual (grrrr), should've expected it - so two nights before we were due to leave I switched to study mode and cut myself off from normal household conversations.  I studied Ruth's fitting comment on my red pants, scanned the pants pages of Sarah Veblen's "Complete Photo Guide to Perfect Fitting", and logged onto Craftsy to fast forward/rewind/fast forward my way through Sandra Betzina's pants fitting tips. And all swotted up, next morning I whipped these pants into a better shape :).


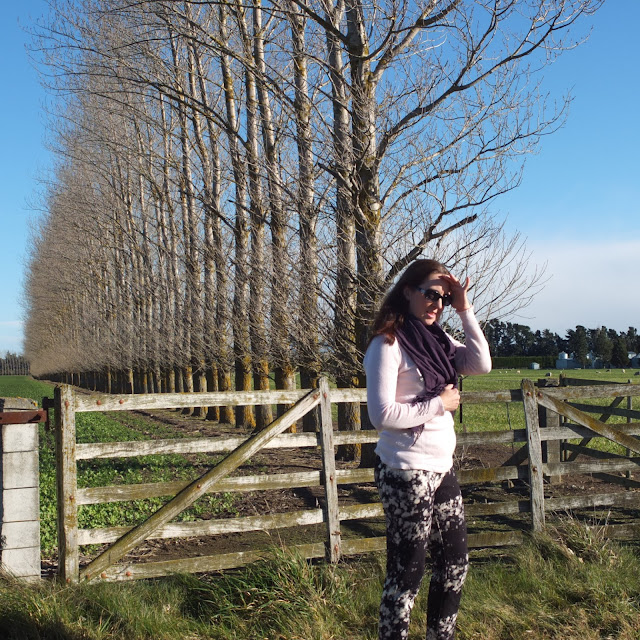
Doesn't look too cold in these photos, does it... but look past the trees, to the right. There's snow!!!


This spot is just somewhere we pulled over for photos on our way to a walk at Rakaia Gorge - to me it's a typical, gorgeous Canterbury Plains view. It was so much colder than it looks - you get a better feel for the temperature in this next photo, taken about an hour later (but excuse my ridiculous boots):


OK, OK, enough with the tourist shots, talk about the pants.

Some close ups now, and I'll describe the fitting changes I made:

Just a few small under-butt lines, + pattern matching over side seam
As I mentioned above, my earlier version of these pants suffered from under-butt wrinkles.  I always have this problem with RTW pants, and the last jeans I bought that fit reasonably well were described as a "curvy" fit.  To paraphrase Ruth's comment on my red pants, wrinkles under the bum say "you need a prominent rear adjustment" (and when you combine this with a swayback Ruth says you get the much more charming sounding "pert bum adjustment"). Translated to a ponti, I figured I could just add a bit of extra length in the curvy area of my bum.

To do this I scooped out the bum curve just a little and extended it about 2cm for a deeper crotch. The inner thigh seam had to join up to this new deeper crotch, so I did a rough bit of grading to adjust the inner thigh line. Scooping out the bum curve also removed a bit of fabric at centre bum (perhaps in the under bum area really?), and I was worried this could remove necessary fabric width across my bum, so I added 0.5cm width to the sides around hip level.

I don't seem to have clear photos to show how well this worked: there is still a little bit of wrinkling under my bum, but it's absolutely inconsequential compared to the amount of wrinkling I normally have in leggings or pants. Very small changes in the crotch curve or length seem to have a big impact on fit!


With a much thicker ponti than first time around, I went up a size from the size my snug measurements indicated for the full length of the front leg pattern pieces and from the hips up on the back leg pattern pieces. The muscles in my front thighs get bigger when I run, but the muscles in my back thighs seem to stay kind of inconspicuous...

I also removed the tapering from around knee level down, and because I wanted cosy ankles (and don't we all?) I added about 10cm in length to the legs... not quite enough as it turns out, so I didn't hem them.

I cut the pattern pieces individually as they would wrap around my body so I could pattern match going around my body, starting at the back left side seam. The fabric matches pretty well on the centre back, right side seam, and centre front, and reasonably well on the inner leg seams, but mismatches on the left side seam:

Reasonable pattern matching over inner leg seams


When you've finally finished taking all your blog photos, then and only then can you sit down and relax!

Longer legs to cover ankles

Phew!

And in brief, the kids also each scored a last minute NZ merino wool top that they could layer over a thermal top for skiing days:


My son's top was drafted using a too-small size 6-8 RTW top for the sleeve and body widths (to make it really snug) and a too-big size 9 RTW top for the sleeve and body lengths, and uses slightly smaller bands around the wrists and neck (twin needle stitched at the neck). My daughter's top used a Burda pattern (which I am feeling too lazy to dig out), simple folded over fabric rather than bands at the wrists, and a band around the neck which is not twin needle stitched down.

Although I find Burda patterns to fit my kids really well, interestingly in this case I prefer the fit of the top that was made without a pattern - looks like my kids' shoulders are narrow - and I like the separate wrist bands on my son's top.

Both of these tops got worn on the coldest skiing day (the one where I had a skiing accident and hit my head on icy snow and may have had concussion, but that's a separate story), but apparently they're itchy and can't possibly be worn without thermals underneath. 

And so concludes the ski holiday sewing!  


See you soon,
  Gabrielle x

Saturday, 13 July 2013

New Dress Goes to Lunch

The New Dress has been getting all the best outings lately... first the Sydney Sewists High Tea, on a date with the New Coat, getting introduced to several other charming garments and their modest owners*, and more recently a celebratory work lunch at Chinta Ria! 

* unfortunately due to technical issues all my photos of the event got corrupted


And despite bucketing rain and my end-of-week decrepitude, my helpful colleague Marylene was able to re-snap The New Dress just before lunch... YAY!


Looks like I've already had lunch in these photos, but that's because I had on a very naughty slip, which sneaked itself all the way up to my waist and hips without lettting on.

I KNEW I should have made the proper lining that came with the pattern!  

Try to remember: no more sewing shortcuts!
Anyway, moving on. 

I really like that this is a winter dress with some interesting design elements - interesting twisting, tucks and pleats; no side seams; front and back cut in one with the right sleeve... it's a recent pattern, Vogue 1341 - a Donna Karan pattern, of course (who else?). 


I realise that you can't see that interesting stuff too well in all the hot pink, so here're the technical drawings:


Isn't that a lot of good detail for a sewist? And yes, there is a curved zip in the back, but you can probably leave it out as I did since the dress is only supposed to be made from stretch knits.

I made my dress from merino wool that I bought last year from Tessuti Fabrics - so scrummy and cosy for winter - but I think the draping and folding would keep in place a lot better in a ponti. I'm tempted to make the dress all over again in fact to find out what happens to all those folds in a less drapey fabric.


Hello workmen in the semi-removated building. No, I'm not having millions of photos taken for your amusement.

The fit of this dress seems consistent with other Vogue Donna Karan patterns, but would depend a lot on fabric choice. In a soft, drapey merino the dress feels roomy and comfortable, but in a firm ponti the bodice and upper arms might be tight. There's more ease around the waist and hips than I expected, so I ended up sewing down one of the waist-level folds to make the dress more fitted.


If you're thinking of making this pattern, it's one of those that come with a warning: "no provisions provided [sic] for above or below waist adjustment". Adjustments can be made, but you have to work them out for yourself ie guidelines for adjustment aren't given and it's not immediately obvious which parts of the main pattern piece relate to the right sleevem, dress front, and section of dress back.


Thanks for reading and have a great weekend,

  - Gabrielle x


Related Posts Plugin for WordPress, Blogger...