Sunday, 2 July 2017

Vogue 1392 for Melbourne Frocktails

The dress I have to share with you is one I'm proud of (carefully planned and successful pattern matching, and a dress that really looks the way I'd intended), the event it was created for was a LOT of fun (Melbourne Frocktails, October 2016), and in fact just thinking about this dress reminds me of the awesome weekend I had with wonderful Melbourne sewing friends.

I don't know why it's taken me so long to post this dress!


Posing before Frocktails with the very charming Nicole of The Somnolent Dachshund

The dress is Vogue 1392, a Kay Unger designer pattern, described on the back of the pattern envelope as follows:

Lined dress has close-fitting, bones, bias front bodice extending into back band, no shoulder seams, concealed, elasticized shoulder straps and ribbon hangers, front pleated skirt, side pockets, attached petticoat, and invisible back zipper.


The dress is really tricky to photograph - even for the professional photographer at the event - I guess because my brocade fabric is so pale and shimmery.  I've darkened all of these professional photos to make it easier to see the fabric, and later in this post are some photos I took in shadow that I think give you a better idea of the fabric colour without the shimmer.

My original idea was actually to sew this dress in either a hot pink designer silk or a vibrant orange silk-cotton, but I wanted to check the fit first - and I'd found a roll of brocade on the nature strip, as you do (apparently my neighbours changed their minds about their curtains).  So I cut out the skirt in this brocade and combined it with some leftover stripey teal and cream upholstery fabric for the bodice, made a few adjustments for fit, and... realised I rather liked the brocade.  I quite like the stripes too...


And that's how it became a brocade dress!


Cutting and Sewing

Although this isn't a complex pattern (it's rated Easy), the dress took a reasonable amount of work, comprising as it does a boned lining and a petticoat and in my case a truck-load of pattern matching.


Pattern matched brocade on the back of Vogue 1392

The pattern matching was of course the first step - I don't have a cutting table, so I basically laid the fabric out over every bit of floor I could claim in the study, decided which way was "up", and then got to work on the priority areas. For the skirt I placed vertical lines at the centre back waistline, with more lines angling outwards lower on the skirt backs, and vertical lines on the front waist darts, with hip-like curves about half way down the skirt fronts. 

For the bodice I wanted strong lines to wrap over the shoulder straps parallel to the neckline, and wanted the shoulder straps to look as though they "grew" out of the centre front.  

Although I do sometimes fuss over side seams too, in this instance the fabric was too complex for me - I just couldn't do any more than make the sides symmetric. 

I'm not super speedy at pattern matching, and my knees don't enjoy scrambling around to move the pattern pieces again and again, but for me this part of sewing is really worth labouring over - I get so much satisfaction from a nicely placed (and matched) print!


Dress front, Vogue 1392 in brocade
Dress back, Vogue 1392 in brocade

Once the fabric was cut out the sewing was pretty straightforward. I made a few changes along the way (summarised below), but all the steps in the pattern were logical and easy to understand.  I hadn't ever sewn boning onto lining fabric before, so that was a worry, but it turns out not to be at all tricky :).

Modifications:

  • Ignored the grainline recommendation for the bodice fronts so I could get the pattern layout I wanted
  • Lengthened the skirt pieces by about 8 centimetres (I'm about 8 cm taller than the drafted height for Vogue patterns)
  • Skipped the step of fusing interfacing to the bodice front and back pieces because my fabric already had plenty of body
  • Moved the invisible zip from centre back to the side seam as I was concerned that the thickness of my brocade would make it tough to get that zip looking truly invisible (I was right)
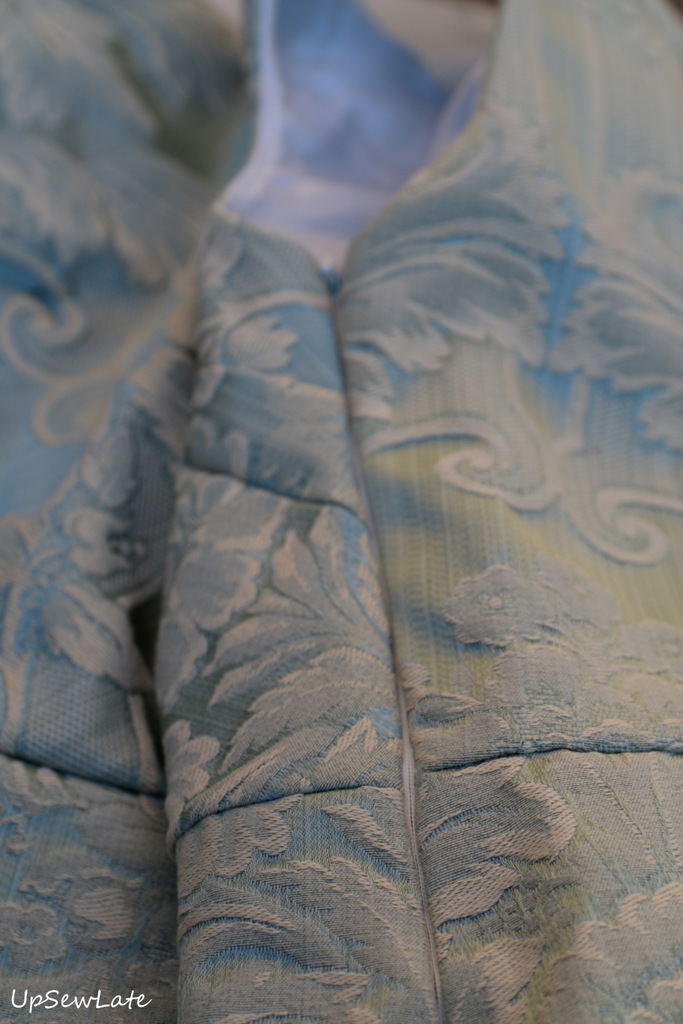


  • Skipped the boning in the side seams of the bodice, though looking at the photos now I think I should have left these in. The bodice is crumpling a little at the side seams and boning would have helped it keep its shape. I might see if I can add this in retrospectively!  I did leave the boning in place on the bodice front linings (and it wasn't nearly as tricky to execute as I'd expected):
Oops, the waist seam in the lining should be facing in towards the wrong side of the brocade
  • Skipped the side pockets - I just wanted smooth side seams
  • Removed the elasticized shoulder straps after sewing them in - they didn't seem to make any difference, perhaps because I'd done my bodice fitting without factoring them in
  • Skipped the ribbon hangers as I thought they'd show


Challenges:

The pattern matching was a challenge of course (d'oh), compounded by stretched out selvedges (grrr!), but there was another challenge: the neckline!  I trimmed those neckline seams aggressively, under-stitched them assiduously, and pressed them hard, and yet the lining persisted in peeking out. I think the huge difference in weight and flexibility of the two fabrics (hmm upholstery-weight brocade vs flimsy lining) is the problem here - are there any other tricks you know of for keeping the lining on the inside? I did think about pick stitching the neckline but ran out of time before Frocktails (and then just couldn't be bothered afterwards), but I'd like to sort it out before I wear the dress again.


Conclusion:

I don't think my choice of colours and fabric were ideal (too pale on me, and probably too thick for a dress), but if you happen to have a smallish amount of fancy fabric, Vogue 1392 may be the one for you.  There are so few patterns for cocktail dresses that don't require crazy amounts of fabric, but with this pattern you only need around 1.5 metres depending on the size you sew.  Even without swathes of fabric, this dress with its boning and elasticized shoulders and layers of lining and organza feels very upmarket. A big tick from me!


Next up I am going to TRY to get some photos of my exciting new Guy Laroche (Vogue 1450) top - and I'm tempted to make the matching skirt, though I suspect as is it'd be another in the not-suitable-for-work series...


See you soon!


- Gabrielle xx

Sunday, 25 June 2017

The Crush and the Wrap


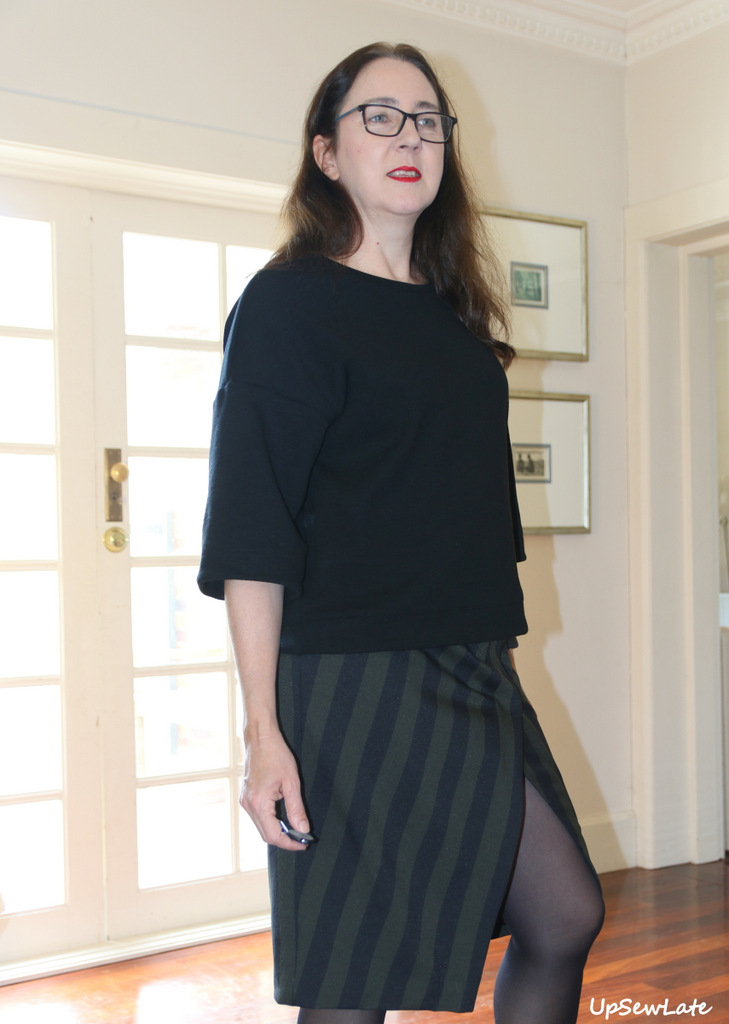
I've got two garments to share with you today, both finished a while ago and even photographed a few weeks back: a stripey wrap skirt that I'd hoped would be suitable for the office (that word "hoped" gives you a hint...), and a very simple boxy merino wool top that has turned out to be a bit of a wardrobe crush for me.


Let's start with the crush:


I've got a favourite, favourite bright green knit top that I wear all summer with jeans, skirts, trousers, you name it (you can see it on me here in day 21 of Me Made May from a few years ago) - and as I was reaching for it to wear out a few weeks ago, I realised (a) it was way too lightweight for winter, and (b) I needed to sew myself a winter version. The original number is RTW from ages ago and a very simple boxy shape, so I decided I'd just trace around it. The need was such that I couldn't even waste time with paper - I traced it straight onto my thick black merino wool with PINS! A few hours later (and a good part of that devoted to measuring all the symmetries; nothing is more annoying than a simple garment cut off grain, and I didn't want one side larger than the other either) the winter version was done.


And not only do I love this top (as is or layered; with jeans, skirts, trousers etc etc) but I also really want a few more of them... I wish I'd bothered to do my tracing onto paper now! I've got in mind a cosy quilted white version and am mulling over a houndstooth wool version too.  Yes, I will need to get out the paper and trace my summer top all over again, but I think it'll be worth it.


Pattern: traced from RTW
Adjustments: none
Fabric: thick merino wool from The Fabric Store
Rating: ACE!!!!

==================

And now for the skirt, view B of Vogue 9172, shown with the same top.

I'd seen a couple of versions of this skirt sewn up online - from memory I think participants in an online sewing comp all had to sew this up? - and it looked like it would make for a great work skirt.


I sewed up version B of the skirt, which is the longest version and supposed to hit below the knee with a demure wrap (judging by the drawings on the pattern envelope). I guess the length is correct on me, but the wrap is not nearly as office-friendly as I'd hoped. The wrap width is quite narrow and the resulting split is very high, so this skirt is never going to come to work with me.  I don't even want to imagine how revealing the split would be when I was sitting down!


I cut out and sewed in the side seam pockets, but their outline showed in the skirt front and I felt they wrecked the sleek lines of the skirt (as well as creating unnecessary bulk) so they were quickly unpicked.


As one of the reviewers noted on Pattern Review, this skirt doesn't include much ease. The pattern description is that it's "semi-fitted" but if you're used to sewing Vogue's designer patterns you might want to go up a size with this one. I sewed a size 16 this time around whereas I'd normally sew a 14 in Vogue skirts/ pants - it feels tight on me despite the stretch fabric, BUT in these photos I'm a several kilos heavier than usual (I changed doctor and my new doctor lowered my daily thyroid extract dose to the point where I was rapidly putting on a heap of weight and feeling like shit. Luckily when I got my blood re-tested recently I was able to prove this had brought my thyroid levels way, way, WAY too low, so my dose is back up and I should be back to normal again soon).


Apart from the height and width of that split - I should have measured first, I should have adjusted... - I think this pattern is a good design. I really like that it's fully lined, and the separating zip hidden on the inside of the wrap is a clever detail. If I made this again I'd use a much lighter weight zip - my heavy duty zip shows through the front wrap layers and creates too much extra bulk on the tummy. I'd also leave off the pockets (as I did this time), and would double the width of the wrap and extend the zip down a few inches. Oh I think I'd change the angle of the front wrap pieces of the skirt and taper in the side seams to better match the tech drawings for this pattern - the skirt is much more rectangular and the wrap much less than the drawings would suggest...


I'm happy enough with my execution of this skirt - I've lined up the stripes the way I intended, the zip looks neater than expected, and I've paired stretch outer with a stretch lining - but unfortunately this skirt is a wadder for me. I know it looks OK from a few angles, but it's too risque for my office, and I just don't feel drawn to wearing it outside of work.


Pattern: Vogue 9172, view B
Adjustments: skipped the pockets
Fabric: striped, stretch medium weight polyester from The Fabric Store and stretch lining from Darn Cheap Fabrics (via last summer's Frocktails trip to Melbourne)
Notions: separating zipper from Spotlight
Rating:  off to the charity shop

==================

Finally, to add a bit of colour to this rather drab post, can I show you some of my recent fabric purchases?  I recently found some lovelies at Tessuti Fabrics: lovely mulberry lace remnant and coordinating stretch viscose for a planned dress, and a gorgeous geometric remnant in some of my favourite colours (hmm not yet sure if this will make a top with a square neckline or a rectangular skirt). 


No promises now, but I took flat photos of a bunch of other clothes today and I'm going to make an effort to blog again before another month passes.

In the meantime, wishing you more sewing successes than failures!


See you soon


Gabrielle xx

Related Posts Plugin for WordPress, Blogger...