Saturday, 29 December 2018

Lois Dress #1

Here's a recent make - and it's something I'm actually proud of!


This is the Lois dress by Tessuti patterns, and it's a pattern I bought relatively promptly after loving the pattern photos - but then sat on for ages. Same story for this lovely fabric from The Fabric Store - when I saw this fabric up sewn up quickly by a few social media friends (@clever_tinker for one) I rushed to Surry Hills to get some, and then brought it home and stashed it. 

Maybe for 2019 I should try a bit harder to sew the patterns and fabrics I like earlier rather than later? What a ridiculous problem to have ;o.

Here's a quick close-up for a better view of the fabric and style lines - and FYI the fabric is a slinky polyester woven with a satiny back:


The dress is quite low cut, which I think makes this more of a special occasion dress than a work or everyday dress - I've nearly finished version number 2 and have plans for a couple more, but there's nothing wrong with a wardrobe full of special occasion dresses, is there?

Hmm... after reviewing the photos I decided it was actually a tad too low cut - so I've now sewn the lowest 2cm of the v-neck together on the inside of the dress, which makes it just the right depth on me for a low cut dress with complete bra coverage, and also makes the bust fit a smidge less loose.


By virtue of a couple of silly mistakes I sewed this up a size smaller than intended. I thought I was making the size 12, my size according to the pattern instructions, but I accidentally cut a size 10 for the bodice pieces and then cut out the skirt pieces poorly, necessitating wide seam allowances that took it down a size too. Luckily this has turned out to be just the right size.  I wouldn't necessarily advise following my lead, but I would recommend basting your cut out pieces together to check the fit before sewing in your zip within the side dart / side bodice seam - if you do this you might also discover (like me, hooray!) that you don't even need the zip!

I should also mention that I have an extra CF seam in my skirt because my fabric was narrower than the recommended width and I just couldn't fit the width of the skirt front and sides across my fabric.  This hasn't particularly affected the dress apart from making the CF bust intersection a bit bulky, but it did bump up the fabric requirement for the dress.  I also lengthened the skirt pieces about 2 inches, and next time around am lengthening it a little more.


There's a step in the instructions (step 9) that asks you to ease the front skirt side seams into the back skirt side seams, but I couldn't think why you'd want to do that*, so I just sewed the seams normally and then cut off the resulting extra length in the front skirt. 

If you've sewn the Lois dress and followed this step, I would love to know how the easing step worked out - did it do something interesting to the skirt drape, or help the skirt skim over hips and butt?


Hmm and the only other change I made was to ignore the recommended steps to stabilise the neckline and waist with tearaway Vilene.

I've tried using tearaway Vilene before but haven't enjoyed using it - so instead I cut the relevant pattern pieces from a lightweight iron-in interfacing, and this worked pretty well.  Before I started sewing the dress I was concerned that the v-neckline would gape, but on top of the tearaway Vilene the pattern uses a clever binding method to stabilise the neckline, and there's absolutely no risk of it stretching out.

This dress was intended to be my Christmas Day dress, but as it turned out I didn't need a Christmas Day dress - my kids both got sick on Christmas Eve and through Christmas Day - but perhaps I can wear it for New Year's Eve instead.

Finally here's the back view, looking quite old fashioned I reckon!


Thank you very much to those of you who replied to my last blog post - it seems that YES, there are still blog readers around! I still enjoy reading blogs too, but wasn't sure how many of us there were... I suspect that there are lots of people who intend to blog but just don't get around to it very often - it's obviously much more time consuming than instagram or facebook, but if you've got verbal diarrhea (ha, that's me!) those media can be a bit frustrating.

So - I'm going to try to keep blogging, and I need to build back up my own list of blogs to read.  If you're still (or newly) blogging I would love to know where; please feel very welcome to leave your blog address in the comments :).

Thanks for reading and have a very happy new year

- Gabrielle x

Sunday, 9 December 2018

Striped Linen Lacey

Does anyone write blog posts anymore? 

Does anyone read them?


I made this dress over a year ago - it's a StyleArc Lacey dress sewn up in a gorgeous striped linen from Tessuti fabrics - and it's one that gets a LOT of wear in summer.  The fabric was meant to be for a collared shirt for my son, but he doesn't ever choose to wear collared shirts, besides which he's been growing so fast that it felt crazy not to wait for all the growing to stop.

Hmmmm... come to think of it, he's now taller than me, so there may be a couple of years before the next growth spurt... (is that the way teenage boys grow? catch up to mum first, then a few years later catch up to dad?)

Whatever, we can call it selfish sewing ;).  I have a very forgiving son. He takes pretty decent photos too.


The Lacey dress is listed as being suitable for knit, jersey, rayon or silk fabric - in other words you want stretchy or drapey. If you choose linen you may end up with something a bit Scandi retro reminiscent, and a quick internet search ("sasha doll striped blue dress") will take you to the dress I think I must have accidentally copied.  I haven't become blond or doll-like, but the dress makes me feel good, so some subconscious desires have obviously now been fulfilled!


As usual, I should tell you about the pattern, right? 

It's a very easy sew and a forgiving fit (ie just check the waist measurement and if that's big enough to get your shoulders through you'll be fine). The shoulders are dropped and the sleeves are then basically cut on, and the skirt is simply gathered. Because there's a "feature" panel on the front and back bodices, this is a pattern you could go totally Beccy Home Eccy on - or mock pinafore - but hopefully not.  I only made very basic simple modifications in my version: extra length as usual in the skirt, and skipped the sleeve cuffs. 


These photos were taken at a beach not too far from Byron in January this year. Just to the right of the breakwater is an area where you can watch dolphins surf. We didn't see too many - one couple catching waves to the shore, swimming back out, then catching the waves in again and again - but even watching two dolphins was pretty cool.


 I can't wait to get back to the beach - but preferably a quiet one like this one!


I'll be back!


See you anon
- Gabrielle xx
Easy slip-on dress with an extended shoulder, square line bodice and slightly gathered skirt.

Tuesday, 12 December 2017

Named Esme Cardigan (How to Wear a Blanket All Winter Long)

In the winter when I'm cold, there is nothing I want more than to feel cosy - warm and snuggly despite the wind, wrapped in a blanket from neck to knee.


This particular Esme cardigan, made in a heavy double knit (and mostly polyester, I believe) is ridiculously cosy. It's as cosy as some of my coats, but it's also snuggly enough to stay on when I'm lounging around the house or sitting at a desk and working on the computer (unlike my coats).  It's pretty much like wearing a blanket!

I absolutely love it.


Pattern: Esme cardigan by Named Patterns

Fabric: double knit (by which I mean double-layered knit) bought at a crazy sale at Spotlight for next to nothing

Overall: an easy and satisfying sew, slowed down by my need to:
  • match the direction of the houndstooth (yes, it's a directional print) and align the horizontals in cutting out 
  • align the horizontals in sewing the main seams
  • align the direction and horizontals between the button band and the cardigan fronts
  • align the print in the pocket openings
I think you can see the pattern alignment / matching between the bands and the cardigan fronts in this flat photo:


And in this next photo you might JUST be able to see that the houndstooth pattern runs down the cardigan fronts right over the pockets without getting out of line :). It doesn't look like my pattern matching on that side seam worked perfectly though:


I made a few changes to the cardigan as I went:
  • omitted the interfacing on the band - a conscious decision, because I wanted the band to have the same amount of stretch as the main part of the cardigan, and I knew the fabric was heavy enough that it probably didn't need interfacing. I've seen a few Esme cardigans where the interfaced button band has stretched less than the cardigan body - I'm not sure how you'd avoid this is you interfaced the band, but I'm also not sure why you need the interfacing there when you're not adding closures. 
  • omitted interfacing on the pocket openings - not needed with a cut-on pocket.
  • cut the pocket bags as part of the cardigan front (one pair of upper cardigan fronts with cut-on pocket bags, and one pair of lower cardigan fronts with cut-on pocket bags).

The pocket bags are recommended to be sewn from a lighter knit, but if you don't mind them being made from the same fabric as the outer cardigan, a cut-on pocket is sleeker. And because the pockets are quite slouchy (more slouchy than they would have been with interfacing, but I suspect they were always going to be somewhat slouchy) the pocket bags are exposed, so a difference in fabrics would have drawn the eye.


Here are a couple more pocket photos - and yes, those pockets were flapping around too much! Right after taking these pictures I tacked the bottom corners of the pockets to the inner layer of my cardigan fronts, and they now don't show.


Notes:
  • as drafted this cardigan is super long, and will grow longer in a heavy fabric.  I cut some of the length off, and still have a deep hem. It's definitely drafted for tall women so I'd recommend checking how much of that length you want before cutting out (or buying) your fabric.
  • the sleeves are pretty narrow, and significantly narrower than I expected.  Next time around I might make them wider to allow for more layering options - as they are I can only fit a thin merino or cotton layer underneath

Although I love this cardigan and wore it pretty much constantly for a few months after wearing it, I'm not sure if it reads "dressing gown"! What do you think? Does a dressing gown have to have a cord to tie around the waist? I keep thinking of those old fashioned checked flannel gowns!


I haven't shown you the back view yet, have I - from behind it's a very plain and boxy shape:


It took a while for this pattern to grab me - it looked quite boxy in the line drawings (and it is boxy), and I thought I was hankering after a cardigan with a bit more shaping. But as winter progressed I noticed people around me wearing cosy-looking, long boxy cardigans just like Esme, and I realized this sort of cardigan was versatile and practical (and sometimes even stylish).

I'm not convinced mine's particularly stylish, but with its muted grey/cream colours I've been able to pair it reasonably well with a black dress or trousers in the office, and even better with jeans and a merino top or t-shirt at home. No one's pulled me aside and told me to get dressed, though when I've asked a few family members they have agreed it's quite dressing gown-like. 


Hmm... maybe it can be both a cardigan and a gown, depending on what you wear underneath?


Thanks for reading and see you soon!


- Gabrielle xx

Sunday, 10 December 2017

Vogue 8945 with Lace Sleeves


Back when the weather was still cold, I stumbled upon a remnant of purple lace at Tessuti fabrics. Below I've got a close up of the fabric drying on the line alongside the coordinating stretch viscose I paired it with, and you can see the pretty patterns in the lace, but what you can't see is the straight edged selvedges on the lace.


The lace remnant was too small for a dress, large enough for a small top perhaps, but the perfect amount for a pair of bell sleeves with the selvedges in place of sleeve hems, woohoo! Aren't those selvedges cool!! 


Vogue 8945 is a semi-fitted dress with two views: view A (this one) with bell sleeves, and view B with layered sleeve flounces.  I made view B of this dress for Melbourne frocktails a few years ago (see dress post here, and post for the related cape here), and I'd been keen to give view A with its simpler bell sleeves a go ever since.  V8945 is a good pattern for a statement sleeve - the dress itself is very plain, so the sleeves really get to star.

Speaking of sleeves that star, I entered these very sleeves in Helen and Diane's sleevefest2017  competition back in August (before I'd tried the dress on though!) and won a prize courtesy of Ryliss Bod - I won a copy of The Minott Method Total Pattern Fit. Have you heard of it? I hadn't, but it's basically a very comprehensive fitting manual.  I've skimmed through the book (so time poor these days!) and it also has fitting tips in the form of handy wrinkle diagrams telling you what the various wrinkles mean - I will definitely be using those diagrams. 


Hmm. And unfortunately, although this dress is one I adored on the hanger, on taking these photos I discovered it was a sausage casing dress. Isn't photography a killjoy! And it turns out the prize is very apt for a dress that fits this badly :(. 

I've deleted most of the sausage photos, but I'm willing to share one piece of proof with you:


This pattern is recommended to be sewn in a faille, crepe, challis or linen - so a woven fabric with some drape I guess? but both times I've made it I've used something quite different, and to do the pattern justice the dress really needs a drapey fabric OR a looser fit.

First time around I used a bonded polyester for the sheath dress and a combination of merino wool, more of the bonded polyester and silk organza for the sleeves - that version was a much more successful incarnation of the pattern, most likely because this dress size was a looser fit on me back then:


The two dresses are the same size (12 top half, 14 bottom half), but those couple of years apparently resulted in a couple of extra kilos, so even though I'm crazy about the sleeves, this dress hasn't had a single wear since being made (hangs head in shame).

The sausage casing factor is not so obvious in the shade, but shade isn't something you can rely on here in Sydney. It looks fine in these next two photos, right?


Gah I do wish I'd checked my measurements before cutting into the fabric! 


I'm keeping this dress for next winter - just in case I shrink a little or the dress grows a little - but next time I sew I'm definitely getting out the measuring tape first!


Happy sewing and see you soon


- Gabrielle xx 

Saturday, 9 December 2017

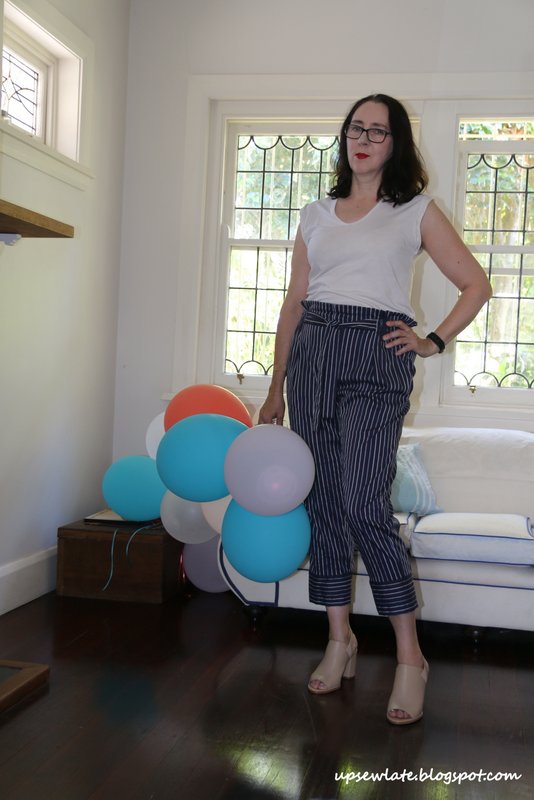
StyleArc Tully Pants

I only meant to step away from the blog for a week or two while work was insane, but somehow that turned into a few months - oops!

Anyway, I'm back now, and I've got a backlog of sewing to share.  I'm keen to get everything blogged by the end of the year, so please excuse my too quickly edited writing and photos - and let's start with these Style Arc Tully pants:


This fabric BTW came from Jen's glorious stash - she has an amazing eye for op shop fabric! It's shirting weight with a bit of stretch, and I suspect its composition is a blend as it didn't respond well to a hot iron. 

The balloons in all these photos are left over from my recent birthday party - seemed a shame to pop them all, so although I've taken them down I'm leaving them around the house for now :). They also make good props for people who've forgotten how to take blog photos...


I liked the look of this pattern when I saw it as a new release on Instagram, but I was a bit concerned that the paper bag waist and bow on the tummy might not look great on my rectangular shape. And to be honest this is not the most flattering style of pants I've ever worn, but I like that they're different to all the other pants in my wardrobe.  Actually I think a few frills on the shoulders or bust might help - or alternatively a strong sleeve could do the trick (I'll try that next time!). 


The pattern is a straightforward one to make because the pants have no closures: no zips or buttons whatsoever! Basically you need the pants to be wide enough at the waist to get on over your hips, and then you bring in that extra width with elastic - easy. The distinctive ties on the front are decorative, and slot neatly into pleats.


The elastic is only supposed to be set in around the sides and back of the pants (ie not over the tummy) but I set it in all the way around, stitching the elastic in place under the ties so it doesn't gather on the tummy.  

Oh - and I should mention the pockets! The pockets are very comfortable:


I believe Style Arc drafts for a women 168 cm tall and I'm about 5 cm taller than that, but my body is a little short for my height and my limbs a little long, so these pants feel a bit short :(.  I sewed a rather narrow hem on the cuff, but it I'd still like another 5 cm or so in length, and preferably added higher in the leg, so next time I make these I'll be chopping up the main leg pattern piece and inserting about 7cm of length there. 


OK, one back view for my sewing friends:


I've seen a few fashionable women wearing this style lately in the CBD, in both stripes and block colours, and if I can find the time I'd really like to make these pants again in a block colour.  The style is also really comfortable to wear, and the pants are a much easier sew than they might look. 

That's it for now! 

I'll be back soon with another quick post - till then, happy sewing!


- Gabrielle xx


Friday, 4 August 2017

To Work: Vintage Calvin Klein


Ta daaaa!  Yep, it's another top...


This one is sewn from a vintage pattern from my 80s/90s pattern collection (which is NOT a "carefully curated collection", though seriously, what even does that phrase mean? Does it just mean "a group of things I like"??). The pattern looks pretty boring in the envelope photos, but it's a designer pattern, which I find usually guarantees good bones, and the back of the envelope shows three very different tops, one of which (this one) only needs a metre of fabric.

The pattern is described as follows:

Loose-fitting pullover top or wrap blouse has cap or full-length sleeves. A and B mock bands, A: buttoned shoulder and sleeves closing. B: dropped shoulders and side-buttoned closing. C: extended shoulders, front pleated into self-lined yoke with forward shoulder seams and two-piece sleeves with buttoned cuffs shown pushed up.

I have a few of Calvin Klein's top patterns from the 70s, 80s and 90s and they seem to have quite a consistent, minimalist aesthetic, but this pattern is from 1986 - even though it has no shoulder pads. Vogue magazine anticipated the 1990s Calvin Klein designs would inspire Raf Simons' 2017 Calvin Klein collection (article and links to collections here), so maybe this is nearly fashionable?? Probably not, haha!

Anyway, these next photos of the pattern come from an etsy shop (linked) that had the pattern for sale as at the time of writing, but I can see it's available in lots of other online shops too if you like the look of it.


So obviously I made view A, the one that takes only a metre of fabric, and I left off the lovely buttoned shoulder detail - with my drapey silk twill I was worried I'd mess up, and the top gets on and off without any closures anyway.


This little top is intended to slot into my work wardrobe - black pants and skirts mixed with more interesting tops and jumpers - and though it looks summery with its fluttery cap sleeves, I think it's going to suit winter too in my current, very warm office.


These pants by the way are RTW, but if you could see them in person you might notice they're quite similar to Vogue 8909, with a loose fit (looser than the Hudson pants) and elasticized waist and ankles.  I'd make a pair except I already have a pair!

Vogue 8909 pants
Not Vogue 8909 pants, but a similar style

Because I left off the shoulder and sleeve buttoning closure this was a very straightforward top to sew.  The fabric, a gorgeous Italian silk twill from Tessuti Fabrics (sorry but it was purchased ages ago so I doubt it'd still be in stock) was a bit shifty to sew so that made things a little slower, but it was still only the matter of a few hours.

I used French seams on the shoulders and side seams and a rolled hem on the sleeves, and I should have but didn't use Lena's gelatine trick for shifty fabrics (here's Lena's original tip blogged in 2011, and here's the link to the 2012 Threads article inspired by Lena's blog post).  The rolled hem is wonky over the French seams, so perhaps French seams weren't such a good idea - that seam area was such a lot bulkier than the rest of the hem.

And I'm not sure if you can see this in the first of the detailed photos below, but I also used Debbie's trick for neat interfaced facings with no messy edges.


One of the nice things about a pattern like this is that it's really easily adjusted up or down a size.  My copy of this pattern was a size 10, but by widening the neckline and adding to the width of the top (including sleeve length) my top was effectively made as a size 12.


Not smug but happy - and that's all!


Happy sewing

- Gabrielle xx
Related Posts Plugin for WordPress, Blogger...