Sunday, 30 September 2012

Rustling Dress (V8811)

A new dress which I love.... if only, if only it wasn't so tight!


The fabric is a "poly" (that's what the label said; I guess that's poyester!) which I bought as a 2m remnant from Tessuti Fabrics a while back. It feels like paper taffeta... it's lightweight but quite crisp and structured. When it moves it rustles (love, love, love that) and it holds this sort of big skirt shape really well. There are some fold lines on the fabric but when you crumple it up then smooth it out again, no creases - yay! it's just the sort of fabric you shouldn't even bother TRYING to iron! 

I used Vogue 8811 for the dress, a reissue of a 1940 original design - advertised as looking like this:


Once I'd sewn the dress together it was obvious the high neck was going to annoy - it was even too high for my dress dummy! I also felt that the dress needed something dramatic at the neckline to balance out the pouf of the skirt. So I took out my bodice pattern pieces and traced them onto some tissue paper, and then I just drew a nice dramatic wide colllar with a much lower neckline. Because my collar is based on the original flat pattern pieces it fits the bodice well, but I also made it up initially just as facings to review the proportions on the dress. It seemed to look how I wanted, so then I cut it out another couple of times to make the collar - and hooray, it's just the dramatic look I wanted. Oh, if only the dress wasn't so tight!


My side zip is wonky looking - late night hand stitching, after the discovery that the dress was too tight:


My bust darts end way too high:


But I love the look and sound of this dress - the colour, the shape, the rustle - here's the full length view (easier to stand on the sofa to get a full length view than to work out a different place to put the camera):


Seriously, if it didn't FEEL way too tight and uncomfortable I would be drinking champagne right now. From the good glasses!


I'm not going to chuck it out. Who knows, the fabric may grow as it ages or something...


Sewing Stats:
I think this cost me around $47 all up.  I wish it fitted.


$28 for 2 metres of fabric.  About $5 for the pattern + part postage in one of those Vogue patterns sales.  Say $2 for the zipper, bought ages ago for something else.  About $4 for sewing needles. $0 for sewing machine thread (an already used reel), and  about $8 for overlocker threads.

If you've made this dress yourself or have sharp eyes you may have noticed I didn't quite finish it. I didn't make the belt (does it need a belt? wouldn't that accentuate the tightness?) and I've just overlocked the hem for now (I want a nice invisible hem finish but this fabric takes on puncture marks from needles so I need to think some more before hemming). And I made a couple of changes - the new collar as described earlier, which also meant I didn't need the back neck slit and somehow amazingly also didn't need the shoulder pads.

This is not a hard pattern - the cutting out and sewing were straightforward - but the total elapsed time for me to make this was around 2 weeks: 15 minutes here, 30 minutes there... mind you, we did have a party to organise last weekend too (happy birthday Master UpSewLate xxx), and I did seem to spend a lot of time thinking about this dress when I should have been making it. 

Hmm. There are many other patterns and fabrics tempting me, but I could always make this again in a larger size with my identical remnant of the same fabric.... (who buys two identical remnants??? you too?)

Tuesday, 18 September 2012

Two Stripes (Do you enter competitions?)

I'm not usually one for entering competitions other than the random draw kind - I worry about looking foolish. In a rational way I do know that entering sewing competitions can be very educational: you try your best, you allow others to judge you, and you accept their feedback. Sounds very civilised, doesn't it, but as we all know the rational brain often loses out to the emotional one! 

So as you probably know - you may have entered - there's this dress sewing competition, The Tessuti Awards, happening at the moment here in Australia, and it's open to everyone around the world. Basically you have to sew a dress from Tessuti fabric in a standard size 10 (AU) to fit a theme. This year's theme is Spots and Stripes; last year's was Linen and Lace. Entries close very soon (less than 1 day left I think...).


After a couple of weeks of planning (also called procrastination and muslining) I ran out of time to make the pink stripey number I'd planned especially for the competition, but I happen to love stripes, so I happen to have a couple of I-made-this-earlier striped dresses made of Tessuti fabrics. PLUS my size is at the upper end of the defined size 10 (AU) :-) which is rather a treat when you think you're a 12 or so.  If you want to skip to the chase, I've entered 2 dresses and you can see the entries here and here. And if you're feeling kind and benevolent you can click on 5 hearts to give me a vote for one or both. 

But if you want to take the long road, keep reading.

My mum came by to take better photos than my originals, but unfortunately I look to have been eating a lot since then :-) - so the photos look better but the model looks worse! The red jacket is from an 80s pattern but it's very similar in style to the one that comes with the dress pattern - just shorter - and I'm glad to find it a dress partner.

Would I tell you if I'd eaten all the pies?

Well frankly my dears, no. And I find the accusation quite belittling.
So I'll just pop my jacket on...
... and seek new horizons over there ...
... or just by the fence where there's a delicious aroma.
I'll cherish my memories of the pianoforte though...
... and of this pattern too.
Harumph.  The pattern's coming avec.  Adieu!

I do love stripes!

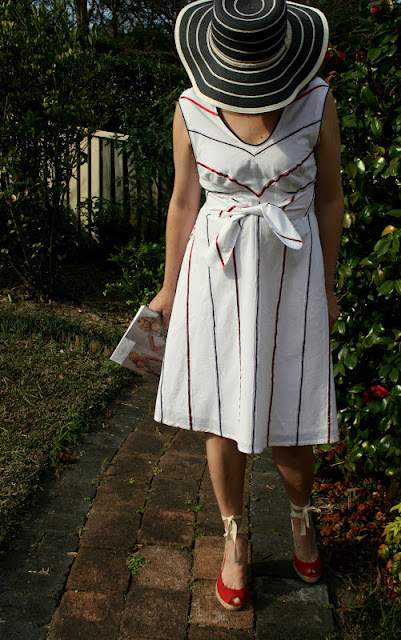
And here are my new photos of dress #2, which is evidently a more flattering cut! Sometimes too a big hat makes one's face invisible, and sometimes that is also a flattering look :-):


There were hundreds in entrants in Tessuti's (Linen and Lace) dress sewing competition last year - and that was just in Australia.  As at the time of this post there look to be more than ?100 entrants, and they are an inspiring bunch. Do go and have a look... BUT if you like either of my dresses, or want to spare me from looking like Nigel-No-Friends, I'd love if you could vote for one of my two dresses - it's anonymous and super-easy... here's my vintage dress entry, and my Tracey Reese dress entry is here.

Anyway, I hope to be back soon to share either a new vintage Vogue pattern dress, or (this would take self-control) a completed jacket, denim skirt or pair of linen pants from the WIP pile.

Wishing you lots of sewing mojo!
-Gabrielle

Sunday, 9 September 2012

Drape Drape Dress

Have you ever made something from the Drape Drape books? 

I hadn't... this is my first foray... no. 10 tuck drape dress* from Drape Drape:
* the black dress with side-on photos of the model tucking her hand into the side of her dress under her arm :-)

front view

back view
side / front view

My dress fabric is a shiny slinky knit from Tessuti fabrics, and the yoke is made from a small remnant piece of white cotton twill. You're supposed to interface the yoke, but my fabric was really sturdy and I didn't think it'd be much fun turning interfaced fabric inside out after stiching together the neckline and armholes :-) I think it's worked out fine without the interfacing. 

Look, the insides are presentable! Overlockers are tops!


the insides

Do you want to see it on me?

Sure, come inside - into the hallway - but bear in mind my dressmaker's dummy seems to have lost a bit of weight over winter, so we no longer fit my clothes the same way:


front view

side view

back view

silly view
Overall I'm really happy with this dress - really quick to make (the slowest part was choosing fabrics from my stash) and perfect for chucking on over a cossie in what promises to be a very hot summer.


The photos of this dress in the Drape Drape book show you the dramatic side / underarm draping (for the front and back views you need to rely on the line drawings).  Although I loved the look of that draping, I wasn't sure about exposing a whole lot of side-torso, so it was kind of lucky for me that my fabric wasn't long enough for the full draped effect. Fabric limitations forced me to remove a wedge about 20cm (about 7") wide from the pattern at each underarm, which I tapered away to nothing at the dress hem.  I also lengthened the dress by about 6cm or a little more than 2", and my hem is as narrow as I could make it. Removing the wedge of fabric makes for a less attractive but also much less revealing dress - but if I make it again I'd like to try to keep that drape and wear the dress with a little tank top underneath.  


The sizing is small of course, because these patterns were designed for the Japanese market, but apparently they keep their structural integrity when sized up. I'm bigger and taller than the biggest size in this book (XL: bust = 90cm or about 35", height = 168cm and I'm guessing that's around 5'6"), but the width of this dress seems alright for my XXL size, and the pattern was easily lengthened.  

If you're worried about making something from Drape Drape, the sewing techniques involved are straightforward but the directions are quite minimal compared to say, those in a Vogue pattern - and the language used to describe some steps is a bit odd. For example, step 2 (of 8) for this dress is "Edge-stitch the neckline and armholes on the upside and lining of the yokes." At this step you haven't yet sewn the yoke outer and lining together, so you're really meant to sew the pieces together with a narrow seam. There are loads of diagrams that show you what's meant at each step though, and the diagrams are excellently explanatory.  Just studying the patterns themselves also helps you understand draping techniques - so useful!

So - one down. This first dress is not perfect, but it gives me a good feel for the sizing of these patterns.  I'd really like to make no. 11 loose flare drape dress and no. 3 drop-waist gather drape dress too... so many patterns, so little time -

- Gabrielle

Wednesday, 5 September 2012

Kirsten Kimono Tee


I know t-shirts are dead simple to make, and kimono sleeve t-shirts are synchicated, but my experience with this pattern may nonetheless be useful to someone...

So. I mentioned I was making this Kirsten Kimono Tee in my last post - and here it is:


Pardon the cranky face - this was the best photo.

I sewed this in a Small / Medium (Small on the shoulders and bust, widening to a Medium on waist/hips) but based on my measurements and the sizing chart provided in the instructions included with the pattern I should have used a Large on the waist / hips.

The pattern is a free pdf pattern by Maria Denmark - this looks to be her simplest design; she also designs and sells lots of more complex patterns. If you "buy" this free pattern it gets emailed to you, and you then print out the pattern pieces and instructions, sticky tape the pattern pieces together and trace over your size, adding your own seam allowances.


This tee as I made it is very fitted on the body but has room in the sleeves. I added the little bands to the sleeves and waist hem, but you could also easily lengthen either and finish a deep hem with a twin-needle straight stitch. Even though this is fitted, it's not tight - it's very comfortable. And if I had made the correct size the tee wouldn't be flaunting my belly...

And I mentioned I've drafted my own kimono sleeve t-shirts before - here's the one I was thinking of:


and here's how the sizing measures up between my self-drafted effort and the Kirsten:


Interestingly there isn't much difference in width at the bust / underarm level, but from there the Kirsten stays slim-fitting while my own effort flares out - but the Kirsten would have had a similar body shape to mine (loose below the bust) if I'd used the right size for my measurements. The sleeves are different shapes, and the shoulder shape in the Kirsten tee is also a more natural shape than the squared off shape I used.

This is a super-quick and cute top. It uses only 0.75metres of fabric, the pattern is free and the instructions include plenty of helpful info - if you are new to sewing with knits this might be a good starting point...

Sunday, 2 September 2012

Overlocked - V1306 T-shirt

Little Betty made one of these V1306 t-shirts recently (well, about 3 months ago) and it looked so nice on her... the pattern is rated Easy and so I assumed it would be super-quick on the overlocker. Hmmm - bear in mind that she's a quick seamstress and I am not.


My new (old, second hand) overlocker came home with me from the sewing repair shop a couple of weekends ago, along with an instructional DVD. The DVD was boring so I haven't watched much of it, but the overlocker? It's so much more fun than I expected, and the machine (an ancient babylock imagine - looks like the original model) is doing a beautiful job!  All I can do so far is 4-thread seam overlocking, but WOW was I deceiving myself when I said I didn't care what the insides of my garments looked like :^>  I am only equipped for black or white overlocking though... where do you buy the coordinating thread? Is there a good online source?
 

This is not a bog-standard t-shirt, and the neckline details and side gathers mean more effort... but it's a Rebecca Taylor pattern, so those extra details are lovely! I made this in a size M (12-14) which is a bit big and loose, but I like it! Now that I look at the envelope again I can see that when I stopped following the instructions after doing the neckline and side gathers I missed a third detail that would've been cute - the sleeve turnups! Maybe next time.


I wore it on Friday for a scenic jog around Barangaroo and Walsh Bay and it was really comfy and (I think hope) a flattering length.

I have also been making a simple kimono-sleeve red t-shirt with white(that's laziness and my lack of red overlocker thread) overlocked seams. I'm using Maria Denmark's Kirsten kimono sleeve t-shirt pattern, which is a free multisized pattern - I'm very interested to see how it fits compared to my own self-drafted efforts. So far my main impression is tighter LOL! When it's done I'll post pictures alongside some of my own old self-drafted t-shirts; maybe I'll learn something:-).


And I also started a summer-weight long-sleeve t-shirt for Mr Upsewlate - trying to remedy some of the fit issues of the last one but the fittings and adjustments are really irritating.  I think I really need to start all over with a new pattern draft! As this is still a work-in-progress I'll keep the sharing for another day if you don't mind, but at least you know I've been up to a few bits and pieces!

PS Sorry it's been such a long time between posts - I didn't lose my mojo as such, but I haven't had much energy for sewing, blogging etc lately... there seems to be so much to keep track of for school / childcare recently, my job is keeping me ridiculously busy, and my recent fitness efforts are sending me to bed NOTsolate.

Related Posts Plugin for WordPress, Blogger...