Sunday, 26 June 2011

Lace Dress, Vintage Style (Vogue 1136)


Vogue 1136, a vintage pattern re-issue from an original 1945 design, is to my mind quite a classy shape.  It's supposed to be lower calf-length, which I guess is fashionable, but I wasn't sure... and I was using the (trimmed) scalloped selvedge edge in lieu of a skirt hem so once cut there was no going back.


So my version is a little shorter than the pattern specifies.  I also left out the back skirt pleats because I didn't think they'd work so well in lace.  For a bit of ease I added some mini pleats in the skirt at the points that lined up with the bodice darts. I love the V-shaped bands on the back... I hope you can see them:


And I love the neckline, and the long bodice darts:


I made this dress in an incredible rush for a function last night.  We left the house late because I was still sewing when we should have been out the door!  Luckily I'd made muslins of the bodice and skirt and didn't have complicated adjustments to make. However, I left  the side zip till last and as a consequence it's
a bit wonky-looking (and needs to be repositioned in the skirt):


Possibly I need to take in the skirt as well: the left-hand photo shows the skirt when I hold it in a little, and the photo on the right shows the skirt left to its own devices and looking quite wide:


These are only minor and definitely fixable problems of my own making, and I'm happy with this dress!


I should give you more of the details I guess and not just show you pictures :-)

The pattern is V1136 of course, and as this is a vintage re-issue it fits as per modern sizing.  I muslined the bodice really carefully but found the straight size 12 was perfect for me with just a little extra width at the waist. I guess if you have a large bust or broad shoulders this pattern might be a bit tricky to adjust though. I muslined the skirt in a rush and just ended up making this a little wider than a size 12 for the full length of my skirt - but the skirt shape is very straightforward when the back pleats are removed, and it'll be easy to take it in later.  I think this would look great in a solid colour, as the lines get a bit lost in the lace detail and would similarly get lost in a busy print.  It's recommended for fabrics like crepe, wool jersey or peau de soie.

Here are the pattern envelope technical drawings for V1136 - the jacket would be nice too:


My fabric is a lace that I bought at the Fabric Shop in Surry Hills, Sydney. I don't know what sort of lace this is classified as - maybe someone can educate me! It's machine made (very regular looking), it has a definite top vs underside, two scalloped selvedge edges that can be trimmed to the scallop shapes, and the floral patterns on the fabric are outlined in an embroidery stitch.

I used less than 2 metres of the lace fabric (phew - that's all I had) and less than 2 m of burdandy coloured lining fabric to make my slightly streamlined V1136.  I underlined the bodice in the lining fabric, and I also used the lining to make a free hanging under skirt with French seams. I did consider using an underlining as well as a lining but thought this may have become a bit bulky and hard to keep smooth in sewing the layers together. As it was, for the bodice I basted all the edges of each piece before doing any of the real sewing - this worked well; otherwise I think the lace would have stretched and moved a lot while being sewn up. Sewing with lace definitely takes some planning, so I read up on a lot of techniques before starting this.  If anyone would like more information about how this dress went together or what my OOP Reader's Digest compendium says about sewing with lace, underlining, fitting etc please let me know.

Thursday, 16 June 2011

BurdaStyle Girl's Dress in Japanese Cotton

The happy recipient of a new dress:


The dress was made in secret as a birthday present so it couldn't be tried on along the way - so I'm pleased to see it does fit.  It's based on BurdaStyle 10/2010-151 in a 110cm height, also described as suiting an age of 6.

front view (hanger too wide)
back view - ties very hard to make out


I made a few small changes to the pattern (and just ignored the instructions):
  • ties that do up in a bow at the back, in case the dress was a lot too wide

  • full rather than 3/4 length sleeves - just the sleeves from blouse #151 in the same issue

  • skirt lined in cotton voile 

  • bodice faced in self-fabric for winter cosiness (instead of binding at the neckline)
oops not a very neat zip and the wrong colour of thread!
  •  a button on the front - I had a button for each colour in the dress and was originally going to sew them in a line down the centre front bodice, but I simply ran out of time

This fabric was my daughter's selection.  I was planning to make her something using girly pink stash fabrics, but I just happened to pop into Tessuti Fabrics to buy some divine fake fur for wintery throws (seen as backdrop to some of the detail pictures above) and she became very quiet and basically glued herself to a bolt of fabric:-). Interesting!  It's a Japanese cotton print made by cosmo textiles.  I couldn't see it listed in Tessuti's online shop but they do have it in stock. It might actually be a quilting cotton...

Apart from finishing that dress I also had to make and ice cupcakes. I baked 120 mini vanilla cupcakes and iced 80 of them with butter cream and lollies for my dd's kindy and for a work morning tea.   


I thought icing and decorating would be fun for the kids, but it might just turn into a lolly-eating fest, given that here's how they decorated the chocolate birthday cake:


Next up I have to make a dress for a dinner function. I have to!  Grrrr... it's so much more fun to be carried away on a whim... Anyway, the fabric is very nice medium weight rose-coloured lace, and I'm thinking of keeping it as a very plain 3/4 sleeve sheath shape. I hope I can make myself do it!

Wednesday, 8 June 2011

Ooh Cashmere! Vogue 1098 Anne Klein Jacket


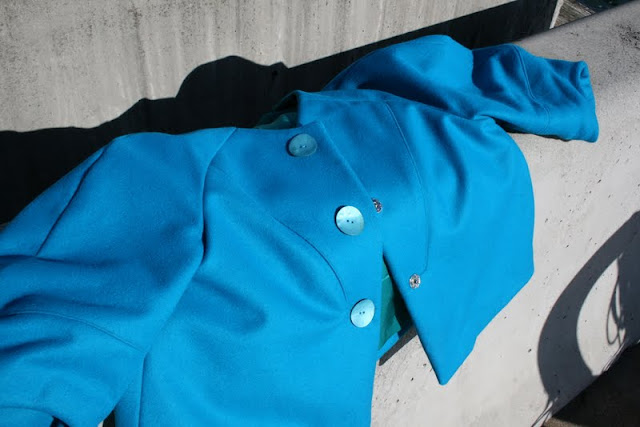
This bright blue cashmere/wool jacket is what I've been working on over the evenings of the last week.  It's by no means perfect but I'm rather happy with it... it even garnered unsolicited compliments in the office.


You won't recognise the dress, but it's from another Vogue pattern, and previously posted here.


I think this jacket looks good draped over the concrete ...


I took my outdoor pictures today at lunchtime, out at Barangaroo.  Not many people around except joggers and tourists wandering too far past Darling Harbour, and interesting views of sea, concrete and sky.  The office felt a long way away - I must do more of these interesting lunchtime walks.

And yes, I went a bit overboard with these pictures, but it was fun and there weren't too many witnesses.


And I returned to the office de-stressed!


Modifications:
You may have observed that my large buttons are non-functioning. You may also have observed that they are a little off-centre. There is a reason! On Saturday night my sewing machine refused to complete the button holes. I had practised on bits of doubled over, interfaced fabric - but I hadn't taken into account the impact of the seam down the centre front and also the angled seam. Both of these annoyed my button hole foot, and made the fabric way too thick for it to cope with. On Sunday afternoon I unpicked the mess and considered using a buttonhole service (if they could put handsome buttonholes on top of my mess - could they?). On Sunday evening I decided I couldn't wait, and decided I'd use platters (ie large buttons) to cover the mess with big press studs underneath.  The buttons had to be positioned to cover the buttonhole marks, and these of course were off-centre because that way the fastened buttons would have been centred!


    The other modification I made was to remove the collar. This was Jacquie's idea, and I think it was a brilliant one - it makes the jacket look more up-to-date.  I did take the opportunity to cut, fuse, trim (for that extra bit of turn of the cloth allowance) and sew the collar pieces so that I could practise some of Sherry's techniques and see what it looked like:


    I guess that's a proper collar! Maybe I should finish the edges and attach fastenings so it can be a detachable collar... hmmm don't think I can be bothered, although the idea does interest me in a theoretical way. 

    Sewing and Fit
    The jacket looks like this on the pattern envelope:


    It goes together nicely and seems pretty fool-proof (eg it already takes into account a certain amount of turn-of-the-cloth allowance for the collar and provides different sized upper and lower collar pieces), but I  found the sleeves and body a bit short on me. The point where the main sleeve pieces join to the shaped "cuff" feels too high - I would have thought this should happen at elbow length, but it seems to happen an inch or so higher. Actually they look this way on the pattern model too! I'm still pretty pleased with the jacket, and it probably fits better than most of my RTW jackets.


    Fabric
    I used a cashmere / wool / poly mix for this jacket, and wow did it feel luxurious to sew with - like moving a knife through whipped cream. I found I only needed about 1.6m of 150cm wide fabric for the jacket in a size 12, although the suggested amount of fabric for size 12 is 1.8m - so this is relatively affordable to make in nice fabric compared to a coat.  My lining is just a regular lining, nothing special.  At the time I was planning the jacket I couldn't get the matching turquoise lining so I chose the green as something I thought would complement the turquoise and go with other colours I wear.  Both the outer and lining fabrics came from Tessuti fabrics last year, and the buttons came from Tessuti a few days ago.
    Related Posts Plugin for WordPress, Blogger...