Showing posts with label winter. Show all posts

Tuesday, 12 December 2017

Named Esme Cardigan (How to Wear a Blanket All Winter Long)

In the winter when I'm cold, there is nothing I want more than to feel cosy - warm and snuggly despite the wind, wrapped in a blanket from neck to knee.


This particular Esme cardigan, made in a heavy double knit (and mostly polyester, I believe) is ridiculously cosy. It's as cosy as some of my coats, but it's also snuggly enough to stay on when I'm lounging around the house or sitting at a desk and working on the computer (unlike my coats).  It's pretty much like wearing a blanket!

I absolutely love it.


Pattern: Esme cardigan by Named Patterns

Fabric: double knit (by which I mean double-layered knit) bought at a crazy sale at Spotlight for next to nothing

Overall: an easy and satisfying sew, slowed down by my need to:
  • match the direction of the houndstooth (yes, it's a directional print) and align the horizontals in cutting out 
  • align the horizontals in sewing the main seams
  • align the direction and horizontals between the button band and the cardigan fronts
  • align the print in the pocket openings
I think you can see the pattern alignment / matching between the bands and the cardigan fronts in this flat photo:


And in this next photo you might JUST be able to see that the houndstooth pattern runs down the cardigan fronts right over the pockets without getting out of line :). It doesn't look like my pattern matching on that side seam worked perfectly though:


I made a few changes to the cardigan as I went:
  • omitted the interfacing on the band - a conscious decision, because I wanted the band to have the same amount of stretch as the main part of the cardigan, and I knew the fabric was heavy enough that it probably didn't need interfacing. I've seen a few Esme cardigans where the interfaced button band has stretched less than the cardigan body - I'm not sure how you'd avoid this is you interfaced the band, but I'm also not sure why you need the interfacing there when you're not adding closures. 
  • omitted interfacing on the pocket openings - not needed with a cut-on pocket.
  • cut the pocket bags as part of the cardigan front (one pair of upper cardigan fronts with cut-on pocket bags, and one pair of lower cardigan fronts with cut-on pocket bags).

The pocket bags are recommended to be sewn from a lighter knit, but if you don't mind them being made from the same fabric as the outer cardigan, a cut-on pocket is sleeker. And because the pockets are quite slouchy (more slouchy than they would have been with interfacing, but I suspect they were always going to be somewhat slouchy) the pocket bags are exposed, so a difference in fabrics would have drawn the eye.


Here are a couple more pocket photos - and yes, those pockets were flapping around too much! Right after taking these pictures I tacked the bottom corners of the pockets to the inner layer of my cardigan fronts, and they now don't show.


Notes:
  • as drafted this cardigan is super long, and will grow longer in a heavy fabric.  I cut some of the length off, and still have a deep hem. It's definitely drafted for tall women so I'd recommend checking how much of that length you want before cutting out (or buying) your fabric.
  • the sleeves are pretty narrow, and significantly narrower than I expected.  Next time around I might make them wider to allow for more layering options - as they are I can only fit a thin merino or cotton layer underneath

Although I love this cardigan and wore it pretty much constantly for a few months after wearing it, I'm not sure if it reads "dressing gown"! What do you think? Does a dressing gown have to have a cord to tie around the waist? I keep thinking of those old fashioned checked flannel gowns!


I haven't shown you the back view yet, have I - from behind it's a very plain and boxy shape:


It took a while for this pattern to grab me - it looked quite boxy in the line drawings (and it is boxy), and I thought I was hankering after a cardigan with a bit more shaping. But as winter progressed I noticed people around me wearing cosy-looking, long boxy cardigans just like Esme, and I realized this sort of cardigan was versatile and practical (and sometimes even stylish).

I'm not convinced mine's particularly stylish, but with its muted grey/cream colours I've been able to pair it reasonably well with a black dress or trousers in the office, and even better with jeans and a merino top or t-shirt at home. No one's pulled me aside and told me to get dressed, though when I've asked a few family members they have agreed it's quite dressing gown-like. 


Hmm... maybe it can be both a cardigan and a gown, depending on what you wear underneath?


Thanks for reading and see you soon!


- Gabrielle xx

Sunday, 10 December 2017

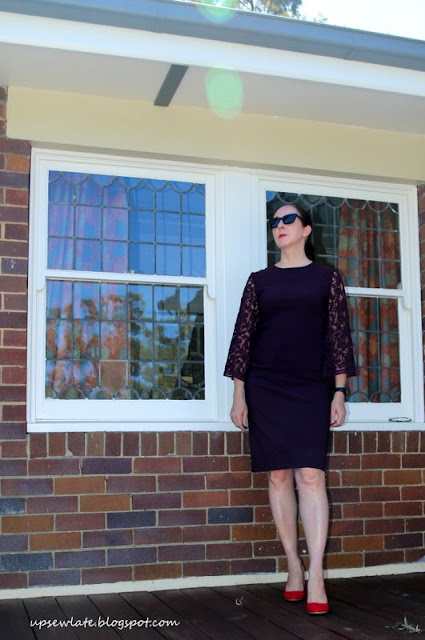
Vogue 8945 with Lace Sleeves


Back when the weather was still cold, I stumbled upon a remnant of purple lace at Tessuti fabrics. Below I've got a close up of the fabric drying on the line alongside the coordinating stretch viscose I paired it with, and you can see the pretty patterns in the lace, but what you can't see is the straight edged selvedges on the lace.


The lace remnant was too small for a dress, large enough for a small top perhaps, but the perfect amount for a pair of bell sleeves with the selvedges in place of sleeve hems, woohoo! Aren't those selvedges cool!! 


Vogue 8945 is a semi-fitted dress with two views: view A (this one) with bell sleeves, and view B with layered sleeve flounces.  I made view B of this dress for Melbourne frocktails a few years ago (see dress post here, and post for the related cape here), and I'd been keen to give view A with its simpler bell sleeves a go ever since.  V8945 is a good pattern for a statement sleeve - the dress itself is very plain, so the sleeves really get to star.

Speaking of sleeves that star, I entered these very sleeves in Helen and Diane's sleevefest2017  competition back in August (before I'd tried the dress on though!) and won a prize courtesy of Ryliss Bod - I won a copy of The Minott Method Total Pattern Fit. Have you heard of it? I hadn't, but it's basically a very comprehensive fitting manual.  I've skimmed through the book (so time poor these days!) and it also has fitting tips in the form of handy wrinkle diagrams telling you what the various wrinkles mean - I will definitely be using those diagrams. 


Hmm. And unfortunately, although this dress is one I adored on the hanger, on taking these photos I discovered it was a sausage casing dress. Isn't photography a killjoy! And it turns out the prize is very apt for a dress that fits this badly :(. 

I've deleted most of the sausage photos, but I'm willing to share one piece of proof with you:


This pattern is recommended to be sewn in a faille, crepe, challis or linen - so a woven fabric with some drape I guess? but both times I've made it I've used something quite different, and to do the pattern justice the dress really needs a drapey fabric OR a looser fit.

First time around I used a bonded polyester for the sheath dress and a combination of merino wool, more of the bonded polyester and silk organza for the sleeves - that version was a much more successful incarnation of the pattern, most likely because this dress size was a looser fit on me back then:


The two dresses are the same size (12 top half, 14 bottom half), but those couple of years apparently resulted in a couple of extra kilos, so even though I'm crazy about the sleeves, this dress hasn't had a single wear since being made (hangs head in shame).

The sausage casing factor is not so obvious in the shade, but shade isn't something you can rely on here in Sydney. It looks fine in these next two photos, right?


Gah I do wish I'd checked my measurements before cutting into the fabric! 


I'm keeping this dress for next winter - just in case I shrink a little or the dress grows a little - but next time I sew I'm definitely getting out the measuring tape first!


Happy sewing and see you soon


- Gabrielle xx 

Saturday, 15 July 2017

I Will Follow (McCall's 7542)

Well I won't usually.  Usually I'll apply my utmost self-discipline to avoid following the social media trends, because I reckon I'm usually tempted to follow only because everyone else is (peer pressure, yes, the force is strong), and that's not a good enough reason really :).


However, this time around the trend was a pattern (McCall's 7542) that looked to tick a lot of boxes for me:
  • Great sleeves: tick
  • More than one variation I'd like to wear: tick
  • Easy without looking like fast fashion: tick
  • Mashable with other patterns: tick
  • Different from other patterns I own: tick


This time around (I'll definitely use this pattern again, even if only for the sleeves) I sewed a variant on option E, which is the option with lower bubble sleeves gathered into the upper sleeve with an exposed seam (no idea of the correct terminology, sorry!). In my version the border between upper and lower sleeves is a regular seam, and that lower sleeve isn't a bubble but a single layer of fabric.

As you'll see I used a couple of fabrics for this top.  I had small and rather lovely piece of geometric wool from The Fabric Store, and it wasn't quite enough for the top, so I coupled it with a small remnant of black ponti for the back of the top.  I love this geometric fabric so much - and it reminds me of a beloved geometric silk from The Fabric Store that I sewed into a summer top a couple of year sago (post here).  The top only needs a single button, so the small purple button comes from my button stash. I think this particular button was inherited from my mother-in-law, who used to wear quite a bit of purple.


I sewed this top in a size 14 - a size bigger than I'd sew in a Vogue designer pattern - because I suspected the McCall's sizing might be more consistent with the Vogue basics line, and I'm more of a 14 than a 12 there.  It's still looking a little tight in these photos, but I expect the fit will be looser when my thyroid levels get back to normal. 


A few people have mentioned the top length in their reviews, and this is something to be aware of before you cut your top out: as well as being quite fitted, it's short!  My version of the top is cut out in the longer of two lengths, but it's not that long. Before whipping this up from a special fabric I'd really recommend measuring the bodice and sleeve widths and lengths. The fact that I've used a stretchy fabric for the back of my top effectively gives me more width, but my lower sleeve is nearly twice the drafted length of the bubble - the original would have hit me at just below elbow length. 


All up, this one's a fun and versatile pattern - highly recommended, and I look forward to trying the trumpet or tulip sleeves soon.  For more examples of this pattern sewn up have a look at Alex's striped viscose version here, Kabunta's blue and pink versions here, Carmen's teal tulip-sleeved version here, and Erika's pale pink accordion pleat sleeved version here.  And there are loads more on Pattern Review of course :).


Ahhh I love geometric fabric...  


See you soon!

- Gabrielle x

PS apparently it's become just about impossible to comment on my blog lately - I'm so sorry if you've been trying to do so.  I do have Disqus installed, so this should be working, but apparently it's become twitchy. Short of uninstalling Disqus and losing lots of lovely interactions, do you know of a good solution for Blogger?  For now, I'm contactable via email (corbettgabrielle .at. gmail .dot. com) and through the bloglovin comments system. Thanks in advance! 

PPS I just went over to the Disqus site and had another go at fixing things - and for now it seems to be working. If you're having similar issues, I logged in to the Disqus site and then under the Settings menu selected Installation.  My Disqus widget looked OK, so I moved on to step 2 (import Blogger comments to Disqus) and then cicked on the button for a one-time import followed by clicking to sync comments. Can you please let me know if things go pear-shaped again? Thanks!


Saturday, 8 July 2017

Guy Laroche Top (Vogue 1450)


Vogue 1450 by Guy Laroche has been waiting in my filing cabinet for a few years... I love the Guy Laroche Vogue patterns, but they often look too "Fashion" when they're first released for me to contemplate them in my wardrobe.  I'm not sure if it's that the designer looks gradually filter down to the high street, or if staring at the designer patterns for a few years makes them eventually look more normal, but I've now made the top and the skirt is on the shortest of my "to sew" lists (the physical version of the list, where fabric is matched with patterns and piled next to my sewing machine - still no guarantee it'll be made though).


This top was designed for summer, but I thought it would look great in a cashmere-wool blend. Possibly that thought was triggered by the fact that I had a nice little cashmere-wool remnant in the stash, but does that even matter? My remnant was pretty short - just 0.7 metres long but 155 centimetre wide - but it looked to me as though the top could be squeezed out of that limited yardage despite the pattern's stated 1.8 metre fabric requirements.


I measured myself and checked the finished dimensions, and went down a size to a 10. I couldn't fit the length of the fronts on my 0.7 metres, so I also cropped the top by an inch or two.

It turns out that the 10 fits when I'm wearing the same lack of layers as when I measured myself.


In all these photos I'm wearing a warm singlet and a high-waisted skirt, and in some I'm also wearing a long-sleeved merino wool top, just because it's cold here at the moment.  With extra layers on, the top is definitely a bit snugger than I'd hoped, and I haven't tried it without layers... I think I need to have another go at making it in the correct size and length, as I suspect I'll love the larger version more than this one.  Bigger is better!


The Sewing Details
Pattern = Vogue 1450 by Guy Laroche:
Very loose-fitting top has asymmetrical snap closing, extended shoulder forming cap sleeves and bias (lining) binding finishing seams and facings. 

Fabric = wool-cashmere mix, a remnant from Tessuti fabrics, along with a small piece of magically coordinating silk also from Tessuti fabrics

So, although this looks like quite a simple loose top, the design is stellar. There's a curve to the shoulder that sits beautifully when worn, and the armholes are perfection: low enough for layering but not so low as to reveal much, but also a great shape. Can you see too the front half of the armhole is a different shape to the back half? The front is slightly lower cut than the back and follows a different curve - and that means a much better fit than the common symmetric armhole, with no excess fabric getting folded under my arm as I swing it forward.  


There are these lovely darts in the back of the top too - no partying in the back, but some interest for sure!  These darts are replicated in the lining to the top. Since I'd bought insufficient lining I rotated the darts into a new horizontal seam line at the same height as the darts - but I don't seem to have a photo of this. 

Anyway, check out my dart alignment in the wool! (I had to have three attempts at the centre back seam before I was happy with their alignment, so a bit of basking is permissible isn't it?)


The top is supposed to be sewn with three large snaps and two buttons, but I got cold feet about the buttonholes, so my top has five large snaps. I'm super slow and not the neatest of hand stitchers, but I love the control you get with hand stitching. With the snaps I decided to start from the bottom and work my way up.  The hemlines really need to align, but at the neckline there's a crossover that would definitely mask a bit of length discrepancy if required. For the left hand side, I sewed the snaps to the wool (and not the lining), using the snap half that has an indentation (I think this may be upside down, but it seemed like this orientation would cause less of a bump to show through when the top was fastened. 


On the right hand side I sewed the snaps to the lining, but before doing so I cut out some small squares of wool that I positioned under the snaps as I sewed them in. The snaps are quite strong, and I didn't think the silk lining on its own would be any kind of match for them - with a wool backing the lining has a chance of surviving!  From the photos on the pattern envelope I assume the snaps aren't supposed to attach to both layers of fabric, though perhaps the designer garment was just sewn by someone with incredible, invisible hand stitching? In any case, sewing them to just one of the layers means a bit of movement can happen without creating too many creases on the outside (and any creases you do see in my top are therefore more likely to be related to my wearing too many layers and wearing the wrong size!). 


The pattern has you use a bias binding seam finish using your lining fabric but I didn't really have any spare lining fabric, besides which my lining was too heavy, so my lining seam edges are overlocked and my wool edges have been left raw after neatening them.  


I'm trying hard now to think what could possibly be improved in this pattern - and the only thing I can come up with is having separate lining and outer pieces, with the lining pieces slightly smaller to ensure it didn't show around the edges... not a big deal with wool as the outer layer as it stretches a little when steamed, but I can imagine this being annoying in a fabric with less give. And other than that, nothing!


Thanks for reading!

See you soon


- Gabrielle xx

Sunday, 25 June 2017

The Crush and the Wrap


I've got two garments to share with you today, both finished a while ago and even photographed a few weeks back: a stripey wrap skirt that I'd hoped would be suitable for the office (that word "hoped" gives you a hint...), and a very simple boxy merino wool top that has turned out to be a bit of a wardrobe crush for me.


Let's start with the crush:


I've got a favourite, favourite bright green knit top that I wear all summer with jeans, skirts, trousers, you name it (you can see it on me here in day 21 of Me Made May from a few years ago) - and as I was reaching for it to wear out a few weeks ago, I realised (a) it was way too lightweight for winter, and (b) I needed to sew myself a winter version. The original number is RTW from ages ago and a very simple boxy shape, so I decided I'd just trace around it. The need was such that I couldn't even waste time with paper - I traced it straight onto my thick black merino wool with PINS! A few hours later (and a good part of that devoted to measuring all the symmetries; nothing is more annoying than a simple garment cut off grain, and I didn't want one side larger than the other either) the winter version was done.


And not only do I love this top (as is or layered; with jeans, skirts, trousers etc etc) but I also really want a few more of them... I wish I'd bothered to do my tracing onto paper now! I've got in mind a cosy quilted white version and am mulling over a houndstooth wool version too.  Yes, I will need to get out the paper and trace my summer top all over again, but I think it'll be worth it.


Pattern: traced from RTW
Adjustments: none
Fabric: thick merino wool from The Fabric Store
Rating: ACE!!!!

==================

And now for the skirt, view B of Vogue 9172, shown with the same top.

I'd seen a couple of versions of this skirt sewn up online - from memory I think participants in an online sewing comp all had to sew this up? - and it looked like it would make for a great work skirt.


I sewed up version B of the skirt, which is the longest version and supposed to hit below the knee with a demure wrap (judging by the drawings on the pattern envelope). I guess the length is correct on me, but the wrap is not nearly as office-friendly as I'd hoped. The wrap width is quite narrow and the resulting split is very high, so this skirt is never going to come to work with me.  I don't even want to imagine how revealing the split would be when I was sitting down!


I cut out and sewed in the side seam pockets, but their outline showed in the skirt front and I felt they wrecked the sleek lines of the skirt (as well as creating unnecessary bulk) so they were quickly unpicked.


As one of the reviewers noted on Pattern Review, this skirt doesn't include much ease. The pattern description is that it's "semi-fitted" but if you're used to sewing Vogue's designer patterns you might want to go up a size with this one. I sewed a size 16 this time around whereas I'd normally sew a 14 in Vogue skirts/ pants - it feels tight on me despite the stretch fabric, BUT in these photos I'm a several kilos heavier than usual (I changed doctor and my new doctor lowered my daily thyroid extract dose to the point where I was rapidly putting on a heap of weight and feeling like shit. Luckily when I got my blood re-tested recently I was able to prove this had brought my thyroid levels way, way, WAY too low, so my dose is back up and I should be back to normal again soon).


Apart from the height and width of that split - I should have measured first, I should have adjusted... - I think this pattern is a good design. I really like that it's fully lined, and the separating zip hidden on the inside of the wrap is a clever detail. If I made this again I'd use a much lighter weight zip - my heavy duty zip shows through the front wrap layers and creates too much extra bulk on the tummy. I'd also leave off the pockets (as I did this time), and would double the width of the wrap and extend the zip down a few inches. Oh I think I'd change the angle of the front wrap pieces of the skirt and taper in the side seams to better match the tech drawings for this pattern - the skirt is much more rectangular and the wrap much less than the drawings would suggest...


I'm happy enough with my execution of this skirt - I've lined up the stripes the way I intended, the zip looks neater than expected, and I've paired stretch outer with a stretch lining - but unfortunately this skirt is a wadder for me. I know it looks OK from a few angles, but it's too risque for my office, and I just don't feel drawn to wearing it outside of work.


Pattern: Vogue 9172, view B
Adjustments: skipped the pockets
Fabric: striped, stretch medium weight polyester from The Fabric Store and stretch lining from Darn Cheap Fabrics (via last summer's Frocktails trip to Melbourne)
Notions: separating zipper from Spotlight
Rating:  off to the charity shop

==================

Finally, to add a bit of colour to this rather drab post, can I show you some of my recent fabric purchases?  I recently found some lovelies at Tessuti Fabrics: lovely mulberry lace remnant and coordinating stretch viscose for a planned dress, and a gorgeous geometric remnant in some of my favourite colours (hmm not yet sure if this will make a top with a square neckline or a rectangular skirt). 


No promises now, but I took flat photos of a bunch of other clothes today and I'm going to make an effort to blog again before another month passes.

In the meantime, wishing you more sewing successes than failures!


See you soon


Gabrielle xx

Related Posts Plugin for WordPress, Blogger...