Showing posts with label pants. Show all posts

Saturday, 9 December 2017

StyleArc Tully Pants

I only meant to step away from the blog for a week or two while work was insane, but somehow that turned into a few months - oops!

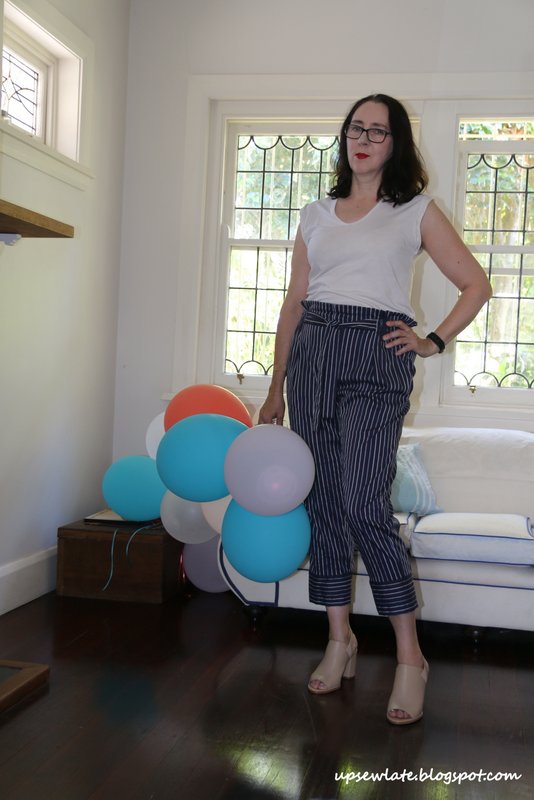
Anyway, I'm back now, and I've got a backlog of sewing to share.  I'm keen to get everything blogged by the end of the year, so please excuse my too quickly edited writing and photos - and let's start with these Style Arc Tully pants:


This fabric BTW came from Jen's glorious stash - she has an amazing eye for op shop fabric! It's shirting weight with a bit of stretch, and I suspect its composition is a blend as it didn't respond well to a hot iron. 

The balloons in all these photos are left over from my recent birthday party - seemed a shame to pop them all, so although I've taken them down I'm leaving them around the house for now :). They also make good props for people who've forgotten how to take blog photos...


I liked the look of this pattern when I saw it as a new release on Instagram, but I was a bit concerned that the paper bag waist and bow on the tummy might not look great on my rectangular shape. And to be honest this is not the most flattering style of pants I've ever worn, but I like that they're different to all the other pants in my wardrobe.  Actually I think a few frills on the shoulders or bust might help - or alternatively a strong sleeve could do the trick (I'll try that next time!). 


The pattern is a straightforward one to make because the pants have no closures: no zips or buttons whatsoever! Basically you need the pants to be wide enough at the waist to get on over your hips, and then you bring in that extra width with elastic - easy. The distinctive ties on the front are decorative, and slot neatly into pleats.


The elastic is only supposed to be set in around the sides and back of the pants (ie not over the tummy) but I set it in all the way around, stitching the elastic in place under the ties so it doesn't gather on the tummy.  

Oh - and I should mention the pockets! The pockets are very comfortable:


I believe Style Arc drafts for a women 168 cm tall and I'm about 5 cm taller than that, but my body is a little short for my height and my limbs a little long, so these pants feel a bit short :(.  I sewed a rather narrow hem on the cuff, but it I'd still like another 5 cm or so in length, and preferably added higher in the leg, so next time I make these I'll be chopping up the main leg pattern piece and inserting about 7cm of length there. 


OK, one back view for my sewing friends:


I've seen a few fashionable women wearing this style lately in the CBD, in both stripes and block colours, and if I can find the time I'd really like to make these pants again in a block colour.  The style is also really comfortable to wear, and the pants are a much easier sew than they might look. 

That's it for now! 

I'll be back soon with another quick post - till then, happy sewing!


- Gabrielle xx


Saturday, 3 September 2016

Linen Crush (Tessuti Chloe Pants + Vogue 8877 Top)

The crushing and wanting started with this image, which I saw on Tessuti Fabrics' Instagram feed.  I didn't save the image anywhere but in my memory, and as it happens, my memory then turned the outfit upside down - loose blue linen top became loose white linen top, and white shorts became blue pants (details, details!).  I already had a beautiful blue linen in my stash, bought from Tessuti fabrics a few years ago just because it was the perfect blue for something, and when the perfect pants pattern came into my possession while the outfit was still cause for obsession the ball really got rolling.  A top pattern quickly followed suit (tick!), along with a heavy white linen from an after work dash to The Fabric Shop.

And here's where I ended up:


My outfit isn't at all like the original inspiration image, and I'm at least twice the age of the girl in the original image, but this look is precisely what I wanted. The photos may or may not be in agreement - but this is my sweet spot :).

A simple pants shape, slim fitting through the hips and neither flared nor skinny, and an oversized top, loose through the bust and more fitted at the hips and lower arms. Not at all what like the original image, I know!


The pants pattern I used is the Chloe pants pattern by Tessuti patterns, which my mum was ditching because she thought the legs looked too wide for her height. The legs look to be very slightly tapered but there is still some fabric flapping around (not something I mind at all).  Normally these pants would be a proper long length on me, even with hemming (and I'm about 5'8" with fairly long legs) but I took them up about 5 centimetres to get the above-ankle length I was after, including a generous hem.  I'm thinking this length will be good for walking and doing stuff in summer - at this length there's zero risk of my tripping on my own hems.


I've sewn these up in a straight size 12, and amazingly the fit seems pretty good as is.  Second time around I could possibly remove a small wedge from the front crotch curve and maybe add that length to the back crotch curve, but the pants are really comfortable so I'll see how they feel after a few wears before I draw any fit conclusions.


There is one small annoyance with these pants: I had the choice of a darker blue (much darker than the fabric) or white invisible zip for the side seam, and as you can see I chose unwisely.  It isn't really a big deal for me - I'm planning to wear these pants with loose tops to about the length of this white top - but I do wonder if there's a way of neatly colouring in the visible white of the zip?


Anyway, regardless, I really like how streamlined these pants look.

Next time: review the fit after wear, and then make any necessary adjustments to the crotch curve; consider adding pockets on the backside (I was fumbling for pockets when I wore the pants to take photos); try them as shorts; and definitely make them again!


The top pattern is Vogue 8877, a "very easy" pattern (and yes, it is) in the size Medium (12-14).  I sewed this top (blog post here) before with short sleeves in a jersey, and it does work in a stretch fabric but it's really intended for wovens.


The top is described as a loose-fitting pullover top, but if you're busty I think you would need to seriously modify the bust seam, as the angled, dropped shoulder line takes away some of the ease you would get in the bust area IF you had a regular shoulder and sleeve. Oh and I didn't notice those dropped shoulders when I wore my earlier top, but I can really feel them on this top, and can feel if the top has wiggled to one side - so the shoulders are obviously another fitting area to watch out for.


My only adjustments to this pattern were to take the neckline in slightly on both sides and to remove some of the length in the bodice.  My adjusted neckline is now less "boat" and a little bit "square", but I think this smaller width is more proportionate to my shoulders while still fitting over my head. For the top length I had a very specific finishing length and hem depth in mind, so I did a lot of trying on and pinning and pressing in place and then cut away what turned out to be an excess of a couple of centimetres of length.


I don't think it's very noticeable in the bright sunlight (yay, Spring sunshine!) but the fabric has a damask sort of floral pattern woven into it.  I think it's pretty, but I do hope I haven't accidentally sewn myself a tablecloth top!  Hmm... more research is required here...


I added a cotton bias binding tag in the back neckline to help quickly identify back from front without the itch factor of a normal garment tag - this is one of those garments whose front and back are extremely similar, so it's actually very helpful, and I'm wishing I'd thought of it in time for the pants too.


The one problem I think I'll have with this top is finding jumpers or jackets to go over it - check out the width of those sleeves!  One obvious solution is to use the pattern again to sew a long-sleeved wool top - or would that be a bit much?  I've got some nice thick merino lined up for the job if I don't come up with a better idea.


Next time: sew again in a heavy knit fabric to make a jumper that will layer over this top and the many other dolman sleeved dresses and tops in my wardrobe - yay!


So all up I am a very happy camper right now.  I've got two garments I love, and they've got my imagination fired up with lots more ideas too...


Happy sewing!


See you soon

- Gabrielle xx

Monday, 9 May 2016

Summer's End Top + Pants

I've whipped up a top and some black work pants - and I'm feeling really happy with them both.

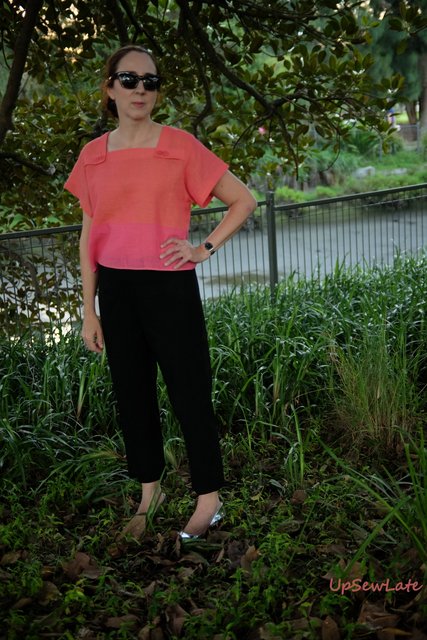
The pullover top is sewn from an 80s pattern (Vogue 8313) and some vintage fabric (quite possibly from the same era).  For all that it's an old style it doesn't look particularly dated to me... and yet it's pure 80s.  In fact my mum had a top with very similar lines to this one when I was growing up, though hers was made from white linen with navy trim inset around the neckline (and no buttons), and had a matching skirt - much more of a classic look than this :).


I found the buttons in my stash - wasn't I lucky to get such a good colour match! 

I modified the pattern slightly to narrow the neckline and to make the buttons decorative rather than functional; I didn't think my loose weave fabric - a lightweight hemp perhaps? - would have stood up to buttoning, and I don't usually have any problems getting pullover tops on. The pattern also called for top stitching to hold the facings in place around the neckline, but I opted instead for lots of 'invisible' hand stitching under the buttoned corners and wherever else I could hide a few stitches...  I love this "no stitches" look and wish I'd thought of it when I was sewing the sleeve hems. 

The top is intended to be a little more cropped than mine but I wanted it to cover the waistline of whatever I wore it with, so I added a few centimetres to the length and cut the front and back with the selvedge in place of a hem.  I can *just* tuck it in too when I wear it with high waisted shorts:


I should have realised such a loose fabric would be slightly transparent - I will have to bear that in mind next time I wear it...


And the black pants are the pants from Vogue 1264 by Anne Klein, described on the pattern envelope as "semi-fitted pants with tapered leg has side invisible zipper" and reviewed here on PatternReview. They're basically just cigarette pants - no pockets, no frills!


Black is so hard to photograph!  

This pattern is a really good basic pants pattern - simple to sew with an invisible side zip and waist darts, and giving a surprisingly decent fit right out of the envelope. My only intentional adjustment from a straight size 14 was to taper the pattern to a size 16 waist, which turns out to be a bit loose on me and makes my pants end up sitting lower than my waistline and makes the pants legs look longer on me than they should (I normally lengthen Vogue pants legs by at least 5 centimetres). 


I also forgot to follow the instructions, and that led to my unintended omission of the cute side slits that should be happening just above my ankles. I'll definitely have to include them next time - they're very easy to sew. and with a nice deep hem they should have enough weight to stay in place and not flop askew.  


I've lightened the next photo so you can see the fit in the back of the pants with my top hoicked up. The fit isn't perfect, but it's a million times less saggy under the backside than all my RTW work pants and would probably look even closer to "spot on" in a drapey wool crepe (these pants are sewn from a stretch cotton):


The pants have a plain facing at the waist and no waistband, and I think this is good for those of us (like me) with a short waist - though I guess it may not work for those who need a belt to keep pants in place. Although I've sewn my pants up with too loose a waist, my impression is that the pattern is also a good starting point for those of us with flat-ish backsides (like me) - the crotch curve looks relatively shallow compared to some pants patterns I've tried.

Extra room for ice cream, right?


Next up I'm hoping to show you a winter dress that's turned out to be more "va-va-voom" than planned (I have no idea whether or not it is going to look alright in the daylight and in photos, but it's looking OK in the weak late-night light...), and then a cute but seasonally inappropriate jacket.

These photos with their varying backgrounds were all taken at Bicentennial Park on the foreshores of Rozelle Bay a couple of weeks ago (thank you mum!) with the exception of the shorts photo (thank you tripod).  I hope this doesn't feel like an excess of photos!


Thanks for reading

Gabrielle xx


Wednesday, 27 January 2016

Mustard Pants (Burda 7214)

Yesterday was a public holiday in Australia, and although the weather was fine and going to the beach on Australia Day is a very Australian tradition, my kids wouldn't have a bar of it.  The new school year is about to start. and I suspect they are trying to eke the holidays out for as long as possible by avoiding doing fun stuff; everyone knows time flies when you're having fun!

No matter; I spent the day sewing, and finally managed to finish off a pair of pants started ages ago and very nearly finished in December.

This is how they were looking in December - so, so, SO close to done!  All that remained to do was the buttonhole and button:


The pants are now finished, and I'm pleased they're done, but putting them on again reminded me why I hadn't finished them earlier - I don't like them. The colour is not doing me any favours, and the fit on my backside is not good at all.

The fit seems to have got worse since December - it could be that I've changed weight (probably) but it could also be that ironing the pants stretched out the fabric in the backside.

Let me show you how they were looking yesterday afternoon:


In these front / side views you can see the front crotch curve is too long; that's why I get a fold of fabric on my upper thigh when I move:


There's also a lot of wrinkling on the side seams. The wrinkling alongside my knees is fine, but the wrinkling at top of my thighs unfortunately relates to the problem at the back of the pants:


There's a lot of extra fabric there - my backside is flatter than the pattern :(. 

I know what to do to fix these issues; I had to work on exactly the same problems when I did a pants fitting class using a Vogue pattern. I wish I'd compared the Burda pattern pieces to the Vogue ones I'd adjusted to fit, but I was too lazy! Next time... 

Although I'm not very happy with the fit of these pants on me, I think this is a terrific pattern, and I've seen it look great on many others.  I really like the proportions of the waistband and yoke (I hate a long yoke!), and the order of construction is very sensible, allowing you to take the pants in to fit at the CB seam rather than just the side seams. 

Speaking of taking in, I should mention the adjustments I made to view A of this pattern. I started with a size 40 (EUR)/ 14 (US), corresponding to my measurements, and then I: 
  1. lengthened the legs (I don't recall how much, but it would have been at least 5 cm for my 174 cm height);
  2. omitted the knee patches;
  3. omitted the zips on the lower leg side seams;
  4. omitted the zips just below the front pockets; 
  5. omitted the belt carriers because I wasn't liking the pants enough to bother - though if I'd ended up liking these, a belt would have been useful, as the pants sit at the low waist;
  6. took in the pants at the side seams by 1 cm for the full length of the pants, suggesting I should have gone down a size;
  7. took in the pants at CB by another 1 cm, tapering to nothing at the junction with the CF seam; and
  8. removed 3.5 cm in the height of the pockets after pinning the originals in place, ready to top stitch. On fitted pants, my preference is for the back pockets to finish ON the backside, and not encroach into thigh territory. For someone with more curve in their backside than me the original pockets should have been fine. 

There's one other part of the pattern I'd change if I made these again, and that's the front pockets. The pocket bags are deep and their outlines show through the front legs in my stretch cotton, so next time around I'd make the pocket bags from a much lighter fabric and perhaps also make the pants themselves from a heavier fabric.  I'd also change the shape of the pocket opening, as I find it quite low and very wide - I prefer a smaller opening to that pocket.

I'll leave you now with some "in the flat" photos so you can see the details properly, including my dodgy repair to the inside of the waistband at CB where I'd accidentally snipped away fabric, and the place where I left the seam finishing too late:  


Happy sewing!


- Gabrielle x


Thursday, 10 July 2014

The Denim Detail: Papercut Patterns Pleated Pants


After a ridiculous amount of procrastination and many substitution projects, I started making these Papercut pleated pants a couple of months ago.  I'd been delighted to win the pattern last year in a giveaway held last year by the very lovely Juliette (yes, all giveaway holders are lovely, but she seems particularly lovely) of the Crazy Gypsy Chronicles; I was mad keen on pleated pants - still am - and desperate to get the pleated look as seen on the cool pattern envelope.


It's a gorgeous package: recycled paper, cool graphics and photography, and a clearly drawn and instructed pattern. The pattern is described as "A pleated pant with a slim fit leg, wide shaped waistband, fly front opening, back darts and side pockets" and that's exactly what I wanted - I wanted pants just like the ones on the pattern envelope!

There was a problem. You know how the sizing of these pants is really huge, and everyone has to take the pants in by 2 sizes to get down to the size they intended to make? Yes? Well apparently that problem got fixed! I had no idea. Unfortunately pattern companies don't do version control, so when you buy a pattern you can't tell if you're getting the pattern that everyone reviewed last year or an improved version...

[Hmm, why don't pattern companies use version control? Wouldn't it make sense? And wouldn't it be great for the pattern buyers of the future to be able to tell whether they're getting the limited edition first print run, or the original release, or the revised and improved version?]


Anyway, suffice to say having read all the reviews I could find, and having checked out all related photos, I very deliberately cut the pants out 2 sizes smaller than my measured size. They looked small, but many had gone before me, so I was utterly confident I was on the right path.
Until I couldn't even get them on!


And so a design feature was born of necessity. 

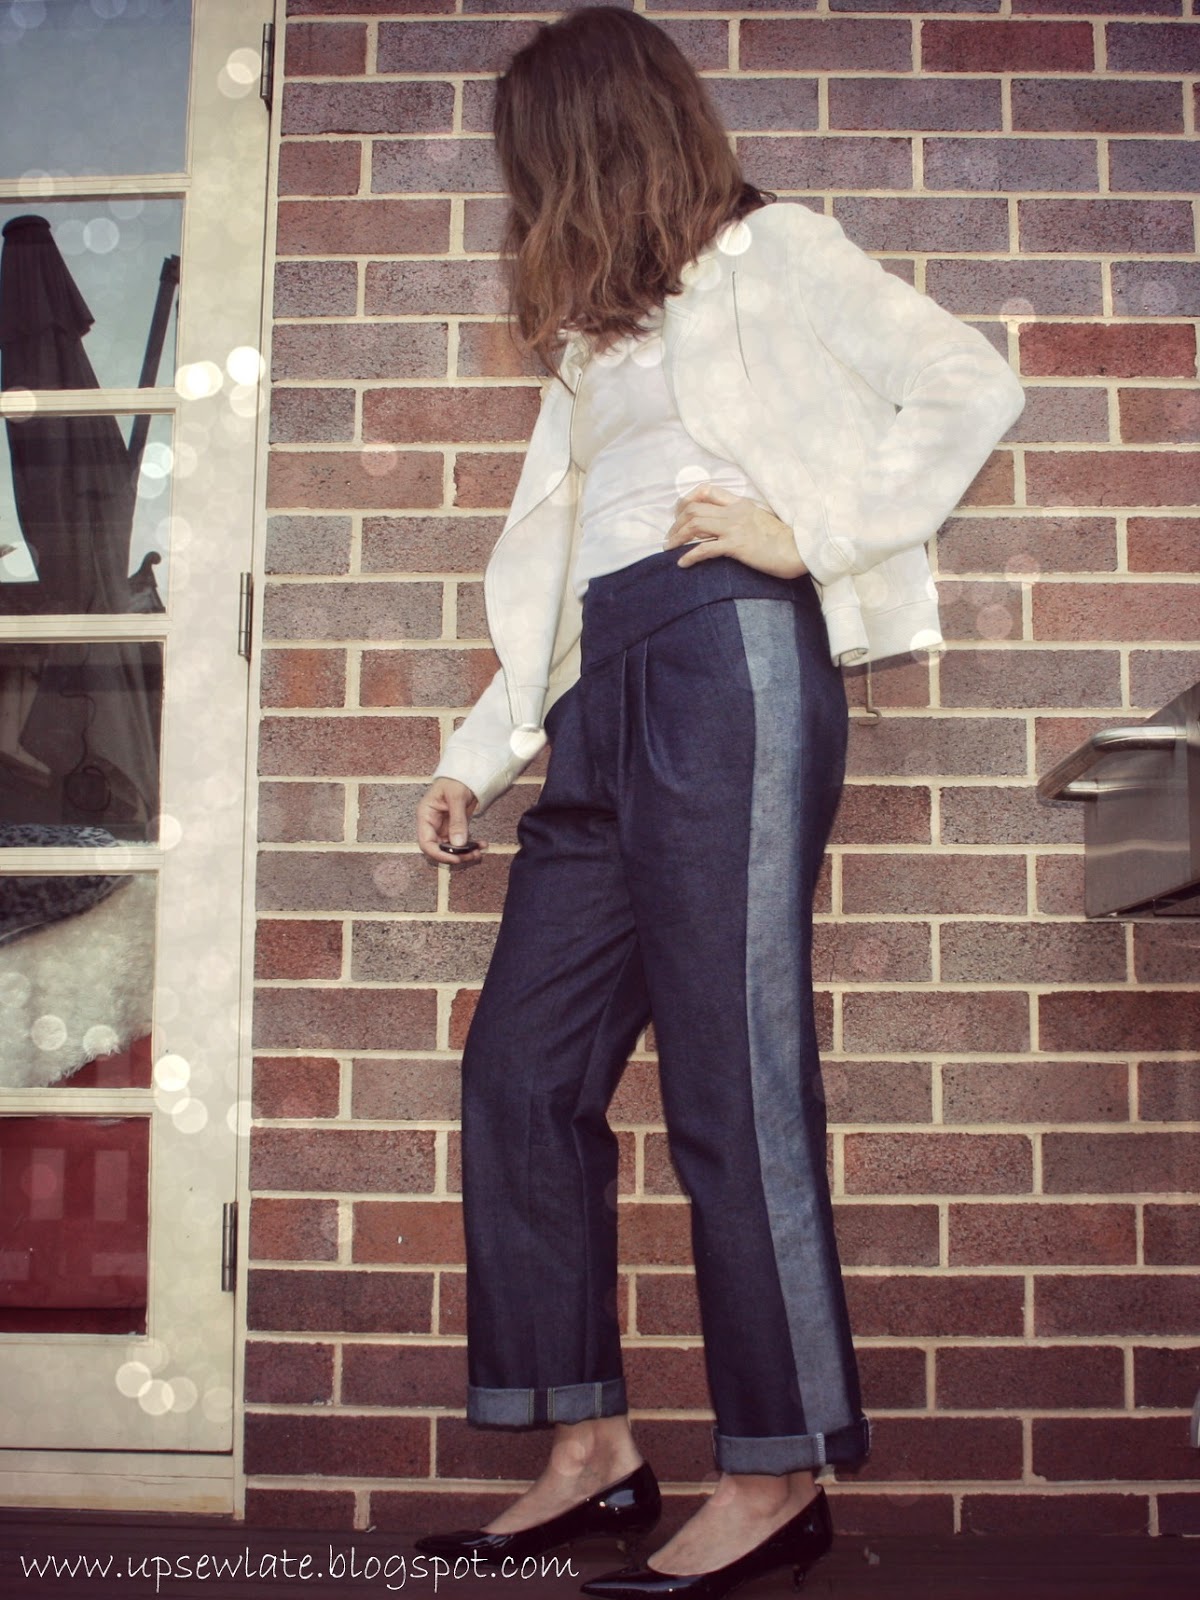
I'd cut the pants out of my good denim (bought from Minerva fabrics last year - and boy was the delivery from the UK speedy!), and there was no back up plan (arghhh, I need to learn a few tricks from risk management). So I measured the extra width to grade UP 2 sizes at the hips, and upper inner thighs. I had enough length of fabric for 2 continuous rectangular strips for my outer leg seams (this is just the reverse side of the denim), and I pieced some smaller pieces of fabric to make continuous narrow rectangular strips for the inner leg seams (same side of the denim so as to keep this extra detail less noticeable).
I like how the contrast strips on the side seams bring the pockets in from the side; they feel like they're perfectly placed for my hands in this position.


But can you see why the design feature is also a problem of its own?

It's entirely my own fault - with that extra width, the pants have ended up too wide at the ankles. As I'm sure you know, legs are more of an upside down skittle shape than a rectangle, so if you're adding width to grade up a leg size, you shouldn't grade up by the same amount at the hip as you do at the ankle.

Overall the fit is pretty good for "out of the envelope" - the compensations I made took the pattern back from an XXS (!!) to about an S, which is the size that corresponds to my waist and hip measurements, and the excess lower leg width is largely (hehe) my own doing.  There is some pulling from the back - the fit on my backside feels too snug compared to the loose comfort of those pleats in the front - but then again I wasn't able to add width at the crotch seam to grade up this part of the patternThe leg length is OK for my height (about 5'8" with a short body), though I don't have enough length for a deep cuff.


Oh and I used too long a fly zipper and my zip comes up onto the waistband, so the (3) hooks and eyes that go over it make for a very secure waistband, but I find this interesting and unusual rather than problematic. I don't have a photo of this, but I'll try to take one and add it for your interest and amusement :).


So what I have now is some really cool pants that I just don't love. I know these photos make the pants look good, but the pants do NOT look that good when I wear them in real life. I do like the pattern, and I'm thinking of making the pants again, this time in the correct size and without any extra ankle width, but this pair have ended up just a bit too wacky... 

 Hopefully some time in the magic wardrobe will make me love them more?


Thanks for reading and see you soon!

- Gabrielle x

PS A few of my Instagram friends have been waiting a long time for this blog post - thank you for your patience guys!


Related Posts Plugin for WordPress, Blogger...