Showing posts with label Tessuti patterns. Show all posts

Saturday, 29 December 2018

Lois Dress #1

Here's a recent make - and it's something I'm actually proud of!


This is the Lois dress by Tessuti patterns, and it's a pattern I bought relatively promptly after loving the pattern photos - but then sat on for ages. Same story for this lovely fabric from The Fabric Store - when I saw this fabric up sewn up quickly by a few social media friends (@clever_tinker for one) I rushed to Surry Hills to get some, and then brought it home and stashed it. 

Maybe for 2019 I should try a bit harder to sew the patterns and fabrics I like earlier rather than later? What a ridiculous problem to have ;o.

Here's a quick close-up for a better view of the fabric and style lines - and FYI the fabric is a slinky polyester woven with a satiny back:


The dress is quite low cut, which I think makes this more of a special occasion dress than a work or everyday dress - I've nearly finished version number 2 and have plans for a couple more, but there's nothing wrong with a wardrobe full of special occasion dresses, is there?

Hmm... after reviewing the photos I decided it was actually a tad too low cut - so I've now sewn the lowest 2cm of the v-neck together on the inside of the dress, which makes it just the right depth on me for a low cut dress with complete bra coverage, and also makes the bust fit a smidge less loose.


By virtue of a couple of silly mistakes I sewed this up a size smaller than intended. I thought I was making the size 12, my size according to the pattern instructions, but I accidentally cut a size 10 for the bodice pieces and then cut out the skirt pieces poorly, necessitating wide seam allowances that took it down a size too. Luckily this has turned out to be just the right size.  I wouldn't necessarily advise following my lead, but I would recommend basting your cut out pieces together to check the fit before sewing in your zip within the side dart / side bodice seam - if you do this you might also discover (like me, hooray!) that you don't even need the zip!

I should also mention that I have an extra CF seam in my skirt because my fabric was narrower than the recommended width and I just couldn't fit the width of the skirt front and sides across my fabric.  This hasn't particularly affected the dress apart from making the CF bust intersection a bit bulky, but it did bump up the fabric requirement for the dress.  I also lengthened the skirt pieces about 2 inches, and next time around am lengthening it a little more.


There's a step in the instructions (step 9) that asks you to ease the front skirt side seams into the back skirt side seams, but I couldn't think why you'd want to do that*, so I just sewed the seams normally and then cut off the resulting extra length in the front skirt. 

If you've sewn the Lois dress and followed this step, I would love to know how the easing step worked out - did it do something interesting to the skirt drape, or help the skirt skim over hips and butt?


Hmm and the only other change I made was to ignore the recommended steps to stabilise the neckline and waist with tearaway Vilene.

I've tried using tearaway Vilene before but haven't enjoyed using it - so instead I cut the relevant pattern pieces from a lightweight iron-in interfacing, and this worked pretty well.  Before I started sewing the dress I was concerned that the v-neckline would gape, but on top of the tearaway Vilene the pattern uses a clever binding method to stabilise the neckline, and there's absolutely no risk of it stretching out.

This dress was intended to be my Christmas Day dress, but as it turned out I didn't need a Christmas Day dress - my kids both got sick on Christmas Eve and through Christmas Day - but perhaps I can wear it for New Year's Eve instead.

Finally here's the back view, looking quite old fashioned I reckon!


Thank you very much to those of you who replied to my last blog post - it seems that YES, there are still blog readers around! I still enjoy reading blogs too, but wasn't sure how many of us there were... I suspect that there are lots of people who intend to blog but just don't get around to it very often - it's obviously much more time consuming than instagram or facebook, but if you've got verbal diarrhea (ha, that's me!) those media can be a bit frustrating.

So - I'm going to try to keep blogging, and I need to build back up my own list of blogs to read.  If you're still (or newly) blogging I would love to know where; please feel very welcome to leave your blog address in the comments :).

Thanks for reading and have a very happy new year

- Gabrielle x

Thursday, 29 December 2016

Top 5 of 2016: the Hits

Taking a lead from Gillian, here are my personal top 5 from 2016:


The flying squirrel Rachel Comey dress (V1482) - I don't wear this that much but I LOVE it; it feels really special on and is incredibly comfortable and eye-catching (in a good way, I hope).


My D&G inspired polka dots and carnations dress - a great work dress, and one that gets a lot of compliments too:


My Japanese seersucker checked Gabby top - I wear this soooo often, and I don't care that Mr UpSewLate hates it (too shapeless apparently, but I won't listen to that!):


My Tessuti Chloe pants and Vogue 8877 linen top - love these as a combination but also as separates. The pants go with everything, and the top feels very designer-ish even with basic jeans:


And another Rachel Comey dress, the super summery Vogue 1501:


I'm sensing a colour theme here... I seem to be a bit obsessed with blues! 

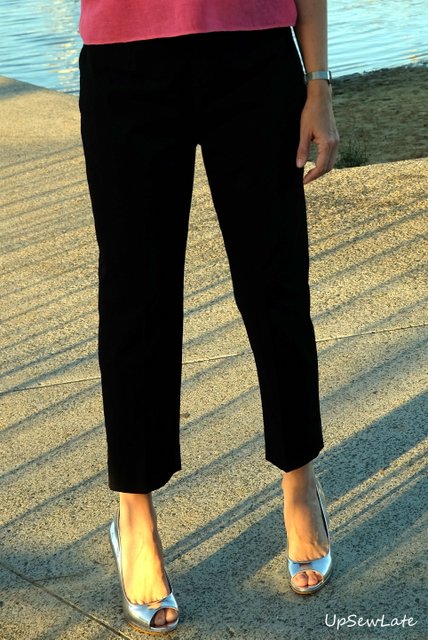
Honourable mentions also go to my StyleArc Edith top (worn very frequently), the Vogue 1264 black pants shown in this post (a work staple, and I should really wear the cute vintage top more often), and the Vogue 8993 dress that I would be wearing now if I hadn't put on a bit of weight - these are all favourites too - and in terms of post popularity, I guess I should include my only "how to" (on mitred self-faced vents). 


It may look like 2016 was all beer and skittles, sewing-wise, but that's of course not the case - I made several garments that I'm not at all interested in wearing, and I'll share that list with you soon. 


1


Till then, happy sewing!


- Gabrielle xx

Saturday, 3 September 2016

Linen Crush (Tessuti Chloe Pants + Vogue 8877 Top)

The crushing and wanting started with this image, which I saw on Tessuti Fabrics' Instagram feed.  I didn't save the image anywhere but in my memory, and as it happens, my memory then turned the outfit upside down - loose blue linen top became loose white linen top, and white shorts became blue pants (details, details!).  I already had a beautiful blue linen in my stash, bought from Tessuti fabrics a few years ago just because it was the perfect blue for something, and when the perfect pants pattern came into my possession while the outfit was still cause for obsession the ball really got rolling.  A top pattern quickly followed suit (tick!), along with a heavy white linen from an after work dash to The Fabric Shop.

And here's where I ended up:


My outfit isn't at all like the original inspiration image, and I'm at least twice the age of the girl in the original image, but this look is precisely what I wanted. The photos may or may not be in agreement - but this is my sweet spot :).

A simple pants shape, slim fitting through the hips and neither flared nor skinny, and an oversized top, loose through the bust and more fitted at the hips and lower arms. Not at all what like the original image, I know!


The pants pattern I used is the Chloe pants pattern by Tessuti patterns, which my mum was ditching because she thought the legs looked too wide for her height. The legs look to be very slightly tapered but there is still some fabric flapping around (not something I mind at all).  Normally these pants would be a proper long length on me, even with hemming (and I'm about 5'8" with fairly long legs) but I took them up about 5 centimetres to get the above-ankle length I was after, including a generous hem.  I'm thinking this length will be good for walking and doing stuff in summer - at this length there's zero risk of my tripping on my own hems.


I've sewn these up in a straight size 12, and amazingly the fit seems pretty good as is.  Second time around I could possibly remove a small wedge from the front crotch curve and maybe add that length to the back crotch curve, but the pants are really comfortable so I'll see how they feel after a few wears before I draw any fit conclusions.


There is one small annoyance with these pants: I had the choice of a darker blue (much darker than the fabric) or white invisible zip for the side seam, and as you can see I chose unwisely.  It isn't really a big deal for me - I'm planning to wear these pants with loose tops to about the length of this white top - but I do wonder if there's a way of neatly colouring in the visible white of the zip?


Anyway, regardless, I really like how streamlined these pants look.

Next time: review the fit after wear, and then make any necessary adjustments to the crotch curve; consider adding pockets on the backside (I was fumbling for pockets when I wore the pants to take photos); try them as shorts; and definitely make them again!


The top pattern is Vogue 8877, a "very easy" pattern (and yes, it is) in the size Medium (12-14).  I sewed this top (blog post here) before with short sleeves in a jersey, and it does work in a stretch fabric but it's really intended for wovens.


The top is described as a loose-fitting pullover top, but if you're busty I think you would need to seriously modify the bust seam, as the angled, dropped shoulder line takes away some of the ease you would get in the bust area IF you had a regular shoulder and sleeve. Oh and I didn't notice those dropped shoulders when I wore my earlier top, but I can really feel them on this top, and can feel if the top has wiggled to one side - so the shoulders are obviously another fitting area to watch out for.


My only adjustments to this pattern were to take the neckline in slightly on both sides and to remove some of the length in the bodice.  My adjusted neckline is now less "boat" and a little bit "square", but I think this smaller width is more proportionate to my shoulders while still fitting over my head. For the top length I had a very specific finishing length and hem depth in mind, so I did a lot of trying on and pinning and pressing in place and then cut away what turned out to be an excess of a couple of centimetres of length.


I don't think it's very noticeable in the bright sunlight (yay, Spring sunshine!) but the fabric has a damask sort of floral pattern woven into it.  I think it's pretty, but I do hope I haven't accidentally sewn myself a tablecloth top!  Hmm... more research is required here...


I added a cotton bias binding tag in the back neckline to help quickly identify back from front without the itch factor of a normal garment tag - this is one of those garments whose front and back are extremely similar, so it's actually very helpful, and I'm wishing I'd thought of it in time for the pants too.


The one problem I think I'll have with this top is finding jumpers or jackets to go over it - check out the width of those sleeves!  One obvious solution is to use the pattern again to sew a long-sleeved wool top - or would that be a bit much?  I've got some nice thick merino lined up for the job if I don't come up with a better idea.


Next time: sew again in a heavy knit fabric to make a jumper that will layer over this top and the many other dolman sleeved dresses and tops in my wardrobe - yay!


So all up I am a very happy camper right now.  I've got two garments I love, and they've got my imagination fired up with lots more ideas too...


Happy sewing!


See you soon

- Gabrielle xx

Saturday, 23 January 2016

Japanese Seersucker Check Gabby


Most New Year's Eves, we catch up with cousins, aunts and uncles over a quick glass of champagne before walking to the water's edge to watch the early fireworks across Sydney Harbour.  I know it sounds posh, but it's still a casual sort of get-together, so this year I decided to whip up a quick top for New Year's Eve with some pretty fabric that had attracted me in Tessuti Fabrics.  I gave myself heaps of time - more than two days! - and set to it. 

I had a few pattern options in mind, but the one I ended up sewing was the Gabby dress, cut (obviously) to top length.  It might even be a tad short to tell you the truth, but there's no spare length in that hem, as once again I didn't buy quite enough fabric...


... to the point where I had to make a sneaky join in the back of the top - which you'll be able to see in the close up:


When it was nearly sewn, I knew I liked it, but I wasn't sure I'd like it on - sometimes seersucker looks like a child's fabric - but no, I love it.  I love the wavering blue lines of the check, the slightly vintage vibe of the fabric, and its lightness in our humid weather. I think that by making a top rather than a dress I've steered clear of childishness, and closer to the "hip" end of the style scale. Which is all good. And I was going to wear it for New Year's Eve, hooray!

But then Mr UpSewLate reminded me that our usual hosts were away, and we decided to go to a different spot that provides great views after a bush walk in the dark, and I decided to avoid not catching my new top on a pointy branch in the dark and ripping it by not wearing it straight away.

Anyway, I've been wearing the top LOTS ever since - with these jeans, but not the heels. It doesn't need heels! I can't remember why I was wearing heels for these pictures (taken a few weeks ago at the very start of the year) but it may well have been just the joy of the new silver shoes that I'd been hoping to take for spin on New Year's Eve.


I only wish I'd bought enough fabric for matching 3/4 length pants, but I guess that's still possible... 


I should give you the sewing details, shouldn't I? 

I cut this out in a size S, which is my usual Gabby dress size (I've made it before in a starry blue version, a striped stretch version that's now an awesome top, a paint splat Nani Iro version, and a red and white picnic version). The dress is quite flared, and I left that flare in the top to keep it super airy. Sewn and overlocked with white thread, hemmed with matching blue on the outside. 

There's self fabric bias binding for the neckline, made by just folding and pressing with the iron, and I didn't even miss the Clover contraption that's been put away god knows where.  The checks on the side seams don't match up (they're offset by a 1/2 repeat), but who cares; the shoulders are satisfyingly symmetric! 


It's simple but I love it.


The End.


Happy sewing!  


- Gabrielle x

Sunday, 19 April 2015

Ruby on the Pier

On Thursday we had a heatwave, and circumstances combined to enable me to get some photos of a little gem that I'd sewn a couple of months ago in the tail end of summer...

Ruby top in striped seersucker cotton

Weather? Check, 33C (91.4F) according to my car; rather warm for Autumn.
Photographer? Check, a son who was prepared to offer his skills with a smile :).
Location? Check, a photogenic pier in Walsh Bay, where we'd be meeting my daughter and a friend.

Location, location, location! 
My photographer

So, the gem in question is a Ruby top, sewn from a lightweight striped cotton seersucker that I'm certain I bought at Tessuti fabrics but that I can no longer see in their online fabric store. 

I loved the look of the Ruby top in Tessuti's photos, but when I looked at the printed pattern pieces the armholes seemed more cutaway than I wanted. What do I know though, right? I'm not a pattern drafter, and it's hard to judge how a flat piece of paper will translate to a fabric draped on the body - so of course I needed to sew one up!

I sewed it up - and what do you know, more cutaway than on Tessuti's photos!

Ruby top, front view

Aha, but it's not what you think...

My Ruby IS more cutaway than you'll see on Tessuti's website, but that's because in my haste to sew the top I didn't read the pattern instructions. My top has no self-binding on the armholes and neckline, and this extra strip of fabric on the openings obviously makes shoulder straps wider and arm and neck openings smaller.  The final look of the top is very pleasing in terms of pattern visualisation skill development (yay!), but not so pleasing when I realise I've sewn myself a more cutaway top than I should have. In practical terms it means I didn't need the keyhole back opening - the neckline became large enough for my head - and that the top was super easy to fully line.

Ruby top, side view


Easy to line? A lined Ruby?

The stripey seersucker was very thin and summery but too see-through by itself, so I lined it with a soft white cotton voile from my stash. Without the keyhole back opening and the bias strips on the openings, a bagged lining was very easy - I sewed up shoulder and side seams on the two tops separately, then sewed them right sides together at the neckline, trimmed seams, and turned right side out and pressed. I then pinned the bottom hems together at the back, then turned the top inside out again and pinned the bottom hems, then sewed them together nearly all the way around, leaving a small gap for turning the top the right side out again.  Because I'd only left a very small opening (the fabric is very lightweight so it doesn't need a big opening), when I pressed the top again I found I didn't need to sew up the small gap - absolutely no fabric is trying to stray out of the gap.

Ruby top, front / side view

This Ruby is also quite cropped compared to most. The finished length is about 56cm (22") from the shoulder seam in my size 8 top, whereas the standard top length is 63.5cm (25") in a standard size 10. I'm really happy with this length, but I do think hip length would be great in a more drapey fabric.

Ruby top, *nearly* back view

And having just had a browse over on the Netaporter site (I really should be browsing that site before sewing, right? So many inspiring garments...) it seems that both lengths are quite fashionable, and that there are lots of interesting variations to make to a Ruby top with side splits, contrast binding, gathering, pleats...

Helmut Lang
Chloe

Isabel Marant
Halston

Yup, they're all basically Ruby tops!


I'll try to post again soon, and till then I hope you're having fun with your sewing!


- Gabrielle xx

Related Posts Plugin for WordPress, Blogger...