Showing posts with label V1270. Show all posts

Saturday, 16 January 2016

Carnations and Polka Dots

What comes first, the fabric or the pattern?

It's not always clear, but this time around the answer is obvious, isn't it:


On Frocktails weekend last year, Sarah introduced me to Darn Cheap Fabrics in person, and I discovered that many of their fabrics are not at all cheap looking.  Many of them looked surprisingly like Dolce & Gabbana fabrics - this fabric is one I recognised immediately.


For me this was one of the more memorable prints from D&G's Spring 2015 RTW collection.  And post catwalk, all kinds of lovely uses for the print were turning up: shirts and dresses in the damask-style fabric that I've used, dresses in a summery poplin version of the print, luxurious silk chiffon dresses for children and adults, swimmers, handbags...


In an effort to restrain myself I only bought 1.5 metres of this fabric - what a fool!  I felt like kicking myself later when I realised 1.5 metres was going to be nowhere near enough for the long sleeved fitted dress I'd been imagining :(.   Top tip for future Gabrielle: check fabric widths vs daydreams. 

Of necessity, I've ended up with this - a simplified version of Vogue 1120; a sleeveless dress which is perfect for summer and perfect for work:  


My mum took these lovely photos for me last Sunday - what a star!  I normally end up having to take a hundred or more remote control photos of myself to get a few that look OK, but mum's photos were ALL great and the process was a lot less embarrassing than usual :). And for a change, the location isn't my garden! Obviously my garden is incredibly convenient, but I feel like the neighbours must be rolling their eyes and shaking their heads in unison at my ongoing narcissism by now, and that's even more embarrassing that taking photos in public places. 

By the way, if you recognise the location, please don't spill the beans - I want to go back there for future blog photos! 


My previous version of this dress, a party frock, was made back in 2011.  That version was true to the pattern, pleats and bow included, but was a bit wide in the neckline and slightly loose. This time around I raised the neckline all around by about an inch, and used the lining pattern pieces for the outer dress, skipping the pleats and bow of the original.  I also left off the lining - the fabric is beefy enough not to need lining - and cut all-in-one facings for the dress front and back (well one piece for the front, and a piece each for the two sides of the dress back).  The only other modification I made was to lengthen the dress as much as I could, about 5 centimetres of extra fabric I think, and to then make as narrow a hem as possible using bias binding so as to eke out a little more length.

I forgot to get a photo of the inside of the dress for you, but I hand stitched the hem using a lovely contrasting satin bias binding - it's shiny and black, and I love the way it looks against the matt white underside of the dress. 

The dress does up very simply with an invisible zip in centre back - and yes, my waist seam aligns properly on either side of the zip :). 
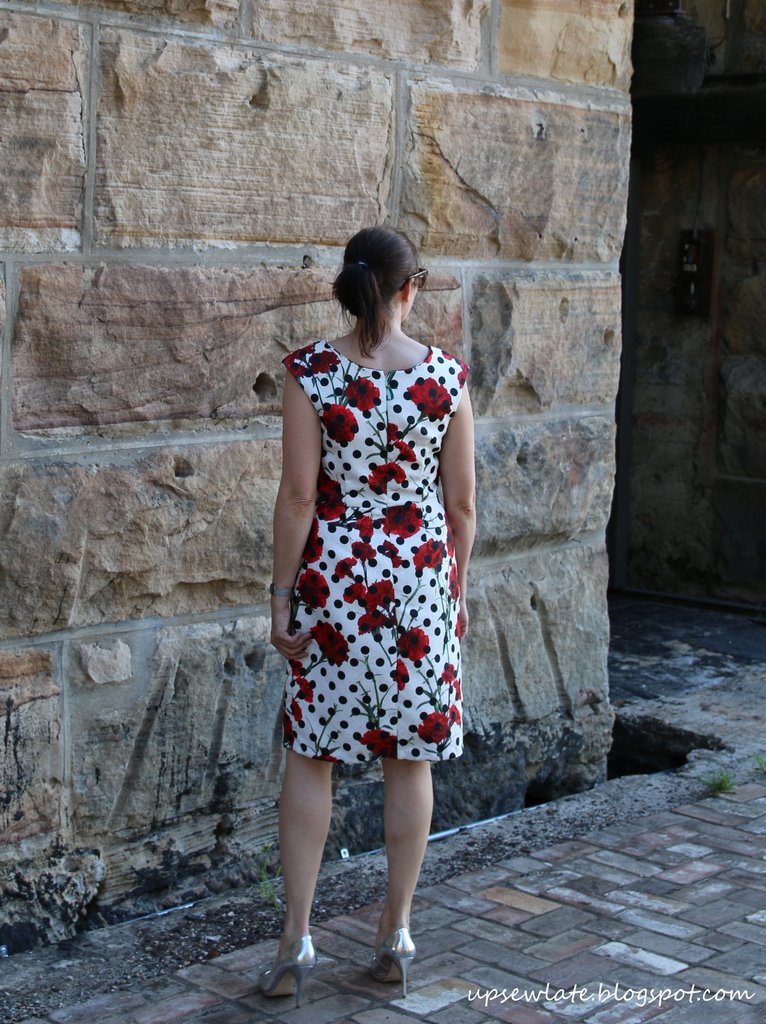


If you skip the pleats and bow and use the lining pattern pieces, Vogue 1270 is quite a streamlined garment.  The shoulder shaping gives a small capped sleeve, which I really like, and I think it goes very well with the curve of the neckline.  If you don't have particularly wide shoulders, raising the neckline an inch all round ensures bra strap coverage without losing the pretty curve. The front bodice lining includes bust darts and waist darts, and the although the skirt shape is straight, it has enough width for walking ease without a vent.  


There are a couple of small issues with my dress - three actually - but they don't bother me much! 

One issue is that I didn't take turn of cloth into account when I cut out and sewed the facings in place. The result is that the dress looks to have piping around the neckline and armholes where you see the facing fabric :). I should probably have used a lighter fabric instead too. 

The second issue is that the dress is a bit on the loose side. I didn't read my own 2011 blog post about my earlier version of the dress, and when I cut this out I just automatically cut it out as a size 12 in the bodice, and a size 14 from the waist down (my usual Vogue designer pattern sizes, though I often downsize the upper bust / shoulders to a size 10).  I don't know that the looseness is particularly noticeable to others, and it certainly keeps the dress comfortable in the heat, but if I make this pattern again I really should size down throughout. 

Oh and the third issue - well does anything about the print annoy you when you look at this dress? I expected the polka dots to be printed parallel to the grain of the fabric - they're not!  To me, the dots look as though they should align with the hemline, perhaps with a nice clear diagonal line running across the print too. They don't! 


You'd probably already noticed those three issues, and perhaps they'd annoy you, but they don't bother me.  I'm not aiming for perfection these days; I'm simply aiming for clothes I want to wear, and this dress definitely fits the bill - I wore it to work the day after taking these pictures, and I'm planning on wearing it at least once a week for as long as the weather is warm enough. 


Thanks for reading, and I hope you're all having lots of success with your sewing machines!


See you soon


- Gabrielle x

Sunday, 27 November 2011

Vogue 1270 - Shiny Pink Party Dress

I did it! I finished Vogue 1270!

Hmm these colours are all wrong... at least the wine's OK.


Nothing really amazing there, it's just that I'm a slow sewer and usually underestimate how long sewing activities will take. And in fact, even though I said I was aiming to finish the dress this weekend, my real due date is still DAYS away - my work Christmas party is not till this Thursday! 

Of course the dress looks much nicer on the dummy (must be my amazing photographic skills, right???):


Two birds with one stone (cruel) and that sort of thing - here's my pattern review:

Pattern Description: 
Close-fitting, lined dress has extended shoulders, pleated left side bodice front with two-piece pleated bow, and invisible back zipper. No provisions provided for above waist adjustments.

Pattern Sizing:
Combinations: B5(8-10-12-14-16), F5(16-18-20-22-24)

Did it look like the photo/drawing on the pattern envelope once you were done sewing with it?
Yes! I'm very happy with this dress.

Were the instructions easy to follow?
Yes, but there was one striking error, and an order of construction I'd change.

Pattern error:
Well I documented this in my last post and I don't want to bore anyone senseless, so if you want to read or re-read it please have a look back there. Basically ignore the picture in step #14.

Order of construction:
The patttern instructions have you sew bodice back pieces to bodice front (step #15), and skirt back pieces to skirt front (step #17) BEFORE sewing bodice to skirt (step #18) - and similarly for the lining pieces. This makes it trickier to take the dress in or out though. Better for future adjustments would have been step #17 before the side seams.

What did you particularly like or dislike about the pattern?
I really like the extended shoulders (which make my mini shoulders look a little broader)


and the nod to vintage dress shapes.


And of course I like the pleats and bow!

Upper bow attached to dress at bust dart


I also like that the dress is fully lined, so that the inside out view is very neat (great for someone without a serger).


Obviously I didn't enjoy finding a mistake in the pattern instructions - but it was terrific to find the maths area of my brain can still figure things out (yippee!)

Fabric Used:
Silk shantung + polyester lining. The shantung was picked up by fluke at a second hand shop, and initially I wasn't sure if it was or wasn't silk - but it passed the burn test and the 'what your mother thinks' test.

Pattern alterations or any design changes you made:
I cut this out in a 12 at the shoulders, a 14 at the bust, and an 18 at the waist and hips. I later took the waist and hips in to about a 14 - 16. I also added about 5cm to the length (I'm 5'9"-ish, and with this lengthening it's an above the knee length). Oh and I also just used a normal zip as I didn't manage to find an invisible one in the right colour.

Although the pattern description says there's no provision for above waist adjustment I'm not sure why they're saying that - you can certainly make the waist wider; that's obviously easy on the back pattern piece, and on the front pattern piece, just fold at the pleats and look at the centre front marking to work out which edge of the pattern piece will be the waist line and work on this. I guess it would be tricky to adjust the length between front bust and waist, although you could adjust the back for a sway back or whatever without problems.

Would you sew it again? Would you recommend it to others?
I would like to sew this again but I don't know if I will - too many patterns and not enough time!

Conclusion:
A sweet dress with a lovely shape - I think this would suit many real figures and all dressmaker's dummies.


Cheers!

Friday, 25 November 2011

Vogue 1270 Preview - and a Clarification

Vogue 1270

I am sooo close to finishing this dress it's not funny - and even less amusing is the fact that it's been really close for over a week!All I need to do now is decide if I want to take it in a bit at the waist (what would you choose: leave it loose in case an opportunity to gorge yourself arises while wearing the dress OR take it in for an illusion of waist?) and do the hems and a spot of handstitching.

This profile photo on the left shows the bagginess on the dressmaker's dummy's waist (although she has become a little slimmer than me recently). The dress is made from a piece of red/pink shantung silk, with a bright red lining. I picked up the silk in a second hand store - a rare lucky find for me as usually I just find really ugly curtains and polyester quilt covers (does anyone else in Australia ever find nice fabric in an op shop?)


Even though I'm not quite ready to show you the completed dress, I thought I could show you a sneek peak and document a tip for the pattern.

I read over here that Cindy was having a problem figuring out the bow on this dress, and I guess other people might have a problem with it too.... because there is an ERROR in the instructions. The picture for step #14 is misleading - this is not where the bottom part of the bow will fit. The top part of the bow comes out through a gap in a slash in the bust dart (step #1 is the slash, step # 12 is the upper bow coming out through this gap), and the bottom part of the bow stays on the inside of the dress until step #19, at which point it comes out in a gap in the seam between bodice and skirt. There are guidelines on the pattern pieces for how far the bow is supposed to come out, but basically it is taut enough on the inside to prevent the bodice pleats from falling open.


Yes, this needs to be pressed!

There is one other point about the bow that doesn't seem to be mentioned in the instructions, and that is how the top part stays up. The upper bow will flop down - we can call it gravity, but it's not serious. My solution was to sew a couple of tiny stitches on the underside of the upper bow attaching it to the dart seam - this makes the upper bow stay up without any visible means of support. 


I am hoping to be able to post the finished dress by the end of the weekend - BUT I have the flu and the weather is really miserable (rainy and grey).  My excuse is ready.


Photos of Kids?

My partner read my last post and was very dissatisfied that I didn't explain my viewpoint clearly, and that the pictures of my daughter said something that my words didn't. So I think I should clarify what I've decided (for now) about posting photos of kids. I've decided that - given my small place on the web and my reasonably low volume of kid photos - the photos I do post are probably at a rather low risk of whatever it is that could happen. That's why I did post a photo that included my daughter's face, but why only one of the photos shows her face (the other photos were cropped). Having said that I am still mindful that low risk doesn't mean zero risk. Today I went and deleted my (few) kid photos that were on flickr, and deleted a whole album on pinterest because it had too many personal photos in it - those two sites get a lot of traffic! I may also go back through this blog and recrop some / all of the kid photos (you will still be getting my mug though).

And speaking of blogging and sewing, I found this post about the sewing blog social hierarchy very interesting - I found myself agreeing with much of it...

Have a great weekend!
Related Posts Plugin for WordPress, Blogger...