Showing posts with label Kay Unger. Show all posts

Sunday, 2 July 2017

Vogue 1392 for Melbourne Frocktails

The dress I have to share with you is one I'm proud of (carefully planned and successful pattern matching, and a dress that really looks the way I'd intended), the event it was created for was a LOT of fun (Melbourne Frocktails, October 2016), and in fact just thinking about this dress reminds me of the awesome weekend I had with wonderful Melbourne sewing friends.

I don't know why it's taken me so long to post this dress!


Posing before Frocktails with the very charming Nicole of The Somnolent Dachshund

The dress is Vogue 1392, a Kay Unger designer pattern, described on the back of the pattern envelope as follows:

Lined dress has close-fitting, bones, bias front bodice extending into back band, no shoulder seams, concealed, elasticized shoulder straps and ribbon hangers, front pleated skirt, side pockets, attached petticoat, and invisible back zipper.


The dress is really tricky to photograph - even for the professional photographer at the event - I guess because my brocade fabric is so pale and shimmery.  I've darkened all of these professional photos to make it easier to see the fabric, and later in this post are some photos I took in shadow that I think give you a better idea of the fabric colour without the shimmer.

My original idea was actually to sew this dress in either a hot pink designer silk or a vibrant orange silk-cotton, but I wanted to check the fit first - and I'd found a roll of brocade on the nature strip, as you do (apparently my neighbours changed their minds about their curtains).  So I cut out the skirt in this brocade and combined it with some leftover stripey teal and cream upholstery fabric for the bodice, made a few adjustments for fit, and... realised I rather liked the brocade.  I quite like the stripes too...


And that's how it became a brocade dress!


Cutting and Sewing

Although this isn't a complex pattern (it's rated Easy), the dress took a reasonable amount of work, comprising as it does a boned lining and a petticoat and in my case a truck-load of pattern matching.


Pattern matched brocade on the back of Vogue 1392

The pattern matching was of course the first step - I don't have a cutting table, so I basically laid the fabric out over every bit of floor I could claim in the study, decided which way was "up", and then got to work on the priority areas. For the skirt I placed vertical lines at the centre back waistline, with more lines angling outwards lower on the skirt backs, and vertical lines on the front waist darts, with hip-like curves about half way down the skirt fronts. 

For the bodice I wanted strong lines to wrap over the shoulder straps parallel to the neckline, and wanted the shoulder straps to look as though they "grew" out of the centre front.  

Although I do sometimes fuss over side seams too, in this instance the fabric was too complex for me - I just couldn't do any more than make the sides symmetric. 

I'm not super speedy at pattern matching, and my knees don't enjoy scrambling around to move the pattern pieces again and again, but for me this part of sewing is really worth labouring over - I get so much satisfaction from a nicely placed (and matched) print!


Dress front, Vogue 1392 in brocade
Dress back, Vogue 1392 in brocade

Once the fabric was cut out the sewing was pretty straightforward. I made a few changes along the way (summarised below), but all the steps in the pattern were logical and easy to understand.  I hadn't ever sewn boning onto lining fabric before, so that was a worry, but it turns out not to be at all tricky :).

Modifications:

  • Ignored the grainline recommendation for the bodice fronts so I could get the pattern layout I wanted
  • Lengthened the skirt pieces by about 8 centimetres (I'm about 8 cm taller than the drafted height for Vogue patterns)
  • Skipped the step of fusing interfacing to the bodice front and back pieces because my fabric already had plenty of body
  • Moved the invisible zip from centre back to the side seam as I was concerned that the thickness of my brocade would make it tough to get that zip looking truly invisible (I was right)
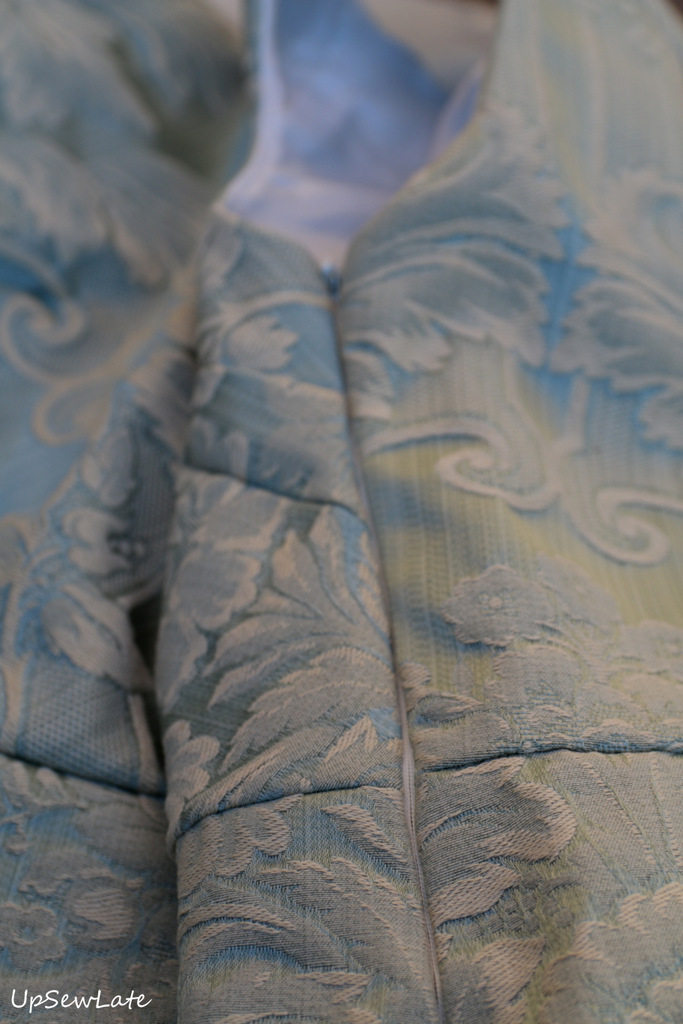


  • Skipped the boning in the side seams of the bodice, though looking at the photos now I think I should have left these in. The bodice is crumpling a little at the side seams and boning would have helped it keep its shape. I might see if I can add this in retrospectively!  I did leave the boning in place on the bodice front linings (and it wasn't nearly as tricky to execute as I'd expected):
Oops, the waist seam in the lining should be facing in towards the wrong side of the brocade
  • Skipped the side pockets - I just wanted smooth side seams
  • Removed the elasticized shoulder straps after sewing them in - they didn't seem to make any difference, perhaps because I'd done my bodice fitting without factoring them in
  • Skipped the ribbon hangers as I thought they'd show


Challenges:

The pattern matching was a challenge of course (d'oh), compounded by stretched out selvedges (grrr!), but there was another challenge: the neckline!  I trimmed those neckline seams aggressively, under-stitched them assiduously, and pressed them hard, and yet the lining persisted in peeking out. I think the huge difference in weight and flexibility of the two fabrics (hmm upholstery-weight brocade vs flimsy lining) is the problem here - are there any other tricks you know of for keeping the lining on the inside? I did think about pick stitching the neckline but ran out of time before Frocktails (and then just couldn't be bothered afterwards), but I'd like to sort it out before I wear the dress again.


Conclusion:

I don't think my choice of colours and fabric were ideal (too pale on me, and probably too thick for a dress), but if you happen to have a smallish amount of fancy fabric, Vogue 1392 may be the one for you.  There are so few patterns for cocktail dresses that don't require crazy amounts of fabric, but with this pattern you only need around 1.5 metres depending on the size you sew.  Even without swathes of fabric, this dress with its boning and elasticized shoulders and layers of lining and organza feels very upmarket. A big tick from me!


Next up I am going to TRY to get some photos of my exciting new Guy Laroche (Vogue 1450) top - and I'm tempted to make the matching skirt, though I suspect as is it'd be another in the not-suitable-for-work series...


See you soon!


- Gabrielle xx

Saturday, 16 January 2016

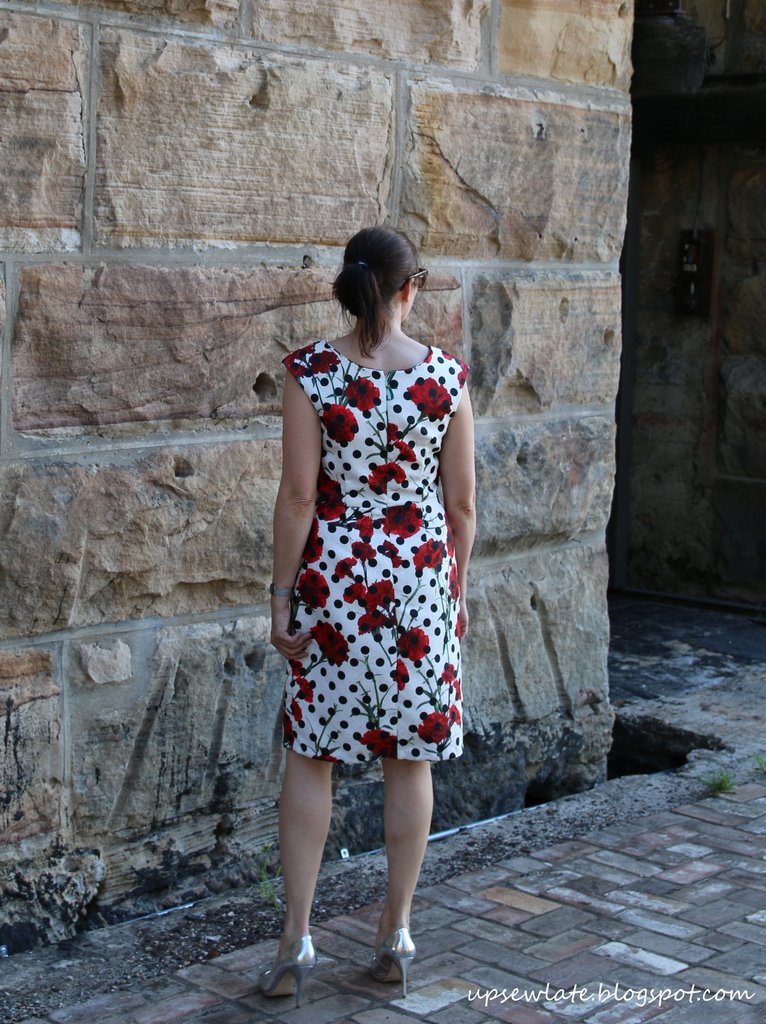
Carnations and Polka Dots

What comes first, the fabric or the pattern?

It's not always clear, but this time around the answer is obvious, isn't it:


On Frocktails weekend last year, Sarah introduced me to Darn Cheap Fabrics in person, and I discovered that many of their fabrics are not at all cheap looking.  Many of them looked surprisingly like Dolce & Gabbana fabrics - this fabric is one I recognised immediately.


For me this was one of the more memorable prints from D&G's Spring 2015 RTW collection.  And post catwalk, all kinds of lovely uses for the print were turning up: shirts and dresses in the damask-style fabric that I've used, dresses in a summery poplin version of the print, luxurious silk chiffon dresses for children and adults, swimmers, handbags...


In an effort to restrain myself I only bought 1.5 metres of this fabric - what a fool!  I felt like kicking myself later when I realised 1.5 metres was going to be nowhere near enough for the long sleeved fitted dress I'd been imagining :(.   Top tip for future Gabrielle: check fabric widths vs daydreams. 

Of necessity, I've ended up with this - a simplified version of Vogue 1120; a sleeveless dress which is perfect for summer and perfect for work:  


My mum took these lovely photos for me last Sunday - what a star!  I normally end up having to take a hundred or more remote control photos of myself to get a few that look OK, but mum's photos were ALL great and the process was a lot less embarrassing than usual :). And for a change, the location isn't my garden! Obviously my garden is incredibly convenient, but I feel like the neighbours must be rolling their eyes and shaking their heads in unison at my ongoing narcissism by now, and that's even more embarrassing that taking photos in public places. 

By the way, if you recognise the location, please don't spill the beans - I want to go back there for future blog photos! 


My previous version of this dress, a party frock, was made back in 2011.  That version was true to the pattern, pleats and bow included, but was a bit wide in the neckline and slightly loose. This time around I raised the neckline all around by about an inch, and used the lining pattern pieces for the outer dress, skipping the pleats and bow of the original.  I also left off the lining - the fabric is beefy enough not to need lining - and cut all-in-one facings for the dress front and back (well one piece for the front, and a piece each for the two sides of the dress back).  The only other modification I made was to lengthen the dress as much as I could, about 5 centimetres of extra fabric I think, and to then make as narrow a hem as possible using bias binding so as to eke out a little more length.

I forgot to get a photo of the inside of the dress for you, but I hand stitched the hem using a lovely contrasting satin bias binding - it's shiny and black, and I love the way it looks against the matt white underside of the dress. 

The dress does up very simply with an invisible zip in centre back - and yes, my waist seam aligns properly on either side of the zip :). 


If you skip the pleats and bow and use the lining pattern pieces, Vogue 1270 is quite a streamlined garment.  The shoulder shaping gives a small capped sleeve, which I really like, and I think it goes very well with the curve of the neckline.  If you don't have particularly wide shoulders, raising the neckline an inch all round ensures bra strap coverage without losing the pretty curve. The front bodice lining includes bust darts and waist darts, and the although the skirt shape is straight, it has enough width for walking ease without a vent.  


There are a couple of small issues with my dress - three actually - but they don't bother me much! 

One issue is that I didn't take turn of cloth into account when I cut out and sewed the facings in place. The result is that the dress looks to have piping around the neckline and armholes where you see the facing fabric :). I should probably have used a lighter fabric instead too. 

The second issue is that the dress is a bit on the loose side. I didn't read my own 2011 blog post about my earlier version of the dress, and when I cut this out I just automatically cut it out as a size 12 in the bodice, and a size 14 from the waist down (my usual Vogue designer pattern sizes, though I often downsize the upper bust / shoulders to a size 10).  I don't know that the looseness is particularly noticeable to others, and it certainly keeps the dress comfortable in the heat, but if I make this pattern again I really should size down throughout. 

Oh and the third issue - well does anything about the print annoy you when you look at this dress? I expected the polka dots to be printed parallel to the grain of the fabric - they're not!  To me, the dots look as though they should align with the hemline, perhaps with a nice clear diagonal line running across the print too. They don't! 


You'd probably already noticed those three issues, and perhaps they'd annoy you, but they don't bother me.  I'm not aiming for perfection these days; I'm simply aiming for clothes I want to wear, and this dress definitely fits the bill - I wore it to work the day after taking these pictures, and I'm planning on wearing it at least once a week for as long as the weather is warm enough. 


Thanks for reading, and I hope you're all having lots of success with your sewing machines!


See you soon


- Gabrielle x

Tuesday, 3 June 2014

MMMay14 Days 26 - 31 (and that's a wrap)

The last of my weekly me made May posts - is that a cheer out there? Was it me???

I have to admit that by the end of the month I was tired...

Day 26

On Monday 26th May I met up with the lovely Kristy of Lower Your Presser Foot fame to help out with some blog photos, though I don't think I managed to do her very attractive jacket justice. We met in a lovely old part of town - wide streets and grand sandstone buildings - and once the embarrassment of public snaps was over, had a good catch up as fellow working mums and sewists. Kristy was kind enough to take lots of photos for me, but my camera then did its trick of not storing the bulk of the photos that she took. There are enough for evidence of me madeness - and you can see what a dork I am in real life; I did my jacket up wrong :)


Just to confound the camera to the max, I was wearing 3 unphotogenic me mades: this V8718 jacket in a stretch designer linen (and let's not talk about the pretentious photos in that original post), this V2465 Chloe for Vogue top in Liberty cotton, and this V1282 Donna Karan for Vogue skirt (you can't see this but it's vertically panelled, with horizontal pleats. And it's a stretch cotton). 

Photos taken by Kristy with camera on continuous burst mode.
 

Day 27

Day 27 was another beautiful day.  I was absolutely busting to wear my floral RTW skirt but I wasn't sure I had any me mades that went with it... dig deep enough though and you'll find OIL! On this occasion the "oil" was a couple of not too ancient makes from rather ancient patterns (though to clarify, we're talking 80s retro 'ancient' as opposed to proper vintage 'ancient'): a cropped jacket made from an 80s Donna Karan for Vogue pattern, and a polka dot silk twill kimono-sleeve top made from an 80s Butterick classics pattern.  I do have a weakness for an 80s silhouette, even though I'm old enough to have enjoyed the 80s first time around :).


I didn't have time to roam too far for photos, so these are taken in the CBD proper, very close to Wynyard station and some of the popular food courts.  Even though I was on a late lunch break, there were loads of passersby - turns out you need to synchronise your photos with the 'don't walk' signals of all the nearby traffic lights. Crazy.

Photos taken by me with camera attached to gorillapod on a step, on 2 second timer, with camera on continuous burst mode.
 

Day 28

And Wednesday 28th May was another gorgeous, Spring-like day with wonderful big blue skies. It was the perfect day for some cheerful tourism, so I took myself speed walking down to the Opera House and Bennelong Point at lunch time.  Places like this are perfect for selfies, because you just blend in with all the other selfie-snappers!


My summer heatwave dress (V1360, Kay Unger for Vogue) has become loose (yes, everything from 2013 is a bit loose now, and the fabric I used for this dress also wasn't the best quality) so I tried adding a belt.  It kind of works, but ultimately I need to take in the princess seam line from under the bust through the length of the skirt.

Photos taken by me with camera attached to the brass railing, via my gorillapod, on 10 second timer, with camera on continuous burst mode.
 

Day 29

Day 29 - the fact that I wore a black me made dress (V1025) tells you I was getting tired by this point! There were still choices in my wardrobe without repeats, but my creative brain could only get as far as 'black dress'.  Hmm. There must have been a few connections still firing though, as out of the wardrobe I managed to pluck a new coordinate, this thrifted linen jacket whose pocket bows match the mock bow belt on the dress. Well!  I've had both garments for years and I hadn't noticed they were a couple till now - maybe there's something to be said for tired brains?


These photos were taken in the high ground of the city that's above the Rocks and just below a busy road coming off the Sydney Harbour Bridge. There were people around, but I was too tired to worry what they thought of my playing with figs (the vine on the wall behind me is figs) and mucking about with dead palm leaves.  Yes, yes, move on...


Photos taken by me with camera sitting on a wall, on 10 second timer, on continuous burst mode.
 

Day 30

Friday! Today the weather started to turn. We had overcast skies, and they matched my sombre mood.  More black clothes... this time my recent Splat! top (the top from V8916, consciously made over-sized) worn with RTW black pants and loafers and red RTW mini trench coat.


I was in such a rush with an errand that had to be completed that day that I took these photos en route in Westfield shopping centre, near some windows and the glow of Miu Miu's signage. So fash.  

Oh camera, you do a great job but I think it's going to have to end soon - it's just not fun anymore the way it used to be, is it... 


Photos taken by me with camera attached to a railing, via my gorillapod, on 10 second timer, and on continuous burst mode.
 

Day 31

Saturday, and the last day of May! My imagination spent, I wore my Grainline Moss Mini again with a RTW t-shirt and jumper. In the photos below I was out with my daughter looking for a special plant which we needed to deliver by 10.30am, in time to drive to netball, before coming home to have guests over for a late lunch / afternoon tea, before going out for drinks and dinner with friends. Phew!


I wasn't going to wear me made that evening - too tired! but then I did. I just didn't take any photos. Can I use an old photo instead? One in which I don't look as tired as I felt? Yes? OK, well the cosy dress is V1338,  and we had a terrific evening.


Photos taken by me with camera on a bench via my gorillapod, on 10 second timer, with camera on continuous burst mode.
 

-----------------------------------

This year was my fourth me made year, and I'd expected it to be pretty similar to previous years - an overwhelming amount of inspiration in the Flickr pool, a few meet-ups with other sewists, and a slightly less vague idea of what I like to wear / what suits me.

It was different this year though.  Because I was Instagramming during the day and trying not to allow the internet to take over my evenings, I didn't spend as much time in the Flickr pool as I've done in previous years.  But the instancy of Instagram and my smaller group of contacts there made the experience feel more personal and more educational - a quick, rough as guts photo shared immediately does tell you quite a lot!


Phew! At the end of the month I resolved to catch up on sleep, but what do you know, it's past 1am and I'm still blogging.

So goodnight ;)

and see you soon


Gabrielle xx


Saturday, 26 October 2013

Heatwave Dress

Another summery dress - heatwave, anyone?


My latest dress (yes, there do seem to be a lot of dresses in this neck of the woods) is a Vogue designer pattern - but for a change from those Donna Karan patterns I usually favour, this one's by Kay Unger.


Aren't these photos terrific? Proper silk purse from a sow's ear stuff! Sooooo guess who found a new photography buddy? Yup, me! These photos were taken by my colleague Helga, who's been studying photography in the evenings and evidently knows a lot about taking decent photos. Ten minutes, a few giggles from passers-by (how embarrassing, but these photos were taken outside a Sydney CBD building, so fair game), all done!

Want some close ups? You got 'em, front and back!


This dress isn't perfect (you only have to look at the close up of the dress back to confirm that) but there's so much about it that I like:
  • the neckline, the shoulder shape and coverage
  • the godet
  • the princess seams
  • the shape: fitted at the top, flared at the bottom :)
  • the bright colours in the fabric
  • the opportunity for a bit of pattern matching in the cutting out stage
  • stretchy cotton, yum
  • the lack of lining

Onto the sewing details:

The pattern:
Vogue 1360, a Kay Unger design.


I think the shape of my dress is more exaggerated than the dress on the pattern envelope, but more on that below. 

The pattern is rated Easy - and it is quite a straightforward pattern for a designer Vogue pattern. The most complex steps relate to sewing in the front godet neatly and keeping the waist seam details aligned horizontally.

The fabric:
A stretch cotton sateen from Lincraft. The pattern is recommended for moderate stretch fabrics. I bought this fabric because I was putting off sewing something more challenging with a more expensive fabric - oops, add that to the list of crazy justifications for fabric shopping! You only need about 1.5 metres of 150cm wide fabric for this dress unless you have a pattern to match up (I used 2 metres with some pattern matching, but I also made facings and lengthened the dress). Oh, and obvious diagonals are not recommended.

The cost:
My fabric cost $27.58, the pattern was about $6 or $7 including postage (on sale through the Vogue patterns website), and the zip was 50c at an op shop. So all up the dress cost me about $35.

The modifications:
Just a few :). I lengthened the dress by about 5 centimetres (and yet it's still shorter than I'd usually wear a work dress), and instead of a full lining I made facings that mimic the external structure ie seamed at centre front, centre back, and along the princess seam lines. This may not have been a smart move. You can definitely see the shape of the facings through the fabric on the back of the dress. Perhaps this problem would disappear if the upper back was as fitted as the upper front, but without any ease the dress might not be very comfortable.


I also played around with the sizes I used, based on some of your comments about taking flat measurements of the pattern tissue OR using the finished garment measurements listed on the pattern tissue to determine size. Taking the finished garment measurements as gospel, I took my measurements and cut out accordingly... size 10 across shoulders and high bust, and then size 12 at the full bust. At waist level I chickened out and sewed a size 14 grading to a size 16 on the hips and down, thinking I'd take it in later if necessary. When I tried this on, the fit seemed good if tighter than I'm used to at the bust (please let me know ~gently~ if this is a bad fit!) but there was a lot of ease at the waist and hips which I reduced slightly by re-sewing side seams with a 2cm seam allowance. There was a significant amount of gaposis in the front neckline, so I added a dart in the centre front seam to correct this.

I thought I'd nailed the fit above the waist, but the photos tell me otherwise - the back looks looser than the front, and there's some gaposis in the back neckline; there's also a bit of excess fabric just under the front bodice princess seams near the armholes (is there a technical term for this area?). The neckline gaposis may have come about through over-handling the fabric when I was sewing the facings entirely by machine. Overall I like the pear-y silhouette that's come from this combination of several sizes, but were I to make the dress again I think I'd stick to a single above-waist size and a single below-waist size.

------

What I've realised from trying to fit this dress is that a single measurement around the body won't necessarily cut the mustard - you really need to know whether your back is relatively broader or narrower than your front, and I guess similarly you need to know whether one side is bigger / higher than the other. Isn't it tricky to think of yourself as an abstract 3D solid (bags be the Klein bottle!)

So, clever readers, any pearls of fitting wisdom to share? When you measure yourself, do you take a single measurement all the way around, or do you break your measurements at the side seams? And finally, do your photos ever surprise you when it comes to fit?


See you soon

- Gabrielle x


Related Posts Plugin for WordPress, Blogger...